
Quick Start Manual

Hardware Installation
11
NETGEAR Managed Switch
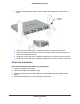
2. Use the provided Phillips head screws to fasten the brackets to the sides of the
RPS.
Mounting
bracket
3. Tighten the screws with a No. 1 Phillips screwdriver to secure each bracket.
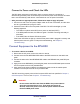
4. Align the bracket and rack holes. Use two pan-head screws with nylon washers to
fasten each bracket to the rack.
5. Tighten the screws with a No. 2 Phillips screwdriver to secure the switch in the rack.
6. Tighten the screws with a No. 2 Phillips screwdriver to secure the switch in the wall.
Check the Installation
Perform the following checks Before you apply power:
1. Inspect the equipment thoroughly.
2. Verify that all cables are installed correctly.
3. Check cable routing to ensure that cables are not damaged and do not create a safety
hazard.
4. Be sure that all equipment is mounted properly and securely.