
Owner's Manual


Getting Started
8
ReadyNAS Surveillance Add-on
Install Surveillance
On Windows Server 2008, the ReadyNAS Surveillance Toolkit needs to be installed before
the Add-on. See
ReadyNAS Surveillance Toolkit on page 9. When you download the
ReadyNAS Surveillance Add-on, you can purchase a license or use the free 30-day trial
version.
To install Surveillance on RAIDiator 4.2.x based devices:
1. Make sure that your ReadyNAS storage unit is installed and working on your network.
2. Use the RAIDar discovery tool to display the FrontView screen for your ReadyNAS storage
system.
3. In FrontView, from the main menu, select Add-ons > Installed.
4. Click Surveillance Add-on.
The software is installed and a message displays notifying you that you have a free
30-day trial license.
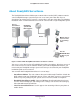
To install Surveillance on ReadyNAS OS 6.x based devices:
1. Make sure that your ReadyNAS storage unit is installed and working on your network
with an Internet connection.
2. Access the local admin page for the ReadyNAS device.
You can use ReadyCLOUD, the local IP address, or RAIDar.
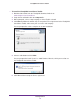
3. Select Apps > Installed.
4. Turn on the Surveillance app.
5. Wait a few minutes while the application accesses the Internet configures itself.
6. Click the Launch button to start the application.
Make Sure That You Have the Licenses You Need
You need a license for each ReadyNAS storage system that will use the Surveillance Add-on.
To buy a license, contact your local reseller or e-commerce site. When you purchase a
license, you need to activate it. See
Activate a License on page 33.
You can transfer an active license from one ReadyNAS unit to another, but you cannot
duplicate a single license for use on multiple ReadyNAS units. See
Transfer Licenses on
page 35.
Log In to ReadyNAS Surveillance
To log in:
1. In FrontView, from the main menu, select Add ons > Installed.
2. Click the Manage ReadyNAS Surveillance button.