
Owner's Manual


Recordings & Events
26
ReadyNAS Surveillance Add-on
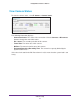
Recording Schedule
You can use the recording schedule to specify when to start and stop recording. When you
set an event, you can specify that motion or digital input is triggered from other cameras. If
the system detects motion or digital input from other cameras or the I/O box, the camera
begins recording.
Note: When changing the motion detection settings of a camera, make
sure to disconnect your unit and that camera first. After you finish,
reconnecting them automatically updates the settings in your unit.
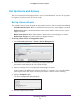
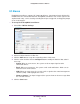
To set up a recording schedule:
1. Select Recording & Event > Recording Settings > Recording Schedule.
2. Select the radio button for Day or Week.
• Day. Schedule recordings at the same time every day
.
• W
eek. Schedule the recording for each day of the week differently.
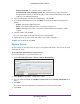
3. Click a camera in the Camera List to select it.
4. Use the following buttons to create or adjust a schedule:
• Insert. Insert new schedules.
• Delete. Delete the selected schedule.
• Configure. Modify the schedule and recording mode settings.
• Copy. Copy today’
s schedule to other channels; or copy this week’s schedule to other
days of a week or other channels.
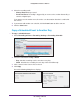
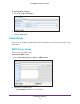
5. If you want to modify the time slot, click the Configure button to modify the settings first.
The default setting for the camera’s recording schedule is from 00:00 to 24:00.
Note: To change the recording time length, drag the end of the time bar from
24:00 back to the length you want, and drag the beginning of the time bar to the
start time.