
Owner's Manual
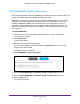

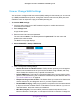

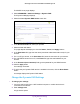
Table Of Contents
- User Manual
- Table of Contents
- Overview
- Connect to the Network and Access the Router
- Specify Your Internet Settings
- Use the Internet Setup Wizard
- Manually Set Up the Internet Connection
- Specify IPv6 Internet Connections
- Requirements for Entering IPv6 Addresses
- Use Auto Detect for an IPv6 Internet Connection
- Use Auto Config for an IPV6 Internet Connection
- Set Up an IPv6 6rd Tunnel Internet Connection
- Set Up an IPv6 6to4 Tunnel Internet Connection
- Set Up an IPv6 Pass Through Internet Connection
- Set Up an IPv6 Fixed Internet Connection
- Set Up an IPv6 DHCP Internet Connection
- Set Up an IPv6 PPPoE Internet Connection
- Change the MTU Size
- Control Access to the Internet
- Optimize Performance
- Specify Network Settings
- View or Change WAN Settings
- Dynamic DNS
- Set Up a Default DMZ Server
- Change the Router’s Device Name
- Change the LAN TCP/IP Settings
- Specify the IP Addresses That the Router Assigns
- Disable the DHCP Server Feature in the Router
- Manage Reserved LAN IP Addresses
- Custom Static Routes
- Specify Basic WiFi Settings
- Set Up a Guest WiFi Network
- View or Change Advanced WiFi Settings
- Use the Router as a WiFi Access Point
- Generate a New Backhaul Password
- Manage Your Network
- Customize Internet Traffic Rules for Ports
- Use VPN to Access Your Network
- Troubleshooting
- Supplemental Information
- Specs
- Quick Start Guide
- Spec Sheet
Specify Network Settings
56
Orbi High-Performance AC3000 Tri-band WiFi System
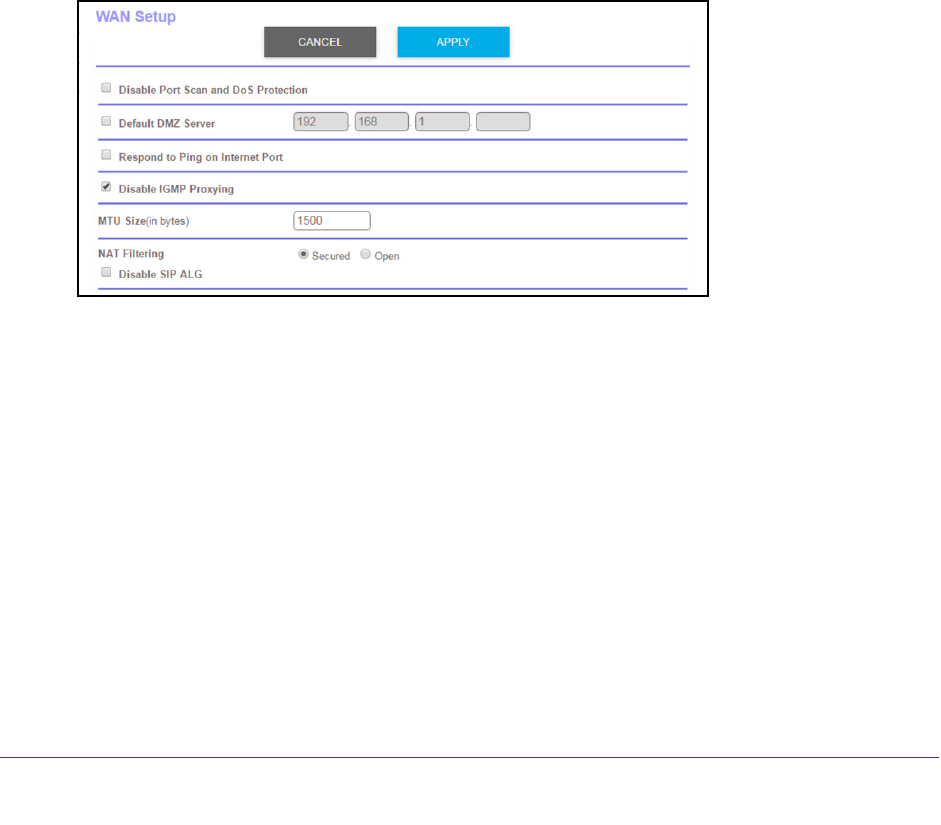
View or Change WAN Settings
You can view or configure wide area network (WAN) settings for the Internet port. You can set
up a DMZ (demilitarized zone) server, change the maximum transmit unit (MTU) size, and
enable the router to respond to a ping to its WAN (Internet) port.
To view the WAN settings:
1. Launch a web browser from a WiFi-enabled computer or mobile device that is
connected to the network.
2. Enter orbilogin.com.
A login window opens.
3. Enter the router user name and password.
The user name is admin.
The default password is password. The user name and
password are case-sensitive.
The BASIC Home page displays.
4. Select
ADVANCED > Setup > WAN Setup.
5. V
iew or change the following settings:
• Disable Port Scan and DoS Protection. DoS protection protects your LAN against
denial of service attacks such as Syn flood, Smurf
Attack, Ping of Death, and many
others. Select this check box only in special circumstances.
• Default DMZ Server.
This feature is sometimes helpful when you are playing online
games or videoconferencing, but it makes the firewall security less effective. See Set
Up a Default DMZ Server on page 60.
• Respond to Ping on Internet Port.
This feature allows your router to be discovered.
Use this feature only as a diagnostic tool or if you have a specific reason.
• Disable IGMP Proxying. IGMP proxying allows a computer on the local area network
(LAN) to receive the multicast traf
fic it is interested in from the Internet. If you do not
need this feature, select this check box to disable it.
• MTU Size (in bytes).
The normal MTU (maximum transmit unit) value for most
Ethernet networks is 1500 bytes, or 1492 bytes for PPPoE connections. Change the