
Owner's Manual


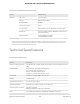


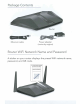
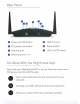
Table Of Contents
- User Manual
- Contents
- 1. Hardware Setup
- 2. Connect to the Network and Access the Router
- 3. Specify Your Internet Settings
- Use the Internet Setup Wizard
- Manually set up the Internet connection
- Specify IPv6 Internet connections
- Requirements for entering IPv6 addresses
- Use auto detect for an IPv6 Internet connection
- Set up an IPv6 6to4 tunnel Internet connection
- Set up an IPv6 pass-through Internet connection
- Set up an IPv6 fixed Internet connection
- Set up an IPv6 DHCP Internet connection
- Set up an IPv6 PPPoE Internet connection
- Use auto config for an IPv6 Internet connection
- Set up an IPv6 6rd Internet connection
- Manage the MTU size
- 4. Control Access to the Internet
- 5. Manage Network Settings
- View or change the WAN settings
- Set up a default DMZ server
- Change the Router’s Device Name
- Change the LAN TCP/IP settings
- Specify the IP addresses that the router assigns
- Disable the DHCP server feature in the router
- Manage reserved LAN IP addresses
- Use the WPS Wizard for WiFi connections
- Specify Basic WiFi Settings
- Change the WiFi Mode
- Change the Transmission Power Control
- Change the WiFi password or the WiFi security
- Set up a guest WiFi network
- Control the WiFi radios
- Set up a WiFi schedule
- Specify WPS settings
- Set up the router as a WiFi access point
- Set up a bridge for a port group or VLAN tag group
- Manage custom static routes
- Enable or disable implicit beamforming
- Enable or disable airtime fairness
- 6. Optimize Performance
- 7. Manage Your Router
- Update the router firmware
- Change the admin password
- Enable admin password recovery
- Recover the admin password
- View information about the router and the Internet and WiFi settings
- Display the statistics of the Internet port
- Check the Internet connection status
- View and manage logs of router activity
- View devices currently on the network
- Monitor Internet traffic
- Manage the router configuration file
- Manage remote access
- Remotely access your router using the Nighthawk app
- Disable LED blinking or turn off LEDs
- Set your time zone
- Return the router to its factory default settings
- 8. Share USB Storage Devices Attached to the Router
- USB device requirements
- Connect a USB storage device to the router
- Access a storage device connected to the router from a Windows-based computer
- Map a USB device to a Windows network drive
- Access a storage device that is connected to the router from a Mac
- Back up Windows-based computers with ReadySHARE Vault
- Back up Mac computers with Time Machine
- Enable FTP access within your network
- View network folders on a storage device
- Add a network folder on a USB storage device
- Edit a network folder on a USB storage device
- Safely remove a USB storage device
- 9. Use the Router as a Media Server
- 10. Use Dynamic DNS to Access USB Storage Devices Through the Internet
- 11. Use VPN to Access Your Network
- 12. Manage Port Forwarding and Port Triggering
- 13. Troubleshooting
- 14. Supplemental Information
- Quick Start for Nighthawk App
- Quick Start Guide
- Update the Firmware
- Data Sheet

Contents
Overview
Router Ethernet Cable Power Adapter
(varies by region)
1
Power LED
4
5 GHz WiFi LED
A
WiFi On/Off button with LED
F
Ethernet ports 1–4
2
Internet LED
5
Ethernet ports 1–4 LEDs
B
WPS button with LED
G
USB 3.0 port
3
2.4 GHz WiFi LED
6
USB 3.0 LED
C
Power On/Off button
H
Reset button
D
Power connector
I
LED On/Off switch
E
Internet port
C D E H IGF
Support and Community
Visit netgear.com/support to get your questions answered and access the latest
downloads.
You can also check out our NETGEAR Community for helpful advice at
community.netgear.com.
NETGEAR, Inc.
350 East Plumeria Drive
San Jose, CA 95134, USA
© NETGEAR, Inc., NETGEAR and the NETGEAR Logo
are trademarks of NETGEAR, Inc. Any non‑NETGEAR
trademarks are used for reference purposes only.
NETGEAR INTERNATIONAL LTD
Floor 1, Building 3,
University Technology Centre
Curraheen Road, Cork,
T12EF21, Ireland
April 2021
Si ce produit est vendu au Canada, vous pouvez accéder à ce document en français
canadien à https://www.netgear.com/support/download/.
(If this product is sold in Canada, you can access this document in Canadian French at
https://www.netgear.com/support/download/.)
For regulatory compliance information including the EU Declaration of Conformity, visit
https://www.netgear.com/about/regulatory/.
See the regulatory compliance document before connecting the power supply.
For NETGEAR’s Privacy Policy, visit https://www.netgear.com/about/privacy-policy.
By using this device, you are agreeing to NETGEAR’s Terms and Conditions at
https://www.netgear.com/about/terms-and-conditions. If you do not agree, return the
device to your place of purchase within your return period.
Regulatory and Legal
Troubleshooting
If you’re having problems with the installation, try the following:
• Turn off your modem and router and disconnect them. Reboot your
modem. Reconnect your router to your modem, and try installing with
the Nighthawk app again.
• If you’re still unable to install your router using the Nighthawk app,
manually install it using the router web interface.
Visit http://www.routerlogin.net to access the router web interface.
For more information, visit netgear.com/routerhelp.
A B
1
2
3
4
6
5