
User Manual


Table Of Contents
- Nighthawk X4 AC2350 Smart WiFi Router
- Contents
- 1. Hardware Setup
- 2. Connect to the Network and Access the Router
- 3. Specify Your Internet Settings
- Use the Internet Setup Wizard
- Manually Set Up the Internet Connection
- Specify IPv6 Internet Connections
- Requirements for Entering IPv6 Addresses
- Use Auto Detect for an IPv6 Internet Connection
- Use Auto Config for an IPv6 Internet Connection
- Set Up an IPv6 6to4 Tunnel Internet Connection
- Set Up an IPv6 Pass Through Internet Connection
- Set Up an IPv6 Fixed Internet Connection
- Set Up an IPv6 DHCP Internet Connection
- Set Up an IPv6 PPPoE Internet Connection
- Change the MTU Size
- 4. Optimize Performance
- 5. Control Access to the Internet
- 6. Share Storage Devices Attached to the Router
- Connect an eSATA Device to the Router
- USB Device Requirements
- Connect a USB Device to the Router
- Access an Storage Device Connected to the Router
- Map a USB Device to a Windows Network Drive
- Back Up Windows Computers with ReadySHARE Vault
- Back Up Mac Computers with Time Machine
- Control Access to a Storage Device
- Use FTP Within the Network
- View Network Folders on a Device
- Add a Network Folder on a Storage Device
- Edit a Network Folder on a Storage Device
- Approve USB Devices
- Safely Remove a USB Device
- 7. Access Storage Devices Through the Internet
- 8. Use the Router as a Media Server
- 9. Share a USB Printer
- 10. Manage Your Network
- 11. Network Settings
- Disable LED Blinking or Turn off LEDs
- View WAN Settings
- Set Up a Default DMZ Server
- Change the Router’s Device Name
- Change the LAN TCP/IP Settings
- Specify the IP Addresses That the Router Assigns
- Disable the DHCP Server Feature in the Router
- Manage Reserved LAN IP Addresses
- Use the WPS Wizard for WiFi Connections
- Specify Basic WiFi Settings
- Change the WiFi Password or Security Level
- Set Up a Guest WiFi Network
- Enable a Video Guest WiFi Network
- Control the Wireless Radios
- Set Up a Wireless Schedule
- Specify WPS Settings
- Use the Router as a Wireless Access Point
- Use the Router in Bridge Mode
- 12. Use VPN to Access Your Network
- 13. Specify Internet Port Settings
- 14. Troubleshooting
- A. Supplemental Information
Connect to the Network and Access the Router
19
Nighthawk X4 AC2350 Smart WiFi Router
When your Internet service starts, your Internet service provider (ISP) typically gives you all
the information needed to connect to the Internet. For DSL service, you might need the
following information to set up your router:
• The ISP configuration information for your DSL account
• ISP login name and password
• Fixed or static IP address setting (special deployment by ISP; this setting is rare)
If you cannot locate this information, ask your ISP to provide it. When your Internet
connection is working, you no longer need to launch the ISP login program on your computer
to access the Internet. When you start an Internet application, your router automatically logs
you in.
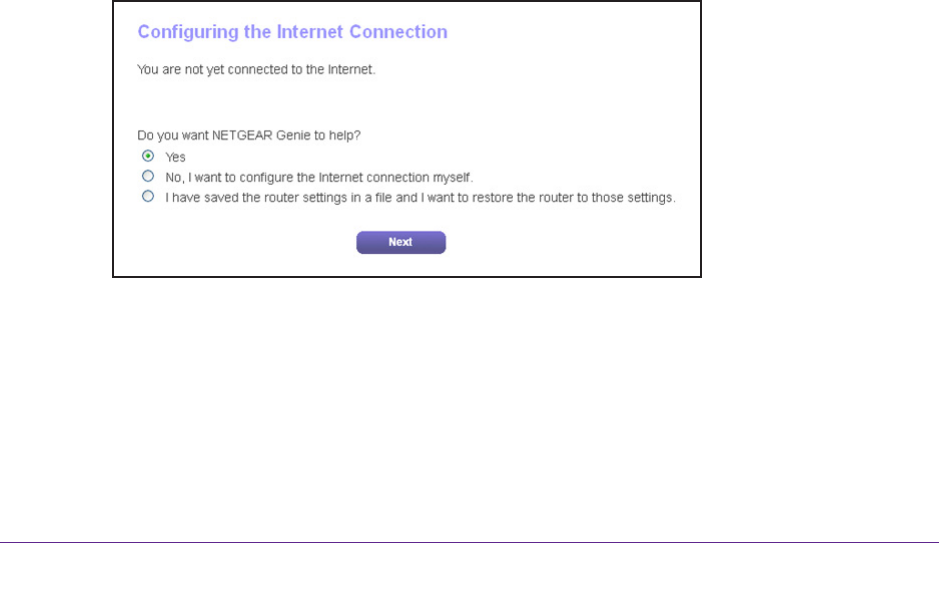
NETGEAR genie runs on any device with a web browser. Installation and basic setup takes
about 15 minutes to complete.
To use NETGEAR genie to set up your router:
1. T
urn the router on by pressing the On/Off button.
2. Make sure that your computer or wireless device is connected to the router with an Ethernet
cable (wired) or wirelessly with the preset security settings listed on the label.
Note: If you want to change the router’s WiFi settings, use a wired connection
to avoid being disconnected when the new WiFi settings take effect.
3. Launch a web browser
.
The screen that displays depends on whether you accessed the router before:
• The first time you set up the Internet connection for your router, the browser goes to
http://www
.routerlogin.net and the NETGEAR genie screen displays.
• If you already used the NETGEAR genie, type http://www.routerlogin.net in the
address field for your browser to display the NETGEAR genie screen.
4. Follow the onscreen instructions.
NETGEAR genie guides you through connecting the router to the Internet.
5. If the browser cannot display the web page, do the following: