
User Manual

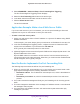

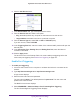


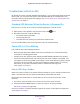

Table Of Contents
- Nighthawk X4 AC2350 Smart WiFi Router
- Contents
- 1. Hardware Setup
- 2. Connect to the Network and Access the Router
- 3. Specify Your Internet Settings
- Use the Internet Setup Wizard
- Manually Set Up the Internet Connection
- Specify IPv6 Internet Connections
- Requirements for Entering IPv6 Addresses
- Use Auto Detect for an IPv6 Internet Connection
- Use Auto Config for an IPv6 Internet Connection
- Set Up an IPv6 6to4 Tunnel Internet Connection
- Set Up an IPv6 Pass Through Internet Connection
- Set Up an IPv6 Fixed Internet Connection
- Set Up an IPv6 DHCP Internet Connection
- Set Up an IPv6 PPPoE Internet Connection
- Change the MTU Size
- 4. Optimize Performance
- 5. Control Access to the Internet
- 6. Share Storage Devices Attached to the Router
- Connect an eSATA Device to the Router
- USB Device Requirements
- Connect a USB Device to the Router
- Access an Storage Device Connected to the Router
- Map a USB Device to a Windows Network Drive
- Back Up Windows Computers with ReadySHARE Vault
- Back Up Mac Computers with Time Machine
- Control Access to a Storage Device
- Use FTP Within the Network
- View Network Folders on a Device
- Add a Network Folder on a Storage Device
- Edit a Network Folder on a Storage Device
- Approve USB Devices
- Safely Remove a USB Device
- 7. Access Storage Devices Through the Internet
- 8. Use the Router as a Media Server
- 9. Share a USB Printer
- 10. Manage Your Network
- 11. Network Settings
- Disable LED Blinking or Turn off LEDs
- View WAN Settings
- Set Up a Default DMZ Server
- Change the Router’s Device Name
- Change the LAN TCP/IP Settings
- Specify the IP Addresses That the Router Assigns
- Disable the DHCP Server Feature in the Router
- Manage Reserved LAN IP Addresses
- Use the WPS Wizard for WiFi Connections
- Specify Basic WiFi Settings
- Change the WiFi Password or Security Level
- Set Up a Guest WiFi Network
- Enable a Video Guest WiFi Network
- Control the Wireless Radios
- Set Up a Wireless Schedule
- Specify WPS Settings
- Use the Router as a Wireless Access Point
- Use the Router in Bridge Mode
- 12. Use VPN to Access Your Network
- 13. Specify Internet Port Settings
- 14. Troubleshooting
- A. Supplemental Information
Specify Internet Port Settings
155
Nighthawk X4 AC2350 Smart WiFi Router
5. Select the Port Triggering radio button.
6. Clear the Disable Port Triggering check box.
If this check box is selected, the router does not use port triggering even if you specified
port triggering settings.
7. In the Port T
riggering Timeout field, enter a value up to 9999 minutes.
This value controls how long the inbound ports stay open when the router detects no
activity
. This value is required because the router cannot detect when the application
terminates.
Application Example: Port Triggering for Internet Relay Chat
Some application servers, such as FTP and IRC servers, send replies to multiple port
numbers. Using port triggering, you can tell the router to open more incoming ports when a
particular outgoing port starts a session.
An example is Internet Relay Chat (IRC). Your computer connects to an IRC server at
destination port 6667.
The IRC server not only responds to your originating source port but
also sends an “identify” message to your computer on port 113. Using port triggering, you can
tell the router, “When you initiate a session with destination port 6667, you must also allow
incoming traffic on port 113 to reach the originating computer.” The following sequence
shows the effects of this port triggering rule:
1. Y
ou open an IRC client program to start a chat session on your computer.
2. Y
our IRC client composes a request message to an IRC server using a destination port
number of 6667, the standard port number for an IRC server process. Your computer then
sends this request message to your router.
3. Y
our router creates an entry in its internal session table describing this communication
session between your computer and the IRC server. Your router stores the original
information, performs Network Address Translation (NAT) on the source address and port,
and sends this request message through the Internet to the IRC server.
4. Noting your port triggering rule and observing the destination port number of 6667, your
router creates another session entry to send any incoming port 1
13 traffic to your computer.
5. The IRC server sends a return message to your router using the NA
T-assigned source port
(for example, port 33333) as the destination port and sends an “identify” message to your
router with destination port 113.