
User Manual
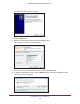
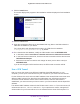
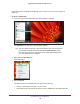
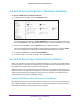


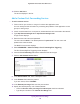
Table Of Contents
- Nighthawk X4 AC2350 Smart WiFi Router
- Contents
- 1. Hardware Setup
- 2. Connect to the Network and Access the Router
- 3. Specify Your Internet Settings
- Use the Internet Setup Wizard
- Manually Set Up the Internet Connection
- Specify IPv6 Internet Connections
- Requirements for Entering IPv6 Addresses
- Use Auto Detect for an IPv6 Internet Connection
- Use Auto Config for an IPv6 Internet Connection
- Set Up an IPv6 6to4 Tunnel Internet Connection
- Set Up an IPv6 Pass Through Internet Connection
- Set Up an IPv6 Fixed Internet Connection
- Set Up an IPv6 DHCP Internet Connection
- Set Up an IPv6 PPPoE Internet Connection
- Change the MTU Size
- 4. Optimize Performance
- 5. Control Access to the Internet
- 6. Share Storage Devices Attached to the Router
- Connect an eSATA Device to the Router
- USB Device Requirements
- Connect a USB Device to the Router
- Access an Storage Device Connected to the Router
- Map a USB Device to a Windows Network Drive
- Back Up Windows Computers with ReadySHARE Vault
- Back Up Mac Computers with Time Machine
- Control Access to a Storage Device
- Use FTP Within the Network
- View Network Folders on a Device
- Add a Network Folder on a Storage Device
- Edit a Network Folder on a Storage Device
- Approve USB Devices
- Safely Remove a USB Device
- 7. Access Storage Devices Through the Internet
- 8. Use the Router as a Media Server
- 9. Share a USB Printer
- 10. Manage Your Network
- 11. Network Settings
- Disable LED Blinking or Turn off LEDs
- View WAN Settings
- Set Up a Default DMZ Server
- Change the Router’s Device Name
- Change the LAN TCP/IP Settings
- Specify the IP Addresses That the Router Assigns
- Disable the DHCP Server Feature in the Router
- Manage Reserved LAN IP Addresses
- Use the WPS Wizard for WiFi Connections
- Specify Basic WiFi Settings
- Change the WiFi Password or Security Level
- Set Up a Guest WiFi Network
- Enable a Video Guest WiFi Network
- Control the Wireless Radios
- Set Up a Wireless Schedule
- Specify WPS Settings
- Use the Router as a Wireless Access Point
- Use the Router in Bridge Mode
- 12. Use VPN to Access Your Network
- 13. Specify Internet Port Settings
- 14. Troubleshooting
- A. Supplemental Information

Use VPN to Access Your Network
143
Nighthawk X4 AC2350 Smart WiFi Router
9. Click the Install button.
The screen displays the progress of the installation and then displays the final installation
screen.
10. Click the Finish button.
11. Unzip the configuration files that you downloaded and copy them to the folder where the
VPN client is installed on your device.
For a client device with Windows 64-bit system, the VPN client is installed at
C:\Program files\OpenVPN\config\ by default.
12. For a client device with Windows, modify the VPN interface name to NETGEAR-VPN:
a. In Windows, select Control Panel > Network and Internet > Network Connections.
b. In the local area connection list, find the local area connection with the device name
T
AP-Windows Adapter.
c. Select the local area connection and change its name (not its device name) to
NETGEAR-VPN.
If you do not change the VPN interface name, the VPN tunnel connection will fail.
Use a VPN Tunnel
After you set up the router to use VPN and install the OpenVPN application on your
computer, you can open a VPN tunnel from your computer to your router over the Internet.
For the VPN tunnel to work, the local LAN IP address of the remote R7500 router must use a
different LAN IP scheme from that of the local LAN where your VPN client computer is
connected. If both networks use the same LAN IP scheme, when the VPN tunnel is
established, you cannot access your home router or your home network with the OpenVPN
software.
The default LAN IP address scheme for the R7500 router is 192.x.x.x. The most common IP
schemes are 192.x.x.x, 172.x.x.x, and 10.x.x.x. If you experience a conflict, change the IP
scheme either for your home network or for the network with the client VPN computer
. For