
User Manual

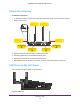


Table Of Contents
- Nighthawk X4 AC2350 Smart WiFi Router
- Contents
- 1. Hardware Setup
- 2. Connect to the Network and Access the Router
- 3. Specify Your Internet Settings
- Use the Internet Setup Wizard
- Manually Set Up the Internet Connection
- Specify IPv6 Internet Connections
- Requirements for Entering IPv6 Addresses
- Use Auto Detect for an IPv6 Internet Connection
- Use Auto Config for an IPv6 Internet Connection
- Set Up an IPv6 6to4 Tunnel Internet Connection
- Set Up an IPv6 Pass Through Internet Connection
- Set Up an IPv6 Fixed Internet Connection
- Set Up an IPv6 DHCP Internet Connection
- Set Up an IPv6 PPPoE Internet Connection
- Change the MTU Size
- 4. Optimize Performance
- 5. Control Access to the Internet
- 6. Share Storage Devices Attached to the Router
- Connect an eSATA Device to the Router
- USB Device Requirements
- Connect a USB Device to the Router
- Access an Storage Device Connected to the Router
- Map a USB Device to a Windows Network Drive
- Back Up Windows Computers with ReadySHARE Vault
- Back Up Mac Computers with Time Machine
- Control Access to a Storage Device
- Use FTP Within the Network
- View Network Folders on a Device
- Add a Network Folder on a Storage Device
- Edit a Network Folder on a Storage Device
- Approve USB Devices
- Safely Remove a USB Device
- 7. Access Storage Devices Through the Internet
- 8. Use the Router as a Media Server
- 9. Share a USB Printer
- 10. Manage Your Network
- 11. Network Settings
- Disable LED Blinking or Turn off LEDs
- View WAN Settings
- Set Up a Default DMZ Server
- Change the Router’s Device Name
- Change the LAN TCP/IP Settings
- Specify the IP Addresses That the Router Assigns
- Disable the DHCP Server Feature in the Router
- Manage Reserved LAN IP Addresses
- Use the WPS Wizard for WiFi Connections
- Specify Basic WiFi Settings
- Change the WiFi Password or Security Level
- Set Up a Guest WiFi Network
- Enable a Video Guest WiFi Network
- Control the Wireless Radios
- Set Up a Wireless Schedule
- Specify WPS Settings
- Use the Router as a Wireless Access Point
- Use the Router in Bridge Mode
- 12. Use VPN to Access Your Network
- 13. Specify Internet Port Settings
- 14. Troubleshooting
- A. Supplemental Information

Hardware Setup
14
Nighthawk X4 AC2350 Smart WiFi Router
Position Your Router
The router lets you access your network anywhere within the operating range of your
wireless network. However, the operating distance or range of your wireless connection can
vary significantly depending on the physical placement of your router. For example, the
thickness and number of walls the wireless signal passes through can limit the range.
Additionally, other wireless access points in and around your home might affect your router’s
signal. Wireless access points are routers, repeaters, WiFi range extenders, and any other
device that emits a wireless signal for network access.
Position your router according to the following guidelines:
• Place your router near the center of the area where your computers and other devices
operate, and within line of sight to your wireless devices.
• Make sure that the router is within reach of an AC power outlet and near Ethernet cables
for wired computers.
• Place the router in an elevated location, minimizing the number walls and ceilings
between the router and your other devices.
• Place the router away from electrical devices such as these:
- Ceiling fans
- Home security systems
- Microwaves
- Computers
- Base of a cordless phone
- 2.4 GHz cordless phone
• Place the router away from large metal surfaces, large glass surfaces, and insulated
walls such as these:
- Solid metal doors
- Aluminum studs
- Fish tanks
- Mirrors
- Brick
- Concrete