
User Manual
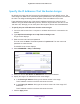

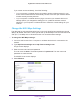


Table Of Contents
- Nighthawk X4 AC2350 Smart WiFi Router
- Contents
- 1. Hardware Setup
- 2. Connect to the Network and Access the Router
- 3. Specify Your Internet Settings
- Use the Internet Setup Wizard
- Manually Set Up the Internet Connection
- Specify IPv6 Internet Connections
- Requirements for Entering IPv6 Addresses
- Use Auto Detect for an IPv6 Internet Connection
- Use Auto Config for an IPv6 Internet Connection
- Set Up an IPv6 6to4 Tunnel Internet Connection
- Set Up an IPv6 Pass Through Internet Connection
- Set Up an IPv6 Fixed Internet Connection
- Set Up an IPv6 DHCP Internet Connection
- Set Up an IPv6 PPPoE Internet Connection
- Change the MTU Size
- 4. Optimize Performance
- 5. Control Access to the Internet
- 6. Share Storage Devices Attached to the Router
- Connect an eSATA Device to the Router
- USB Device Requirements
- Connect a USB Device to the Router
- Access an Storage Device Connected to the Router
- Map a USB Device to a Windows Network Drive
- Back Up Windows Computers with ReadySHARE Vault
- Back Up Mac Computers with Time Machine
- Control Access to a Storage Device
- Use FTP Within the Network
- View Network Folders on a Device
- Add a Network Folder on a Storage Device
- Edit a Network Folder on a Storage Device
- Approve USB Devices
- Safely Remove a USB Device
- 7. Access Storage Devices Through the Internet
- 8. Use the Router as a Media Server
- 9. Share a USB Printer
- 10. Manage Your Network
- 11. Network Settings
- Disable LED Blinking or Turn off LEDs
- View WAN Settings
- Set Up a Default DMZ Server
- Change the Router’s Device Name
- Change the LAN TCP/IP Settings
- Specify the IP Addresses That the Router Assigns
- Disable the DHCP Server Feature in the Router
- Manage Reserved LAN IP Addresses
- Use the WPS Wizard for WiFi Connections
- Specify Basic WiFi Settings
- Change the WiFi Password or Security Level
- Set Up a Guest WiFi Network
- Enable a Video Guest WiFi Network
- Control the Wireless Radios
- Set Up a Wireless Schedule
- Specify WPS Settings
- Use the Router as a Wireless Access Point
- Use the Router in Bridge Mode
- 12. Use VPN to Access Your Network
- 13. Specify Internet Port Settings
- 14. Troubleshooting
- A. Supplemental Information

Network Settings
122
Nighthawk X4 AC2350 Smart WiFi Router
Your settings are saved.
The router delivers the following parameters to any LAN device that requests DHCP:
• An IP address from the range that you define
• Subnet mask
• Gateway IP address (the router’s LAN IP address)
• DNS server IP address (the router’s LAN IP address)
Disable the DHCP Server Feature in the Router
By default, the router acts as a DHCP server. The router assigns IP, DNS server, and default
gateway addresses to all computers connected to the LAN. The assigned default gateway
address is the LAN address of the router.
You can use another device on your network as the DHCP server or specify the network
settings of all your computers.
To disable the DHCP server feature in the router:
1. Launch a web browser from a computer or wireless device that is connected to the
network.
2. Type http://www.routerlogin.net or http://www.routerlogin.com.
A login screen displays.
3. Enter the router user name and password.
The user name is admin. The default password is password. The user name and
password are case-sensitive.
The BASIC Home screen displays.
4. Select ADVANCED > Setup > LAN Setup.
5. Clear the Use Router as DHCP Server check box.
6. Click the Apply button.
7. (Optional) If this service is disabled and no other DHCP server is on your network, set your
computer IP addresses manually so that the computers can access the router.
Manage Reserved LAN IP Addresses
When you specify a reserved IP address for a computer on the LAN, that computer always
receives the same IP address each time it accesses the router’s DHCP server. Assign
reserved IP addresses to computers or servers that require permanent IP settings.