
User Manual


Table Of Contents
- Nighthawk X4 AC2350 Smart WiFi Router
- Contents
- 1. Hardware Setup
- 2. Connect to the Network and Access the Router
- 3. Specify Your Internet Settings
- Use the Internet Setup Wizard
- Manually Set Up the Internet Connection
- Specify IPv6 Internet Connections
- Requirements for Entering IPv6 Addresses
- Use Auto Detect for an IPv6 Internet Connection
- Use Auto Config for an IPv6 Internet Connection
- Set Up an IPv6 6to4 Tunnel Internet Connection
- Set Up an IPv6 Pass Through Internet Connection
- Set Up an IPv6 Fixed Internet Connection
- Set Up an IPv6 DHCP Internet Connection
- Set Up an IPv6 PPPoE Internet Connection
- Change the MTU Size
- 4. Optimize Performance
- 5. Control Access to the Internet
- 6. Share Storage Devices Attached to the Router
- Connect an eSATA Device to the Router
- USB Device Requirements
- Connect a USB Device to the Router
- Access an Storage Device Connected to the Router
- Map a USB Device to a Windows Network Drive
- Back Up Windows Computers with ReadySHARE Vault
- Back Up Mac Computers with Time Machine
- Control Access to a Storage Device
- Use FTP Within the Network
- View Network Folders on a Device
- Add a Network Folder on a Storage Device
- Edit a Network Folder on a Storage Device
- Approve USB Devices
- Safely Remove a USB Device
- 7. Access Storage Devices Through the Internet
- 8. Use the Router as a Media Server
- 9. Share a USB Printer
- 10. Manage Your Network
- 11. Network Settings
- Disable LED Blinking or Turn off LEDs
- View WAN Settings
- Set Up a Default DMZ Server
- Change the Router’s Device Name
- Change the LAN TCP/IP Settings
- Specify the IP Addresses That the Router Assigns
- Disable the DHCP Server Feature in the Router
- Manage Reserved LAN IP Addresses
- Use the WPS Wizard for WiFi Connections
- Specify Basic WiFi Settings
- Change the WiFi Password or Security Level
- Set Up a Guest WiFi Network
- Enable a Video Guest WiFi Network
- Control the Wireless Radios
- Set Up a Wireless Schedule
- Specify WPS Settings
- Use the Router as a Wireless Access Point
- Use the Router in Bridge Mode
- 12. Use VPN to Access Your Network
- 13. Specify Internet Port Settings
- 14. Troubleshooting
- A. Supplemental Information
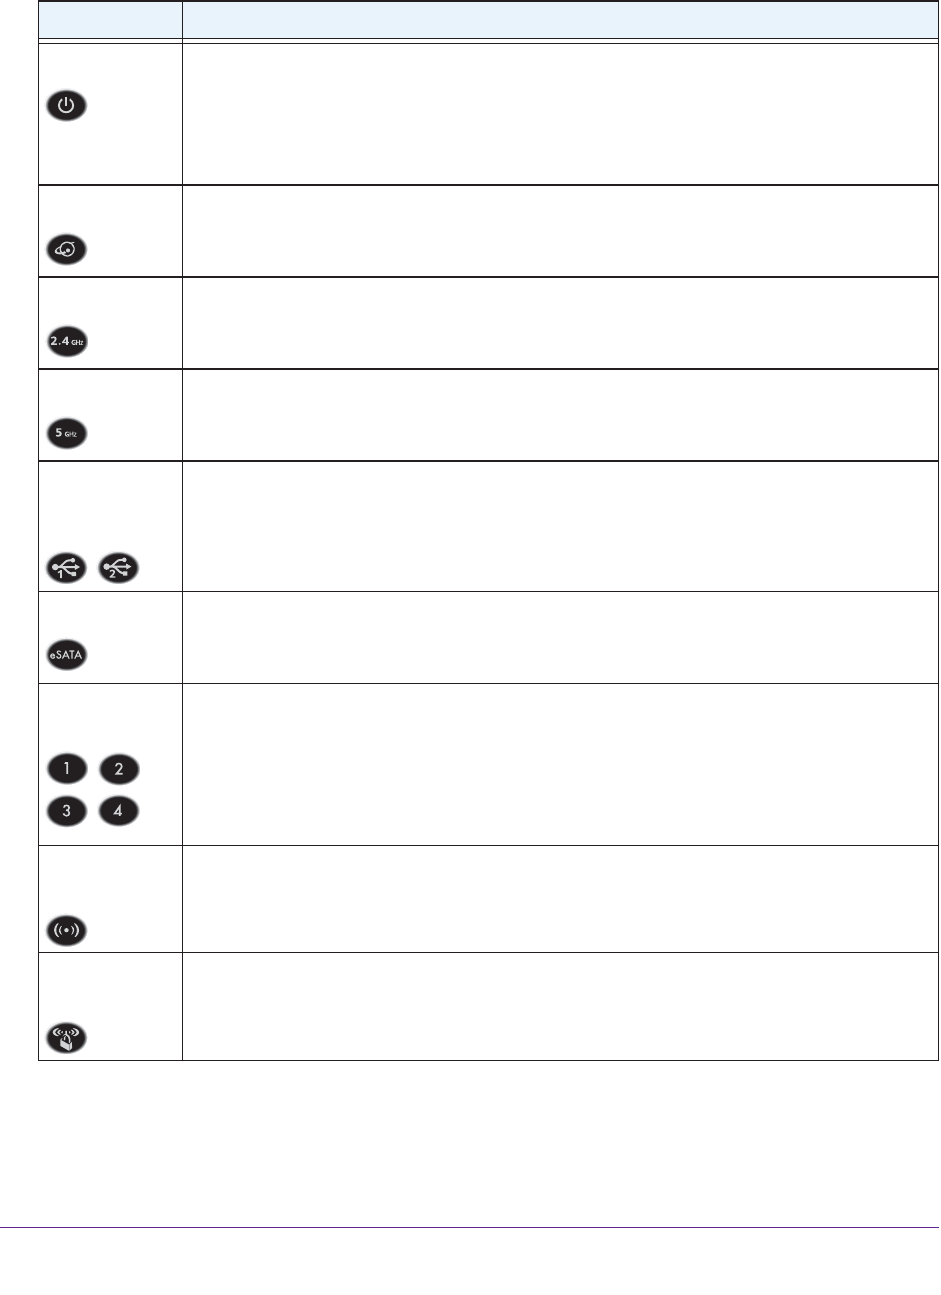
Table 1. LED and button descriptions
LED Description
Power
• Solid amber. The router is starting.
• Blinking amber. The
firmware is upgrading, or the Reset button was pressed.
• Solid white. The
router is ready.
• Blinking white. The
firmware is corrupted.
• Off. Power is not supplied to the router.
Internet
• Solid white. The Internet connection is ready.
• Solid amber.
The router detected an Ethernet cable connection to the modem.
• Off. No Ethernet cable is connected between the router and the modem.
2.4 GHz WiFi
• Solid white. The 2.4 GHz WiFi radio is operating.
• Blinking. The
router is sending or receiving WiFi traffic.
• Off.
The 2.4 GHz WiFi radio is off.
5 GHz WiFi
• Solid white. The 5 GHz WiFi radio is operating.
• Blinking. The
router is sending or receiving WiFi traffic.
• Off. The
5 GHz WiFi radio is off.
USB 3.0 port 1
and USB 3.0
port 2
• Solid white. A USB device is connected and is ready.
• Blinking.
A USB device is plugged in and is trying to connect.
• Off. No USB device is connected, or someone clicked the Safely Remove Hardware
button and it is now safe to remove the attached USB device.
eSATA
• Solid white. An eSATA device is connected and is ready.
• Blinking.
An eSATA device is plugged in and is trying to connect.
• Off. No eSA
TA device is connected.
Ethernet ports
1–4
The LED color indicates the speed: white for Gigabit Ethernet connections and amber for 100
Mbps or 10 Mbps Ethernet connections.
• Solid.
A powered-on device is connected to the Ethernet port.
• Blinking.
The port is sending or receiving traffic.
• Off. No device is connected to this Ethernet port.
WiFi On/Off
button with LED
Pressing this button for two seconds turns the 2.4 GHz and 5 GHz WiFi radios on and off.
If this LED is lit, the WiFi radios are on. If this LED is off, the WiFi radios are turned off and you
cannot use WiFi to connect to the router.
WPS button with
LED
This button lets you use WPS to join the WiFi network without typing the WiFi password. The
WPS LED blinks white during this process and then lights solid white.
Hardware Setup
10
Nighthawk X4 AC2350 Smart WiFi Router
You can use the LED On/Off switch on the rear panel of the router to turn the LEDs on the
top of the router on or off. See Turn the LEDs On or Off Using the LED On/Off Switch on
page 11.