Package Contents Trademarks NETGEAR, the NETGEAR logo, and Connect with Innovation are trademarks and/or registered trademarks of NETGEAR, Inc. and/or its subsidiaries in the United States and/or other countries. Information is subject to change without notice. © NETGEAR, Inc. All rights reserved. Compliance For the current EU Declarations of Conformity, visit http://support.netgear.com/app/answers/detail/a_id/11621/. The box contains the following items.
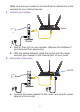
You can use this diagram to connect your router or follow the detailed instructions in this booklet. 4. Power on the router. 1. Attach the antennas. The Power LED lights amber and then turns white when the router is ready. Attach the antennas on the threaded antenna posts. Position the antennas for the best WiFi performance. To connect with WiFi, use the WiFi network name and password on the router label. For product updates and web support, visit http://support.netgear.com. NETGEAR genie displays.
Contents Install Your Router . . . . . . . . . . . . . . . . . . . . . . . . . . . . . . . . . . . . . . 2 1. Attach the antennas. . . . . . . . . . . . . . . . . . . . . . . . . . . . . . . . 2 2. Prepare your modem. . . . . . . . . . . . . . . . . . . . . . . . . . . . . . . 2 3. Connect your modem. . . . . . . . . . . . . . . . . . . . . . . . . . . . . . . 3 4. Add power to the router. . . . . . . . . . . . . . . . . . . . . . . . . . . . . 3 5. Connect a computer. . . . . . . . . . . . . . . . . . . .
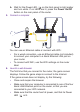
Install Your Router Make sure that your Internet service is active before you install your router. To install your router: 1. Attach the antennas. a. Align the antennas with the antenna posts on the router. b. Attach the antennas on the threaded antenna posts. c. Position the antennas for the best WiFi performance. NETGEAR recommends that the center antenna be vertical and that you aim the others outward at 45 degree angles, as shown. 2. Prepare your modem. Internet a. Unplug your modem’s power. b.
Make sure that your modem is turned off and is cabled only to the wall jack for your Internet service. 3. Connect your modem. Router Modem a. Plug in, then turn on your modem. (Replace the batteries if you removed them previously.) b. With the yellow Ethernet cable that came with the router, connect your modem to the Internet port of your router. 4. Add power to the router. On/Off a. Connect the power adapter to the router, and plug the power adapter into an outlet.
b. Wait for the Power LED on the front panel to light amber and turn white. If no LEDs are lit, press the Power On/Off button on the rear panel of the router. 5. Connect a computer. You can use an Ethernet cable or connect with WiFi: • For a wired connection, use an Ethernet cable (not included) to connect your computer to a black Ethernet LAN port on your router. • To connect with WiFi, use the WiFi settings on the router label. 6. Launch a web browser.
• If your computer is set to a static or fixed IP address (this is uncommon), change it to obtain an IP address automatically from the router. If you still do not see the genie screen, log in to the router so that genie can detect your Internet connection. To log in to the router: 1. In the address field of your web browser, type www.routerlogin.net or www.routerlogin.com. A login screen displays. 2. Enter admin for the user name and password for the password. The router BASIC Home screen displays.
WiFi Network and Security The preset WiFi network name (SSID) and network key (password) are unique to your router, like a serial number. Because the router automatically uses WiFi security, you don’t need to set it up. The WiFi settings are on the label. NETGEAR recommends that you use the preset WiFi settings because you can check the router label if you forget them. NETGEAR genie lets you change these settings if you want. If you do so, write down the new WiFi settings and store them in a safe place.
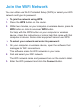
Join the WiFi Network You can either use Wi-Fi Protected Setup (WPS) or select your WiFi network and type its password. To join the network using WPS: 1. Press the WPS button on the router. 2. Within two minutes, on your computer or wireless device, press its WPS button or click its onscreen WPS button. For help with the WPS button on your computer or wireless device, check the instructions or online help that came with that computer or device. Some older equipment cannot use WPS.
View or Change the Router Settings After you use genie to set up the router, you can log in to the router to view or change its settings. Log In to the Router To log in to the router: 1. Connect a computer or wireless device to the router. You can use an Ethernet cable or connect with WiFi. • For a wired connection, use an Ethernet cable (not included) to connect your computer to a black Ethernet LAN port on your router. • To connect with WiFi, select and join your WiFi network. 2.
Recover a Forgotten Admin Password The default password for the admin user name is password. If you changed the password and used the password recovery feature, you can retrieve this password. To retrieve a forgotten admin password: 1. Launch a web browser. 2. Type www.routerlogin.net in the address field of the browser. A login screen displays. 3. Click the Cancel button. 4. When prompted, enter your saved answers.
Prioritize with Quality of Service You can use Quality of Service (QoS) to assign high priority to gaming and streaming video from the Internet. Downstream QOS (Video Streaming) Internet Upstream QOS (Gaming) To set up QoS, log in to the router and enable Downstream QoS and Upstream QoS. • • Downstream QoS prioritizes Internet traffic from the Internet to your network. This delivers better performance when you stream Internet video, such as when you watch YouTube videos.
Prioritize Internet Video Streaming To set up QoS to assign a high priority to Internet video streaming, log in to the router and enable Downstream QoS. To enable downstream QoS: 1. Click the ADVANCED tab. 2. Select Setup > QoS Setup > Downstream QoS. 3. Select the Enable Downstream QoS (Improved Video Streaming) check box. 4. (Optional) Select the Streaming Database Auto Upgrade check box. The router automatically checks for updates for the streaming database, and downloads and installs them. 5.
Prioritize Internet Gaming To set up QoS to assign a high priority to Internet traffic from your gaming system, log in to the router and enable Upstream QoS. To enable upstream QoS: 1. Click the ADVANCED tab. 2. Select Setup > QoS Setup > Upstream QoS. 3. Select the Turn Internet Access QoS On check box. 4. Select the Turn Bandwidth Control On check box. 5. If you do not know what your uplink bandwidth is, use speedtest.net to find out: a. Visit http://www.speedtest.net/. b.
Share a USB Drive on the Network ReadySHARE lets you access and share a USB drive connected to the router USB port. (If your USB drive has special drivers, it is not compatible.) USB 3.0 port To connect a USB drive: 1. Insert your USB storage drive into the blue USB 3.0 port on the front of the router. 2. If your USB drive has a power supply, you must use it when you connect the USB drive to the router.
To access the USB drive from a Mac: 1. Select Go > Connect to Server. 2. Enter smb://readyshare as the server address. 3. Click the Connect button. To access the USB drive from a Windows computer: Select Start > Run. Enter \\readyshare in the dialog box and click the OK button. NETGEAR genie App The free NETGEAR genie app lets you easily monitor, connect, and control your home network from a Windows or Mac computer, tablet, or smartphone.
ReadySHARE Vault Backup App Your router comes with free backup software for all the Windows computers in your home. Connect a USB hard disk drive (HDD) to the USB port on your router for centralized, continuous, and automatic backup. To back up your Windows computer: 1. Connect a USB HDD to a USB port on the router. For best performance, connect a USB 3.0 HDD to the blue USB 3.0 port on the front of the router. 2. Install the genie app on each Windows computer. 3. Download ReadySHARE Vault from www.netgear.
Share a USB Printer You can connect a USB printer to the router’s USB port and print wirelessly. To set up ReadySHARE Printer: 1. Connect the USB printer to the router’s USB port with a USB printer cable. 2. On each computer that will share the printer: a. Install the current USB printer driver software (available from the printer manufacturer). b. Download the NETGEAR USB Control Center utility from www.netgear.com/readyshare. c. Select the language. 3.
To set up iTunes Server: From the ADVANCED tab, select Advanced > USB Storage > Media Server. VPN Service VPN Service allows you remote access to your home network with a secure connection. To set up VPN Service: From the ADVANCED tab, select Advanced Setup > VPN Service to set up the VPN connection. Personal FTP Server With your customized free URL, you can easily access your own FTP server set up on your home network remotely. To set up FTP and your free URL in the router: 1.