
User Manual


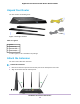
Table Of Contents
- Contents
- 1. Hardware Overview of the Router
- 2. Connect to the Network and Access the Router
- 3. Specify Your Internet Settings
- Use the Internet Setup Wizard
- Manually Set Up the Internet Connection
- Specify an IPv6 Internet Connection
- IPv6 Internet Connections and IPv6 Addresses
- Use Auto Detect for an IPv6 Internet Connection
- Use Auto Config for an IPv6 Internet Connection
- Set Up an IPv6 6to4 Tunnel Internet Connection
- Set Up an IPv6 Pass-Through Internet Connection
- Set Up a Fixed IPv6 Internet Connection
- Set Up an IPv6 DHCP Internet Connection
- Set Up an IPv6 6rd Tunnel Connection
- Set Up an IPv6 PPPoE Internet Connection
- Manage the MTU Size
- 4. Optimize Performance
- 5. Control Access to the Internet
- 6. Share a Storage Device Attached to the Router
- USB Device Requirements
- Connect a USB Device to the Router
- Access a Storage Device Connected to the Router
- Map a USB Device to a Windows Network Drive
- Back Up Windows Computers With ReadySHARE Vault
- Back Up Mac Computers With Time Machine
- Manage Access to a Storage Device
- Enable FTP Access Within Your Network
- View Network Folders on a Device
- Add a Network Folder on a Storage Device
- Change a Network Folder, Including Read and Write Access, on a USB Drive
- Approve USB Devices
- Set Up NETGEAR Downloader
- Safely Remove a USB Device
- 7. Manage Dynamic DNS and Access Storage Devices Through the Internet
- 8. Use the Router as a Media Server
- 9. Share a USB Printer
- 10. Manage the WAN and LAN Network Settings
- Manage the WAN Security Settings
- Set Up a Default DMZ Server
- Manage IGMP Proxying
- Manage NAT Filtering
- Manage the SIP Application-Level Gateway
- Manage the LAN IP Address Settings
- Manage the Router Information Protocol Settings
- Manage the DHCP Server Address Pool
- Manage Reserved LAN IP Addresses
- Disable the Built-In DHCP Server
- Change the Router’s Device Name
- Set Up and Manage Custom Static Routes
- Set Up a Bridge for a Port Group or VLAN Tag Group
- 11. Manage the WiFi Network Settings
- Use WPS to Add a Device to the WiFi Network
- Specify Basic WiFi Settings
- Change the WiFi Data Rate Settings
- Change the WiFi Password or Security Level
- Set Up a Guest WiFi Network
- Specify How the Router Manages WiFi Clients
- Control the WiFi Radios
- Set Up a WiFi Schedule
- Manage the WPS Settings
- Use the Router as a WiFi Access Point
- Use the Router in WiFi Bridge Mode
- 12. Manage the Router and Monitor the Traffic
- Update the Firmware of the Router
- Change the admin Password
- Set Up Password Recovery
- Recover the admin Password
- Manage the Configuration File of the Router
- Disable LED Blinking or Turn Off LEDs
- Return the Router to Its Factory Default Settings
- View the Status and Statistics of the Router
- Manage the Activity Log
- View Devices Currently on the Network
- Monitor and Meter Internet Traffic
- Manage the Router Remotely
- Remotely Access Your Router Using the genie App
- 13. Use VPN to Access Your Network
- 14. Manage Port Forwarding and Port Triggering
- 15. Troubleshooting
- A. Supplemental Information

1
Hardware Overview of the Router
The NETGEAR Nighthawk
®
AC1900 Smart WiFi Router Model R6900P, in this manual referred to as the router,
delivers combined WiFi connection speeds of up to AC1900 WiFi (600 Mbps
1
on 2.4 GHz 802.11n and 1300
Mbps
2
on 5 GHz 802.11ac). Both 2.4 GHz and 5 GHz radios can be active simultaneously.
Nighthawk, powered by a dual-core 1 GHz processor, is ideal for bandwidth-hungry activities such as online
gaming and video streaming. High-powered amplifiers with antennas provide WiFi coverage anywhere around
your home, inside or out.
For gamers, Nighthawk supports Dynamic Quality of Service (QoS) optimized for online game play with game
consoles like Xbox. For uninterrupted HD streaming media, Nighthawk features multiuser multiple input, multiple
output (MU-MIMO) for simultaneous streaming and Dynamic QoS to identify and prioritize streaming traffic from
websites like Netflix, YouTube, and Hulu Plus.
Nighthawk provides fast central storage, backup, and streaming to every device in your home with the USB 3.0
port (10 times faster than USB 2.0). Sharing content across your network is easy, whether you’re accessing
stored photos and music or printing over WiFi. Stream your stored media files anywhere on the network to DLNA
screens. Share your music to AirPlay-compatible devices from the USB hard drive connected to the router. Use
the free NETGEAR ReadySHARE
®
Vault app to back up your Windows-based computers to a USB hard drive
connected to Nighthawk.
The chapter contains the following sections:
• Unpack Your Router on page 10
• Attach the Antennas on page 10
• LEDs and Buttons on the Top Panel on page 11
• Ports, Buttons, and Connectors on the Back Panel on page 13
• USB Port on the Front Panel on page 13
• Router Label on page 14
• Position Your Router on page 14
• Cable Your Router on page 15
For more information about the topics that are covered in this manual, visit the support website at
netgear.com/support.
Firmware updates with new features and bug fixes are made available from time to time at
downloadcenter.netgear.com.You can check for and download new firmware manually. If the features or behavior
of your product does not match what is described in this guide, you might need to update your firmware.
In this manual, the terms wireless and WiFi are interchangeable.
1. Maximum WiFi signal rate derived from IEEE standard 802.11 specifications. Actual data throughput and WiFi coverage will vary. Network conditions
and environmental factors, including volume of network traffic, building materials and construction, and network overhead, lower actual data throughput
rate and WiFi coverage. NETGEAR makes no express or implied representations or warranties about this product’s compatibility with any future
standards. 802.11ac 1300 Mbps is approximately 3x faster than 802.11n 450 Mbps.
2. Up to 1300 Mbps WiFi speeds can be achieved when you are connecting to other 802.11ac 1300 Mbps devices.
9