
User Manual


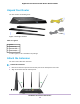
Table Of Contents
- Contents
- 1. Hardware Overview of the Router
- 2. Connect to the Network and Access the Router
- 3. Specify Your Internet Settings
- Use the Internet Setup Wizard
- Manually Set Up the Internet Connection
- Specify an IPv6 Internet Connection
- IPv6 Internet Connections and IPv6 Addresses
- Use Auto Detect for an IPv6 Internet Connection
- Use Auto Config for an IPv6 Internet Connection
- Set Up an IPv6 6to4 Tunnel Internet Connection
- Set Up an IPv6 Pass-Through Internet Connection
- Set Up a Fixed IPv6 Internet Connection
- Set Up an IPv6 DHCP Internet Connection
- Set Up an IPv6 6rd Tunnel Connection
- Set Up an IPv6 PPPoE Internet Connection
- Manage the MTU Size
- 4. Optimize Performance
- 5. Control Access to the Internet
- 6. Share a Storage Device Attached to the Router
- USB Device Requirements
- Connect a USB Device to the Router
- Access a Storage Device Connected to the Router
- Map a USB Device to a Windows Network Drive
- Back Up Windows Computers With ReadySHARE Vault
- Back Up Mac Computers With Time Machine
- Manage Access to a Storage Device
- Enable FTP Access Within Your Network
- View Network Folders on a Device
- Add a Network Folder on a Storage Device
- Change a Network Folder, Including Read and Write Access, on a USB Drive
- Approve USB Devices
- Set Up NETGEAR Downloader
- Safely Remove a USB Device
- 7. Manage Dynamic DNS and Access Storage Devices Through the Internet
- 8. Use the Router as a Media Server
- 9. Share a USB Printer
- 10. Manage the WAN and LAN Network Settings
- Manage the WAN Security Settings
- Set Up a Default DMZ Server
- Manage IGMP Proxying
- Manage NAT Filtering
- Manage the SIP Application-Level Gateway
- Manage the LAN IP Address Settings
- Manage the Router Information Protocol Settings
- Manage the DHCP Server Address Pool
- Manage Reserved LAN IP Addresses
- Disable the Built-In DHCP Server
- Change the Router’s Device Name
- Set Up and Manage Custom Static Routes
- Set Up a Bridge for a Port Group or VLAN Tag Group
- 11. Manage the WiFi Network Settings
- Use WPS to Add a Device to the WiFi Network
- Specify Basic WiFi Settings
- Change the WiFi Data Rate Settings
- Change the WiFi Password or Security Level
- Set Up a Guest WiFi Network
- Specify How the Router Manages WiFi Clients
- Control the WiFi Radios
- Set Up a WiFi Schedule
- Manage the WPS Settings
- Use the Router as a WiFi Access Point
- Use the Router in WiFi Bridge Mode
- 12. Manage the Router and Monitor the Traffic
- Update the Firmware of the Router
- Change the admin Password
- Set Up Password Recovery
- Recover the admin Password
- Manage the Configuration File of the Router
- Disable LED Blinking or Turn Off LEDs
- Return the Router to Its Factory Default Settings
- View the Status and Statistics of the Router
- Manage the Activity Log
- View Devices Currently on the Network
- Monitor and Meter Internet Traffic
- Manage the Router Remotely
- Remotely Access Your Router Using the genie App
- 13. Use VPN to Access Your Network
- 14. Manage Port Forwarding and Port Triggering
- 15. Troubleshooting
- A. Supplemental Information

Contents
Chapter 1 Hardware Overview of the Router
Unpack Your Router.............................................................................................10
Attach the Antennas.............................................................................................10
LEDs and Buttons on the Top Panel....................................................................11
Ports, Buttons, and Connectors on the Back Panel.............................................13
USB Port on the Front Panel................................................................................13
Router Label........................................................................................................14
Position Your Router.............................................................................................14
Cable Your Router................................................................................................15
Chapter 2 Connect to the Network and Access the Router
Connect to the Router..........................................................................................17
Connect to the Router Through an Ethernet Cable.........................................17
Join the WiFi Network of the Router................................................................17
Manual Method...........................................................................................17
Wi-Fi Protected Setup Method...................................................................18
Types of Logins...............................................................................................18
Use a Web Browser to Access the Router...........................................................18
Automatic Internet Setup.................................................................................19
Log In to the Router........................................................................................20
Install the Router With the NETGEAR Up App....................................................20
Change the Language.........................................................................................21
Access the Router With the NETGEAR genie App..............................................21
Chapter 3 Specify Your Internet Settings
Use the Internet Setup Wizard.............................................................................24
Manually Set Up the Internet Connection............................................................25
Specify an Internet Connection Without a Login.............................................25
Specify an Internet Connection That Uses a Login and PPPoE Service........26
Specify an Internet Connection That Uses a Login and PPTP or L2TP
Service............................................................................................................28
Specify an IPv6 Internet Connection....................................................................30
IPv6 Internet Connections and IPv6 Addresses..............................................30
Use Auto Detect for an IPv6 Internet Connection...........................................31
Use Auto Config for an IPv6 Internet Connection...........................................32
Set Up an IPv6 6to4 Tunnel Internet Connection............................................34
Set Up an IPv6 Pass-Through Internet Connection........................................36
Set Up a Fixed IPv6 Internet Connection........................................................36
Set Up an IPv6 DHCP Internet Connection....................................................38
Set Up an IPv6 6rd Tunnel Connection...........................................................39
Set Up an IPv6 PPPoE Internet Connection...................................................41
Manage the MTU Size.........................................................................................43
3