
User Manual
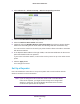
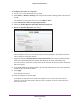

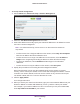
Table Of Contents
- R6250 Smart WiFi Router
- Contents
- 1. Hardware Setup
- 2. Getting Started
- 3. NETGEAR genie Basic Settings
- 4. NETGEAR genie Advanced Home
- 5. USB Storage
- 6. ReadySHARE Printer
- 7. Security
- Keyword Blocking of HTTP Traffic
- Block Services (Port Filtering)
- Port Triggering to Open Incoming Ports
- Port Forwarding to Permit External Host Communications
- How Port Forwarding Differs from Port Triggering
- Set Up Port Forwarding to Local Servers
- Set Up Port Triggering
- Schedule Blocking
- Security Event Email Notifications
- 8. Administration
- 9. Advanced Settings
- 10. Troubleshooting
- A. Supplemental Information
- B. Notification of Compliance

Advanced Settings
96
R6250 Smart WiFi Router
To configure the router as a repeater:
1. Log in to the router that will be the repeater.
2. Select Basic > W
ireless Settings and verify that the wireless settings match the base unit
exactly.
The wireless security option has to be set to WEP or None.
3. Select Advanced > W
ireless Repeating Function.
4. Select the Enable W
ireless Repeating Function check box.
5. Select the W
ireless Repeater radio button.
6. Fill in the Repeater IP Address field.
This IP address has to be in the same subnet as the base station, but different from the
LAN IP address of the base station.
7. (Optional) Select the Disable W
ireless Client Association check box to prevent wireless
clients from associating with the repeater and allowing LAN client associations only.
You can leave the check box cleared if you prefer wireless clients to be able to associate
with the repeater
.
8. In the Base Station MAC Address field, enter the MAC addresses for the access point that
should function as the base station.
9. Click Apply.
Your changes are saved.
10. V
erify connectivity across the LANs.
A computer on any wireless or wired LAN segment of the router can connect to the
Internet or share files and printers with any other computer or server connected to the
other access point.