
User Manual


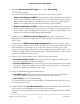

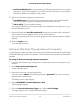


Table Of Contents
- Contents
- 1. Hardware Overview of the Router
- 2. Connect to the Network and Access the Router
- 3. Specify Your Internet Settings
- Use the Internet Setup Wizard
- Manually Set Up the Internet Connection
- Specify an IPv6 Internet Connection
- IPv6 Internet Connections and IPv6 Addresses
- Use Auto Detect for an IPv6 Internet Connection
- Use Auto Config for an IPv6 Internet Connection
- Set Up an IPv6 6to4 Tunnel Internet Connection
- Set Up an IPv6 Pass-Through Internet Connection
- Set Up a Fixed IPv6 Internet Connection
- Set Up an IPv6 DHCP Internet Connection
- Set Up an IPv6 PPPoE Internet Connection
- Manage the MTU Size
- 4. Control Access to the Internet
- 5. Manage the Basic WiFi Network Settings
- 6. Share a Storage Device Attached to the Router
- USB Device Requirements
- Connect a USB Device to the Router
- Access a Storage Device Connected to the Router
- Map a USB Device to a Windows Network Drive
- Manage Access to a Storage Device
- Enable FTP Access Within Your Network
- View Network Folders on a Device
- Add a Network Folder on a Storage Device
- Change a Network Folder, Including Read and Write Access, on a USB Drive
- Approve USB Devices
- Safely Remove a USB Device
- 7. Share a USB Printer
- 8. Manage the WAN and LAN Network Settings
- View or Change WAN Settings
- Set Up a Default DMZ Server
- Manage IGMP Proxying
- Manage VPN Pass-Through
- Manage NAT Filtering
- Manage the SIP Application-Level Gateway
- Manage the LAN IP Address Settings
- Manage the Router Information Protocol Settings
- Manage the DHCP Server Address Pool
- Manage Reserved LAN IP Addresses
- Disable the Built-In DHCP Server
- Change the Router’s Device Name
- Set Up and Manage Custom Static Routes
- Set Up a Bridge for a Port Group or VLAN Tag Group
- Improve Network Connections With Universal Plug-N-Play
- 9. Manage the Router
- Update the Firmware of the Router
- Change the admin Password
- Set Up Password Recovery
- Recover the admin Password
- Manage the Configuration File of the Router
- Return the Router to Its Factory Default Settings
- View the Status and Statistics of the Router
- Manage the Activity Log
- View Devices Currently on the Network
- 10. Manage the Advanced WiFi Features
- 11. Manage Port Forwarding and Port Triggering
- 12. Troubleshooting
- A. Supplemental Information

6.
(Optional) In the DHCP User Class (If Required) field, enter a host name.
Most people can leave this field blank, but if your ISP gave you a specific host name,
enter it here.
7.
(Optional) In the DHCP Domain Name (If Required) field, enter a domain name.
You can type the domain name of your IPv6 ISP. Do not enter the domain name for
the IPv4 ISP here. For example, if your ISP’s mail server is mail.xxx.yyy.zzz, type
xxx.yyy.zzz as the domain name. If your ISP provided a domain name, type it in this
field. For example, Earthlink Cable might require a host name of home, and Comcast
sometimes supplies a domain name.
8. Select an IPv6 Domain Name Server (DNS) Address radio button:
•
Get Automatically from ISP. Your ISP uses DHCP to assign your DNS servers.
Your ISP automatically assigns this address.
•
Use These DNS Servers. If you know that your ISP requires specific servers, select
this option. Enter the IP address of your ISP’s primary DNS server. If a secondary
DNS server address is available, enter it also.
9. Select an IP Address assignment radio button:
•
Use DHCP Server. This method passes more information to LAN devices but
some IPv6 systems might not support the DHCPv6 client function.
•
Auto Config. This is the default setting.
This setting specifies how the router assigns IPv6 addresses to the devices on your
home network (the LAN).
10.
(Optional) Select the Use This Interface ID check box and specify the interface ID
to be used for the IPv6 address of the router’s LAN interface.
If you do not specify an ID here, the router generates one automatically from its MAC
address.
11. Click the Apply button.
Your settings are saved.
Set Up an IPv6 PPPoE Internet Connection
To set up a PPPoE IPv6 Internet connection:
1.
Launch a web browser from a computer or mobile device that is connected to the
network.
2.
Enter http://www.routerlogin.net.
A login window opens.
User Manual38Specify Your Internet Settings
AC1200 WiFi Router Model R6120