User's Manual
Table Of Contents
- ProSecure Web/Email Security Threat Management (STM) Appliance Reference Manual
- Contents
- About This Manual
- Chapter 1 Introduction
- Chapter 2 Using the Setup Wizard to Provision the STM in Your Network
- Choosing a Deployment Scenario
- Understanding the Steps for Initial Connection
- Logging In to the STM
- Using the Setup Wizard to Perform the Initial Configuration
- Setup Wizard Step 1 of 10: Introduction
- Setup Wizard Step 2 of 11: Networking Settings
- Setup Wizard Step 3 of 11: Time Zone
- Setup Wizard Step 4 of 11: Email Security
- Setup Wizard Step 5 of 11: Web Security
- Setup Wizard Step 6 of 11: Email Notification Server Settings
- Setup Wizard Step 7 of 11: Update Settings
- Setup Wizard Step 8 of 11: HTTP Proxy Settings
- Setup Wizard Step 9 of 11: Web Categories
- Setup Wizard Step 10 of 11: Configuration Summary
- Setup Wizard Step 11 of 11: Restarting the System
- Verifying Proper Installation
- Registering the STM with NETGEAR
- What to Do Next
- Chapter 3 Performing Network and System Management
- Configuring Network Settings
- Configuring Session Limits and Timeouts
- Configuring the HTTP Proxy Settings
- About Users with Administrative and Guest Privileges
- Configuring Remote Management Access
- Using an SNMP Manager
- Managing the Configuration File
- Updating the Software
- Configuring Date and Time Service
- Managing Digital Certificates
- Managing the Quarantine Settings
- Performance Management
- Chapter 4 Content Filtering and Optimizing Scans
- About Content Filtering and Scans
- Configuring E-mail Protection
- Configuring Web and Services Protection
- Configuring Application Control
- Setting Scanning Exclusions and Web Access Exceptions
- Chapter 5 Managing Users, Groups, and Authentication
- About Users, Groups, and Domains
- Configuring Groups
- Configuring User Accounts
- Configuring Authentication
- Global User Settings
- Viewing and Logging Out Active Users
- Chapter 6 Monitoring System Access and Performance
- Chapter 7 Troubleshooting and Using Online Support
- Appendix A Default Settings and Technical Specifications
- Appendix B Related Documents
- Index

ProSecure Web/Email Security Threat Management (STM) Appliance Reference Manual
4-18 Content Filtering and Optimizing Scans
v1.0, September 2009
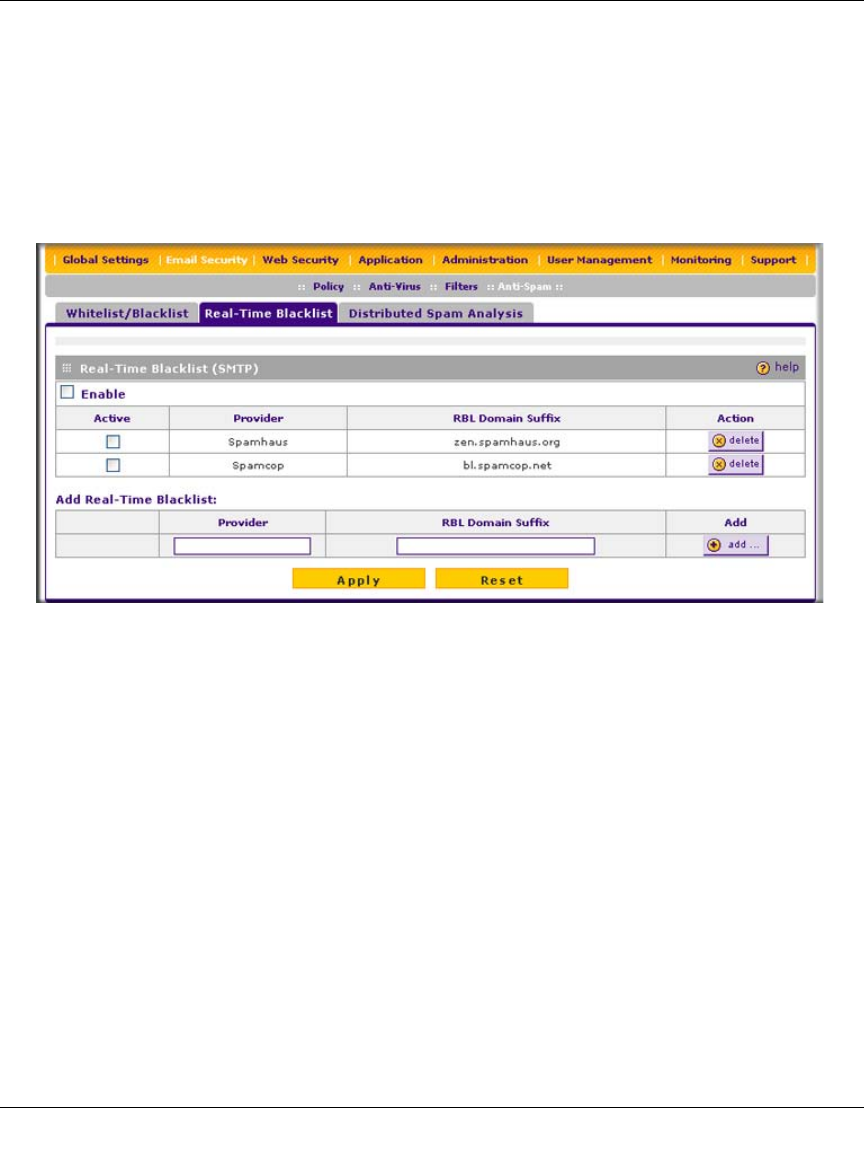
By default, the STM comes with two pre-defined blacklist providers: Spamhaus, and Spamcop.
You can add a maximum of 16 blacklist providers to the RBL sources.
To enable the real-time blacklist:
1. Select Email Security > Anti-Spam from the menu. The Anti-Spam submenu tabs appear,
with the Whitelist/Blacklist screen in view.
2. Click the Real-time Blacklist submenu tab. The Real-time Blacklist screen displays.
3. Select the Enable checkbox enable the Real-Time Blacklist function.
4. Select the Active checkboxes to the left of the default blacklist providers (Spamhaus and
Spamcop) that you want to activate.
5. Click Apply to save your settings.
To add a blacklist provider to the real-time blacklist:
1. In the Add Real-time Blacklist section, add the following information:
• In the Provider field, add the name of the blacklist provider.
• In the RBL Domain Suffix field, enter the domain suffix of the blacklist provider.
2. Click the add table button in the Add column. The new blacklist provider is added to the Real-
time Blacklist (SMTP) table, and it is disabled by default.
To delete a blacklist provider from the real-time blacklist, click the delete table button next to the
blacklist provider that you want to delete.
Figure 4-7


