
Quick Reference Guide


Chapter 2: Common Tasks | 39
NMS200 Quick Reference Manual
1. Open Topology View from the navigation panel, or with File > Open > Inventory >
Topology Views.
2. Click action > New to begin configuring a view.
3. Click action > Add content.
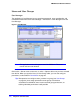
4. In the subsequent screen, click Equipment (you can also add contacts, for example).
5. In the next screen, select the inventory that you want to map. You can Ctrl+Click to select
multiple items.
6. Click Select.
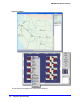
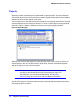
7. The equipment appears, represented as icons on a blank (white) screen. You can
re-arrange these icons by clicking and dragging them. The icons display the color of the
highest value alarm (critical / red is the highest) that most recently came from that device.
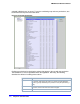
8. Select a background by clicking Properties, then selecting a background from the pick list.
To add graphics to those listed, click the command button (...) to the right of the pick list, and
select the graphic file. As long as the graphic is a
.jpg, .gif
or
.png
file, it can appear
behind the icons.
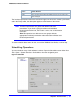
Tip: Notice that, within the view, you can make a larger display than appears
in this screen and click and drag the gray square in the Overview
(bottom, right) panel to select the area in the larger view screen.
You can also right-click an item to see a menu of additional options (see the NMS200
User Guide for details). For example, you can alter the magnification of the view with the
Zoom options, or open a web session with the selected device with the Direct Access
option.
Not all selections work with all devices. Consult the NMS200 User Guide for more
information about the functions available on this screen.
9. Click File > Save to preserve this view.