NETGEAR® ProSafe® NMS200 Network Management Software Quick Reference Manual 350 East Plumeria Drive San Jose, CA 95134 USA September 2010 202-10727-01 v1.
NMS200 Quick Reference Manual ©2010 NETGEAR, Inc. All rights reserved. No part of this publication may be reproduced, transmitted, transcribed, stored in a retrieval system, or translated into any language in any form or by any means without the written permission of NETGEAR, Inc. Technical Support Thank you for choosing NETGEAR. To register your product, get the latest product updates, or get support online, visit us at http://support.netgear.com.
Chapter 1 Overview Introducing NMS200 NETGEAR® ProSafe® Network Management Software 5 System Basics 5 Supported Operating System Versions 5 Hardware Recommendations 6 Basic Network Considerations 6 Authentication 7 Name Resolution 7 Protocols 8 Fixed IP Address 8 Updating Your License 8 The Application Interface 9 Managing Multiple Screens 9 Screen Layouts 10 Getting Started 11 Installation and Startup 11 Starting the Client 15 Troubleshooting 16 Discovering Resources 16 Scheduling Discovery 22 Monitoring P
NMS200 Quick Reference Manual Chapter 3 Troubleshooting Troubleshooting Tips 43 Name Resolution 43 Common Issues 44 Index 4 |
NMS200 Quick Reference Manual 1. Overview 1 Introduction This Quick Reference Guide will help you start using your Product Name & Model as quickly and productively as possible. After a review of the hardware and software requirements needed for your installation in System Basics, you can move on to Installation and Startup on page 11. To start using the software, see Discovering Resources on page 16. This software includes reporting capabilities. These are described in online help.
NMS200 Quick Reference Manual Note: Windows Terminal Server is not supported. The installer becomes non-responsive with Data Execution Prevention enabled. This option is disabled by default on Windows Server 2008, but is enabled on a Windows Server 2008 machine running Terminal Server. • Microsoft Windows XP (Professional) with current patches applied, including SP3.
NMS200 Quick Reference Manual address.The fixed IP address is required for the managment server to communicate with the managed devices. Firewalls, or even SNMP management programs using the same port on the same machine where this software is installed can interfere with communication with your equipment. Your network may have barriers to communication with this software.
NMS200 Quick Reference Manual CAUTION: This software supports installation only on the local file system. Avoid installing to shared drives. Protocols The network managament software uses the following protocols: TCP/IP, SNMP, HTTP/S, UDP Multicast. Fixed IP Address The network managament software includes a web server and must be installed on a host with a fixed IP address or a permanently assigned Dynamic Host Control Protocol (DHCP) lease.
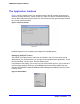
NMS200 Quick Reference Manual The Application Interface Figure 1 shows a typical screen. The navigation panel to the left provides quick access to common functions (discovery, reports, and so on), which can also be accessed through the menus. When visible the left panel remains on screen while the main panel changes to reflect the currently selected function. Figure 1. Discovery Screen Main Panel Nodes that appear in the navigation panel depend on installed options.
NMS200 Quick Reference Manual If you right-click a device, for example, and select Open, the editor screen that appears does not close the screen where you selected the device. Both remain open. You can navigate between screens by selecting them in the Window menu, or with the browser buttons. Figure 3. Browser Buttons and Select Layout / Select Content The right and left arrows just left of the Select Layout pick list navigate backward and forward through the open screens.
NMS200 Quick Reference Manual Getting Started This section outlines the steps in a typical installation and first use. This section does not describe all the details of possible installations. Refer to the NMS200 User Guide or online help for additional information. A typical installation will consist of the following: 1. Installation and Startup— See the NMS200 User Guide for additional information. 2.
NMS200 Quick Reference Manual In Linux, the installing user must have a home directory, and must have permissions to write both there and in the installation’s target directory. At one point the Linux installation stops and asks the installing user to run a script in a separate shell as root user. Other than these differences, to install on both Windows and Linux, you must follow these steps. After initiating installation, click Next.
NMS200 Quick Reference Manual 3. Confirm your hardware meets the displayed Minimum System Requirements. These instructions assume a full install. Both the client and management server software will be installed on the same system. Click Next. 4. Accept the license agreement after reading it, otherwise, you cannot proceed. Click Next. 5. Confirm or alter the installation path. Click Next. 6. Select either Full installation or Client installation.
NMS200 Quick Reference Manual 7. View the final confirmation of components to install. Click Next. Observe the progress bar as files are copied for installation. 8. The database size typically defaults to 2G with unlimited expansion. 9. Click Finish. 10. In a Windows installation, notice the Server Monitor icon ( ) in the system tray. When the icon turns green, you can start your application client. This icon indicates the application server’s status.
NMS200 Quick Reference Manual Start > Programs > NETGEAR >. Click that icon to start the client. Installation will place an NMS200 icon on the Desktop. You can also launch the client program by clicking on this icon. Figure 5. Login Screen A login screen appears. The default login user is admin, with a blank password. Enter admin and click Logon. After logging in as admin, you are prompted to change the password.
NMS200 Quick Reference Manual configuring user privileges and the kind of password constraints that appear on the Change Password dialog. Figure 6. Change Password The Enter a new password, confirm and click OK. The Startup screen will display. See Screen Layouts for more about managing the user interface. See Troubleshooting Tips on page 52 to solve application problems. Troubleshooting If startup fails, see Troubleshooting on page 51 or consult the NMS200 User Guide.
NMS200 Quick Reference Manual Figure 7. Initial Screen for Admin. Click Begin Discovery. The Resource Discovery screen will display. You can enter the IP addresses of devices to be discovered or a range of addresses to search. Consult the section about Advanced Discovery in online help for additional information. Follow these steps to discover your network resources: 1. The next Discovery Wizard screen that appears is where you determine what devices you are going to discover.
NMS200 Quick Reference Manual Remove to delete a previously created range you selected. You can add several such criteria. Note: Select Manage via Hostname in a DNS / DHCP environment. For this to be effective, however, the association between hostname and the correct IP address for the discovered equipment must be accurate. 2. New / Edit Authentication.
NMS200 Quick Reference Manual 4. Options. This screen lets you configure a variety of global discovery options for the targets configured in the Discovery tab. Tip: In addition to discovering devices by themselves, you can now discover links between them as an activity that follows discovering the devices. Click the checkbox next to the link discovery task appropriate to your network in the lower part of this screen to do link discovery too.
NMS200 Quick Reference Manual Tip: You can add a task to add discovered devices to NMS200 NETGEAR® ProSafe® Network Management Software’s heartbeat. You can configure what appears by default as described in the NMS200 User Guide. You can also use the up/down/top/bottom arrows to reorder selected rows, reordering what activities discovery executes.
NMS200 Quick Reference Manual You can click Close at any time. If you click it before the Equipment Discovery Finished message appears, discovery continues in the background. The final discovery panel, whether appearing for a Resource Discovery Profile or at the end of the a conventional basic / advanced discovery process presents asynchronous information. If you click Finish before the process is done, the discovery process still continues.
NMS200 Quick Reference Manual To clarify the origin of application features, the navigation window often appears throughout the documentation. 9. After you click Finish, a QuickView screen appears. Scheduling Discovery When you first discover devices, you typically use a Discovery Profile that includes the discovery parameters (IP addresses, authentication used, and so on). You can keep your inventory up-to-date and discover equipment over a range of addresses by scheduling a repeated discovery.
NMS200 Quick Reference Manual Default Monitors Other, seeded monitors are available to add to the core set of monitors. By default, these are active monitoring the group of all discovered entities. Create a Dashboard View You can create custom dashboard views as described in the following steps: 1. Click Active Monitoring > Dashboard Views to open the view manager. 2. Click action > New to create a new view. By default this appears with two rows and three columns.
NMS200 Quick Reference Manual several entities to monitor, but only one attribute. In our example, we select a single interface, and monitor several attributes (BW Util, Error Count, Errors and Discards Count, High, Low, Packets In, Packets Out). The exact configuration of this portion of the screen depends on the Component Type you select. 6. Notice you can also configure items in the Data Source portion of the screen. For this example we accept the defaults.
NMS200 Quick Reference Manual 8. Notice that this simple example does not show all possibilities for these views. For example, you can have several components within a single view. In the example below, the same monitor appears in all four panels, displaying the monitoring for different attributes in different graph types.
NMS200 Quick Reference Manual Reports From Monitors When you create a monitor, a report template and several reports automatically appear for it in the Reports section of the application. Figure 9. Monitor Reports You can modify these reports, but by default, they include the monitored attributes and/or devices. The reports appear pre-configured for the day, week, and the last 30 days. These intervals are also modifiable.
NMS200 Quick Reference Manual Click the Go button in the upper right corner of this panel to refresh the screen if resources do not appear when you discovery is complete. Figure 10. Resource View Title bar, Action, Lay out buttons and display Filters Discovered Resources Detail Pan describes a selected resource You can view all discovered resources from this screen. Selecting a resource in the upper panel lets you view details about that resource in the lower panel.
NMS200 Quick Reference Manual Alarm Panels This section describes the alarm panels, visible when you click Event Services > Alarms in the navigation tree or File menu. You can reorder or hide these panels to customize your view. You can also further customize some of these panels by adding, removing or reordering their columns. When you select an alarm in Alarm Manager, its information appears in the detail panels at the bottom of this screen.
NMS200 Quick Reference Manual Tip: As in most such screens, you can sort the listed Alarms by clicking a column header. Toggle the sort order by clicking the header again. The Action Button or right-click menu displays the following items (some installations hide some of these): Open > Entity — This opens an editor where you can configure the device from which this alarm came. See the NMS200 User Guide, or online help. Open > Alarm — Opens a screen describing all the details of the selected alarm.
NMS200 Quick Reference Manual E-mail Alarm — E-mail the selected alarms. A subsequent screen lets you specify the addressee, header, and footer. Print — Prints the displayed Alarms to a pdf file. Figure 13. Printed Alarms (pdf) You can print or save this report from Acrobat. If you do not have the free Acrobat reader, download it from www.adobe.com. This reader must be installed for printing to work.
2. Common Tasks 2 Administering the Application This software controls access to your network resources and device data, and offers many forms of automation: • You can configure multiple security levels (read-only access, read/write-access, administrative access, and so on) and multiple types of users (user groups). This is described briefly in the next section. . • You can automate and schedule a variety of operations. The following sections describe these examples.
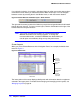
NMS200 Quick Reference Manual Users and User Groups User Manager The application’s User Manager lets you associate passwords, group membership, and contact information with users. Select Settings > Permissions > User Manager to see the User Manager. Figure 1. User Manager Note: This application comes with system users like OWAdmin. These are normal and cannot be deleted. Click action > New to create a new user, or action > Open to edit a user you have selected from the list.
NMS200 Quick Reference Manual User Groups The User Group Manager lets you create user groups just as you create or edit users. The detail panels display the name, description and whether the group is protected. Open this manager from Settings > Permissions > User Group Manager. Initially, a Group is nothing more than a name and a description. Figure 2. User Group Manager Click New or select a group and click Open to modify a group.
NMS200 Quick Reference Manual selected, individual user (or group). To see the combined group and user permissions, see the All Permissions panel in the User editor. Figure 3. Functional Permissions Configure permissions by checking the actions that appear in the row with the permission. These determine a user’s capabilities within the application. Generally, the following describes the effects of enabling these actions:.
NMS200 Quick Reference Manual Action Default Behavior write When checked, this enables the Save button within editors. delete When checked, this enables the Delete menu item on the action menu within managers. The functional permissions that use these actions appear in this screen. Select a permission, and in the Group editor, the description appears at the bottom of the screen. Note: Functional permissions are global and additive with other permissions.
NMS200 Quick Reference Manual Click New, then select an operation (Group Operations, Inventory Reports, Resynchronization, and so on), and configure the selected option. Finally, select the schedule timing, frequency, and so on. Consult the NMS200 User Guide for more information about scheduling capabilities. Tip: You can set up a recurring discovery of an IP range that automatically adds any new networked devices to those already in your inventory.
NMS200 Quick Reference Manual Mapping Equipment In addition to their listing in the Inventory screen, discovered resources can appear in a topology mapping.
NMS200 Quick Reference Manual Figure 5.
NMS200 Quick Reference Manual 1. Open Topology View from the navigation panel, or with File > Open > Inventory > Topology Views. 2. Click action > New to begin configuring a view. 3. Click action > Add content. 4. In the subsequent screen, click Equipment (you can also add contacts, for example). 5. In the next screen, select the inventory that you want to map. You can Ctrl+Click to select multiple items. 6. Click Select. 7. The equipment appears, represented as icons on a blank (white) screen.
NMS200 Quick Reference Manual Reports Reporting includes a defined report combined with a report template. The report definition itself selects the devices to query and the (reusable) template selects which of the available attributes of those printers appear in the report. The first reports you create about discovered equipment are typically done with the included report templates that come with your software.
NMS200 Quick Reference Manual To see a report after selecting it, click Go. Figure 7. Executed Report Click the disk icon on this screen to save the report in any of several file formats, including pdf (Acrobat), HTML, CSV (comma-separated value), RTF, single or multi-sheet Excel spreadsheets (.xls), or XML. Click the printer icon to send this report to a printer. Note: For pdf printing to work correctly, you must have the Acrobat reader installed. This is available, free, from www.adobe.com.
NMS200 Quick Reference Manual Branding Reports Reports come with a default logo, but you can change that, as is illustrated in the above screen. Put the .png, .jpg or .gif graphic file with your desired logo in owareapps\redcell\images. In the owareapps\installprops\lib\installed.properties file, alter this property: redcell.report.branding.image= No need to include the path, just use the file name. Note: You must include the file on clients as well as the application server.
3. Troubleshooting 3 Troubleshooting Tips The following answer common questions that arise when managing your equipment. For more details, refer to the User Guide. The applicability of the following will depend on what drivers and other add-ons you have installed with MS200 NETGEAR® ProSafe® Network Management Software. The following sections discuss some troubleshooting techniques. See the NMS200 User Guide for additional techniques.
NMS200 Quick Reference Manual Common Issues The following list contains possible issues and some suggested sources and resolutions for these issues: Application does not start: • Check whether the IP address of server has changed. • Ensure the database is large enough. See the application’s other manuals for instructions about changing the database size.
Index A H Active Performance Monitor 23 Administering the Application 31 Alarm Manager 28 Authentication 7 Hardware 6 System Requirements 5 Hardware recommendations 6 I B Basic Network Considerations 6 Branding Reports 41 Installation and Startup 118 IP address changes 7 L C License 8 Customizing Report Logos 41 M D Managing Multiple Screens 9 Minimum hardware 6 Monitor performance 23 Default Monitors 23 Discover Network Devices 16 DNS 7 Domain Name Servers 7 F Figures Alarm Manager 28 Execute
NMS200 Quick Reference Manual S Scheduling Operations 357 Screen Layouts 7 Shared drive unsupported 4 Starting the Client 10 System Basics 5 System requirements 5 T Topology 37 U Updating Your License 8 Upgrade licenses from previous version 8 User Group Manager 33 User Groups Manager 33 User Groups 33 Index | 46