N150 4-Port Wireless Router JNR1010 User M anual 350 East Plumeria Drive San Jose, CA 95134 USA August 2012 202-11017-01 v1.
N150 4-Port Wireless Router JNR1010 ©2012 NETGEAR, Inc. All rights reserved. No part of this publication may be reproduced, transmitted, transcribed, stored in a retrieval system, or translated into any language in any form or by any means without the written permission of NETGEAR, Inc. Technical Support Thank you for choosing NETGEAR. To register your product, get the latest product updates, or get support online, visit us at http://support.netgear.com.
Contents Chapter 1 Hardware Setup Unpack Your Router . . . . . . . . . . . . . . . . . . . . . . . . . . . . . . . . . . . . . . . . . . . 7 Position Your Router . . . . . . . . . . . . . . . . . . . . . . . . . . . . . . . . . . . . . . . . . . 7 Hardware Features. . . . . . . . . . . . . . . . . . . . . . . . . . . . . . . . . . . . . . . . . . . . 8 Front Panel . . . . . . . . . . . . . . . . . . . . . . . . . . . . . . . . . . . . . . . . . . . . . . . . 8 Side Panel . . . . . . . . . . . . . . . . .
N150 4-Port Wireless Router JNR1010 Setup Menu . . . . . . . . . . . . . . . . . . . . . . . . . . . . . . . . . . . . . . . . . . . . . . . . 34 WAN Setup. . . . . . . . . . . . . . . . . . . . . . . . . . . . . . . . . . . . . . . . . . . . . . . . . 34 Default DMZ Server . . . . . . . . . . . . . . . . . . . . . . . . . . . . . . . . . . . . . . . . 35 Change the MTU Size . . . . . . . . . . . . . . . . . . . . . . . . . . . . . . . . . . . . . . 36 LAN Setup . . . . . . . . . . . . . . . . . . . . . .
N150 4-Port Wireless Router JNR1010 Dynamic DNS . . . . . . . . . . . . . . . . . . . . . . . . . . . . . . . . . . . . . . . . . . . . . . . 77 Static Routes . . . . . . . . . . . . . . . . . . . . . . . . . . . . . . . . . . . . . . . . . . . . . . . 79 Remote Management . . . . . . . . . . . . . . . . . . . . . . . . . . . . . . . . . . . . . . . . .80 Universal Plug and Play . . . . . . . . . . . . . . . . . . . . . . . . . . . . . . . . . . . . . . .81 Traffic Meter . . . . . . . . . . . . . . . . . .
1. Hardware Setup 1 Get ti ng to know your router If you already set up your N150 4-Port Wireless Router, you can skip this chapter. If you have not done that yet, this chapter covers the hardware setup. Chapter 3, genie Basic Settings, explains how to set up your Internet connection. This chapter contains the following sections: • Unpack Your Router • Position Your Router • Hardware Features The NETGEAR genie® app provides easy installation from an iPad, tablet, computer, or smartphone.
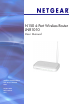
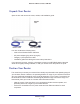
N150 4-Port Wireless Router JNR1010 Unpack Your Router Open the box and remove the router, cables, and installation guide. JNR1010 router JNR1010 router Ethernet cable Power adapter Your box contains the following items: • N150 4-Port Wireless Router JNR1010 • AC power adapter (plug varies by region) • Category 5 (Cat 5) Ethernet cable • Installation guide with cabling and router setup instructions If any parts are incorrect, missing, or damaged, contact your NETGEAR dealer.
N150 4-Port Wireless Router JNR1010 • In an elevated location such as a high shelf, keeping the number of walls and ceilings between the router and your other devices to a minimum. • Away from electrical devices that are potential sources of interference. Equipment that might cause interference includes ceiling fans, home security systems, microwaves, PCs, the base of a cordless phone, or 2.4-GHz cordless phone. • Away from any large metal surfaces, such as a solid metal door or aluminum studs.
N150 4-Port Wireless Router JNR1010 Table 1. Front panel LED descriptions LED Power WPS/ FastLane Wireless Internet Ethernet (1, 2, 3, 4) Description • Solid green. Power is supplied to the router. • Off. Power is not supplied to the router. • WPS mode: - Solid green. WPS mode is enabled. - Off. WPS mode is disabled. - Blinking green. WPS mode is available for connection. • FastLane mode: - Solid green. FastLane mode is enabled. - Off. FastLane mode is disabled. • Blinking green.
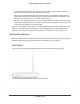
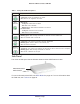
N150 4-Port Wireless Router JNR1010 Back Panel The back panel has the connections shown in the following figure. Ethernet LAN ports (4) Internet port Reset button Power connector Power On/Off See Factory Settings on page 94 for information about restoring factory settings. Label The label on the bottom of the router shows the preset WiFi network name and password, login information, MAC address, and serial number.
2. Getting Started with NETGEAR genie Con ne cting to the router 2 This chapter explains how to use NETGEAR genie to set up your router after you complete cabling as described in the installation guide and in the previous chapter.
N150 4-Port Wireless Router JNR1010 Router Setup Preparation You can set up your router with the NETGEAR genie automatically, or you can use the genie menus and screens to set up your router manually. Before you start the setup process, get your ISP information, and make sure the computers and devices in the network have the settings described here.
N150 4-Port Wireless Router JNR1010 Types of Logins Different types of logins have different purposes: • Router login. Logs you in to the router interface from NETGEAR genie. See Use NETGEAR genie After Installation on page 14 for details about this login. • ISP login. Logs you in to your Internet service. Your service provider has provided you with this login information in a letter or some other way. If you cannot find this login information, contact your service provider.
N150 4-Port Wireless Router JNR1010 • Browse to http://www.routerlogin.net. • If the computer is set to a static or fixed IP address (this situation is uncommon), change it to obtain an IP address automatically from the router. To troubleshoot Internet access problems: If the router does not connect to the Internet, follow these troubleshooting steps: 1. Review your settings to be sure that you have selected the correct options and typed everything correctly. 2.
N150 4-Port Wireless Router JNR1010 Upgrade Router Firmware When you set up your router and are connected to the Internet, the router automatically checks to see if newer firmware is available. If it is, a message displays on the top of the screen. See Upgrade the Router Firmware on page 53 for more information about upgrading firmware. Click the message when it displays, and click Yes to upgrade the router with the latest firmware. After the upgrade, the router restarts.
N150 4-Port Wireless Router JNR1010 • Parental Controls. Download and set up parental controls to prevent objectionable content from reaching your computers. • Guest Network. Set up a guest network to allow visitors to use your router’s Internet connection. • FastLane. Enable FastLane mode to reserve bandwidth on the router for a trusted IP address that you specify. • Advanced tab. Set the router up for unique situations such as when remote access by IP or by domain name from the Internet is needed.
N150 4-Port Wireless Router JNR1010 Manual Method With the manual method, you choose the network that you want, and type its password to connect. To connect manually: 1. On your computer or wireless device, open the software that manages your wireless connections. This software scans for all wireless networks in your area. 2. Look for your network and select it. The unique WiFi network name (SSID) and password is on the router label.
N150 4-Port Wireless Router JNR1010 You can use the genie mobile app on your iPhone, iPad, or Android phone.
3.
N150 4-Port Wireless Router JNR1010 Internet Setup The Internet Setup screen is where you view or change ISP information. 1. From the Home screen, select Internet. The following screen displays: The fields that display in the Internet Setup screen depend on whether your Internet connection requires a login. 2. Select a radio button in the Does your Internet connection require a login section as follows: • Yes. Select the encapsulation method and enter the login name.
N150 4-Port Wireless Router JNR1010 Internet Setup Screen Fields The following descriptions explain all of the possible fields in the Internet Setup screen. The fields that display in this screen depend on whether an ISP login is required. • Does Your ISP Require a Login? Answer either yes or no. • • • • • The following fields display when no login is required: • Account Name (if required). Enter the account name that your ISP provided. It might also be called the host name.
N150 4-Port Wireless Router JNR1010 Attached Devices You can view all computers or devices that are currently connected to your network here. From the Basic Home screen, select Attached Devices to display the following screen: Wired devices are connected to the router with Ethernet cables. Wireless devices have joined the wireless network. NETGEAR genie displays the following information about devices that are currently connected to your network: • # (number).
N150 4-Port Wireless Router JNR1010 Parental Controls The first time you select Parental Controls from the Basic Home screen, your browser goes to the Parental Controls website. You can learn more about Live Parental Controls or download the application. To set up Live Parental Controls: 1. Select Parental Controls on the Dashboard screen. 2. Click either the Windows Users or Mac Users button. 3.
N150 4-Port Wireless Router JNR1010 Because Live Parental Controls uses free OpenDNS accounts, you are prompted to log in or create a free account. 5. Select the radio button that applies to you, as follows, and click Next: • If you already have an OpenDNS account, leave the Yes radio button selected. • If you do not have an OpenDNS account, select the No radio button. If you are creating an account, the following screen displays: Complete the fields and click Next.
N150 4-Port Wireless Router JNR1010 6. Select a filtering level radio button and click Next. 7. Click the Take me to the status screen button. Parental controls are now set up for the router. The Dashboard shows Parental Controls as enabled. Basic Wireless Settings The Wireless Settings screen lets you view or configure the wireless network setup. The N150 4-Port Wireless Router comes with preset security.
N150 4-Port Wireless Router JNR1010 To view or change basic wireless settings: 1. On the Basic Home screen, select Wireless to display the Wireless Settings screen. The screen sections, settings, and procedures are explained in the following sections. 2. Make any changes that are needed and click Apply to save your settings. 3. Set up and test your wireless devices and computers to make sure that they can connect wirelessly.
N150 4-Port Wireless Router JNR1010 • Name (SSID). The SSID is also known as the wireless network name. Enter a 32-character (maximum) name in this field. This field is case-sensitive. The default SSID is randomly generated, and NETGEAR strongly recommends that you do not change this setting. • Channel. This setting is the wireless channel the gateway uses. Enter a value from 1 through 13. (For products in the North America market, only Channels 1 through 11 can be operated.
N150 4-Port Wireless Router JNR1010 Guest Networks Adding a guest network allows visitors at your home to use the Internet without giving them your wireless security key. You can add a guest network to the 2.4 GHz b/g/n wireless network. To set up a guest network: 1. Select Basic > Guest Network to display the following screen: 2. Select any of the following wireless settings: • Enable Guest Network.
N150 4-Port Wireless Router JNR1010 Guest Network Wireless Security Options A security option is the type of security protocol applied to your wireless network. The security protocol in force encrypts data transmissions and ensures that only trusted devices receive authorization to connect to your network. Wi-Fi Protected Access (WPA) has several options including pre-shared key (PSK) encryption. This section presents an overview of the security options and provides guidance on when to use which option.
N150 4-Port Wireless Router JNR1010 To set up the FastLane feature: 1. On the Basic Home tab, select FastLane: 2. Select the Turn On FastLane check box. 3. Select the amount of bandwidth to be reserved from the drop-down list. You can choose to reserve 50%, 60%, 70%, or 80% of the bandwidth. 4. Enter the trusted IP address. 5. Select the FastLane radio button. 6. Click Apply.
4. genie Advanced Home 4 Spe ci f ying custom set ti ngs This chapter explains the features available from the genie Advanced Home screen, shown in the following figure: This screen is also displayed through the Administration menu. This chapter contains the following sections: • Setup Wizard • WPS Wizard • Setup Menu • WAN Setup • LAN Setup • Quality of Service (QoS) Setup Some selections on the Advanced Home screen are described in separate chapters: • Security. See Chapter 5, Security.
N150 4-Port Wireless Router JNR1010 Setup Wizard The NETGEAR genie installation process launches the first time you set up the router. After you set up the router the first time, you can use the Setup Wizard again. To use the setup wizard again: 1. Log in to the router and select the Advanced tab. 2. Select Setup Wizard. The following screen displays. 3. Select the Yes radio button and click the Next button. If you select No, you are taken to the Internet Setup screen (see Internet Setup on page 20).
N150 4-Port Wireless Router JNR1010 WPS Wizard The WPS Wizard helps you add a WPS-capable client device (a wireless device or computer) to your network. On the client device, either press its WPS button or locate its WPS PIN. To use the WPS Wizard: 1. Select Advanced > WPS Wizard. 2. Click Next. The following screen lets you select the method for adding the WPS client (a wireless device or computer). 3.
N150 4-Port Wireless Router JNR1010 Setup Menu Select Advanced > Setup to display the Setup menu. The following selections are available: • Internet Setup. Go to the same Internet Setup screen that you can access from the dashboard on the Basic Home screen. See Internet Setup on page 20. • Wireless Setup. Go to the same Wireless Settings screen that you can access from the dashboard on the Basic Home screen. See Basic Wireless Settings on page 25. • Guest Network.
N150 4-Port Wireless Router JNR1010 • Respond to Ping on Internet Port. If you want the router to respond to a ping from the Internet, select this check box. Use this setting only as a diagnostic tool because it allows your router to be discovered. Do not select this check box unless you have a specific reason. • Disable IGMP Proxying. IGMP proxying allows a computer on the local area network (LAN) to receive the multicast traffic it is interested in from the Internet.
N150 4-Port Wireless Router JNR1010 To set up a default DMZ server: 1. On the WAN Setup screen, select the Default DMZ Server check box. 2. Type the IP address. 3. Click Apply. Change the MTU Size The maximum transmission unit (MTU) is the largest data packet a network device transmits. When one network device communicates across the Internet with another, the data packets travel through many devices along the way.
N150 4-Port Wireless Router JNR1010 If you suspect an MTU problem, a common solution is to change the MTU to 1400. If you are willing to experiment, you can gradually reduce the MTU from the maximum value of 1500 until the problem goes away. The following table describes common MTU sizes and applications. Table 2. Common MTU Sizes MTU Application 1500 The largest Ethernet packet size and the default value.
N150 4-Port Wireless Router JNR1010 Note: If you change the LAN IP address of the router while connected through the browser, you will be disconnected. You must open a new connection to the new IP address and log in again. To change the LAN settings: 1. Select Advanced > Setup > LAN Setup to display the following screen: 2. Enter the settings that you want to customize. These settings are described in the following section, LAN Setup Screen Settings. 3. Click Apply to save your changes.
N150 4-Port Wireless Router JNR1010 • RIP Direction. Router Information Protocol (RIP) allows a router to exchange routing information with other routers. This setting controls how the router sends and receives RIP packets. Both is the default setting. With the Both or Out Only setting, the router broadcasts its routing table periodically. With the Both or In Only setting, the router incorporates the RIP information that it receives. • RIP Version.
N150 4-Port Wireless Router JNR1010 • Primary DNS server (if you entered a primary DNS address in the Internet Setup screen; otherwise, the router’s LAN IP address) • Secondary DNS server (if you entered a secondary DNS address in the Internet Setup screen) To use another device on your network as the DHCP server, or to specify the network settings of all of your computers, clear the Use Router as DHCP Server check box and click Apply. Otherwise, leave this check box selected.
N150 4-Port Wireless Router JNR1010 Quality of Service (QoS) Setup QoS is an advanced feature that can be used to prioritize some types of traffic ahead of others. The N150 4-Port Wireless Router can provide QoS prioritization over the wireless link and on the Internet connection. To configure QoS, use the QoS Setup screen.
N150 4-Port Wireless Router JNR1010 Set Up QoS for Applications and Online Gaming To create a QoS policy for applications and online games: 1. In the QoS Setup screen, select the Turn Internet Access QoS On check box. 2. Click the Setup QoS Rule button to see the existing priority rules. You can edit or delete a rule by selecting its radio button and clicking either the Edit or Delete button. You can also delete all of the rules by simply clicking the Delete All button. 3.
N150 4-Port Wireless Router JNR1010 4. In the QoS Policy for field, type the name of the application or game. 5. In the Priority Category list, select either Applications or Online Gaming. In either case, a list of applications or games displays in the list. 6. You can select an existing item from the list, or you can scroll and select Add a New Application or Add a New Game, as applicable. a. If you add an entry, the Priority Rules screen expands as shown: b.
N150 4-Port Wireless Router JNR1010 5. From the LAN port list, select the LAN port. 6. From the Priority list, select the priority for Internet access for this port’s traffic relative to other applications. The options are Low, Normal, High, and Highest. 7. Click Apply to save this rule to the QoS Policy list and return to the QoS Setup screen. 8. In the QoS Setup screen, click Apply. Set up QoS for a MAC Address To create a QoS policy for traffic from a specific MAC address: 1.
N150 4-Port Wireless Router JNR1010 Edit or Delete an Existing QoS Policy To edit or delete a QoS policy: 1. Select Advanced > QoS Setup to display the QoS Setup screen. 2. Select the radio button next to the QoS policy that you want to edit or delete, and do one of the following: • Click Delete to remove the QoS policy. • Click Edit to edit the QoS policy. Follow the instructions in the preceding sections to change the policy settings. 3. Click Apply in the QoS Setup screen to save your changes.
5. Security Keepi ng unwanted content out of your net work 5 This chapter explains how to use the basic firewall features of the router to prevent objectionable content from reaching the computers and devices on your network.
N150 4-Port Wireless Router JNR1010 Keyword Blocking of HTTP Traffic Use keyword blocking to prevent certain types of HTTP traffic from accessing your network. The blocking can be always or according to a schedule. 1. Select Advanced > Security > Block Sites to display the following screen: 2. Select one of the keyword blocking options: • Per Schedule. Turn on keyword blocking according to the Schedule screen settings. • Always. Turn on keyword blocking all the time, independent of the Schedule screen.
N150 4-Port Wireless Router JNR1010 Block Services (Port Filtering) Services are functions that server computers perform at the request of client computers. For example, web servers serve web pages, time servers serve time and date information, and game hosts serve data about other players’ moves. When a computer on the Internet sends a request for service to a server computer, the requested service is identified by a service or port number.
N150 4-Port Wireless Router JNR1010 3. Click Add to add a service. The Block Services Setup screen displays: 4. From the Service Type list, select the application or service to allow or block. The list already displays several common services, but you are not limited to these choices. To add any additional services or applications that do not already appear, select User Defined. 5. If you know that the application uses either TCP or UDP, select the appropriate protocol. If you are not sure, select Both.
N150 4-Port Wireless Router JNR1010 Schedule Blocking You can specify the days and time that you want to block Internet access. To schedule blocking: 1. Select Advanced > Security > Schedule to display the following screen: 2. Set up the schedule for blocking keywords and services. • Days to Block. Select days on which you want to apply blocking by selecting the appropriate check boxes, or select Every Day to select the check boxes for all days. • Time of Day to Block.
N150 4-Port Wireless Router JNR1010 Security Event Email Notifications To receive logs and alerts by email, provide your email information in the Email screen, and specify which alerts you want to receive and how often. To set up email notifications: 1. Select Advanced > Security > Email to display the following screen: 2. To receive email logs and alerts from the router, select the Turn Email Notification On check box. 3.
6. Administration 6 M anaging your net work This chapter describes the router settings for administering and maintaining your router and home network. See Remote Management on page 80 for information about checking the status of your router over the Internet, and Traffic Meter on page 83 for information about monitoring Internet traffic on your router’s Internet port.
N150 4-Port Wireless Router JNR1010 Upgrade the Router Firmware The router firmware (routing software) is stored in flash memory. You can update the firmware from the Administration menu on the Advanced tab. You might see a message at the top of the genie screens when new firmware is available for your product. You can use the Check button on the Router Update screen to check and update to the latest firmware for your product if new firmware is available.
N150 4-Port Wireless Router JNR1010 View Router Status To view router status and usage information, select Advanced Home or select Administration > Router Status to display the following screen: Router Status This router status section provides the following information: • Hardware Version. The router model. • Firmware Version. The version of the router firmware. It changes if you upgrade the router firmware. • GUI Language Version. The localized language of the user interface. • MAC Address.
N150 4-Port Wireless Router JNR1010 Internet Port The Internet port section provides the following information: • MAC Address. The Media Access Control address, which is the unique physical address used by the Internet (WAN) port of the router. • IP Address. The IP address used by the Internet (WAN) port of the router. If no address is shown or the address is 0.0.0, the router cannot connect to the Internet. • Connection. This shows if the router is using a fixed IP address on the WAN.
N150 4-Port Wireless Router JNR1010 • Connection Status button. Click the Connection Status button to view connection status information. The Connection Status screen displays the following information: • IP Address. The IP address that is assigned to the router. • Subnet Mask. The subnet mask that is assigned to the router. • Default Gateway. The IP address for the default gateway that the router communicates with. • DHCP Server.
N150 4-Port Wireless Router JNR1010 Wireless AP The Wireless AP section displays the following information: • Wireless Network Name (SSID). The wireless network name (SSID) used by the router. • Region. The geographic region where the router is being used. It might be illegal to use the wireless features of the router in some parts of the world. • Wireless Channel. Identifies the operating channel of the wireless port being used. The default channel is Auto.
N150 4-Port Wireless Router JNR1010 View Logs of Web Access or Attempted Web Access The log is a detailed record of the websites you have accessed or attempted to access. Up to 256 entries are stored in the log. Log entries appear only when keyword blocking is enabled and no log entries are made for the trusted user. To view web access logs: 1. Select Advanced > Administration > Logs. The Logs screen displays. The log screen shows the following information: • Date and time.
N150 4-Port Wireless Router JNR1010 Manage the Configuration File The configuration settings of the N150 4-Port Wireless Router are stored within the router in a configuration file. You can back up (save) this file to your computer, restore it, or reset it to the factory default settings. Back Up Settings To back up the router’s configuration settings: 1. Select Advanced > Administration > Backup Settings to display the following screen: 2. Click Back Up to save a copy of the current settings. 3.
N150 4-Port Wireless Router JNR1010 Erase You can erase the configuration and restore the factory default settings. You might want to restore factory default settings if you move the router to a different network or if you forget the password. You can use the Restore Factory Settings button on the back of the router (see Factory Settings on page 94), or you can click the Erase button in this screen. Erase sets the user name to admin, the password to password, and the LAN IP address to 192.168.1.
7. Advanced Settings 7 This chapter describes the advanced features of your router. The information is for readers with advanced networking knowledge who want to configure the router for unique situations such as when remote access from the Internet by IP or domain name is needed.
N150 4-Port Wireless Router JNR1010 Advanced Wireless Settings To configure advanced wireless settings: 1. Select Advanced > Advanced Setup > Wireless Settings. The following screen displays: 2. Adjust the following settings as needed: • Enable Wireless Router Radio. You can completely turn off the wireless portion of the wireless router by clearing this check box. Select this check box again to enable the wireless portion of the router.
N150 4-Port Wireless Router JNR1010 • • WPS Settings.You can add WPS devices to your network: • Disable Router’s PIN. The router’s PIN lets you use the WPS PIN method to join the wireless network. Selecting this check box disables the PIN, which means the WPS PIN method cannot be used. • Keep Existing Wireless Settings. By default this check box is selected so that when WPS is used to join the wireless network, the router wireless settings do not change. Wireless Card Access List.
N150 4-Port Wireless Router JNR1010 3. If the computer or device you want is in the Available Wireless Cards list, select that radio button; otherwise, type a name and the MAC address. You can usually find the MAC address on the bottom of the wireless device. You can copy and paste the MAC addresses from the Attached Devices screen into the MAC Address field of this screen. To do this, use each wireless computer to join the wireless network. The computer should then appear in the Attached Devices screen.
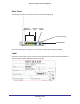
N150 4-Port Wireless Router JNR1010 Wireless repeating is a type of Wireless Distribution System (WDS). A WDS allows a wireless network to be expanded through multiple access points instead of using a wired backbone to link them. The following figure shows a wireless repeating scenario. Repeater access point Base station access point The scenario includes these components: • Wireless Base Station. The router acts as the parent access point, bridging traffic to and from the child repeater access point.
N150 4-Port Wireless Router JNR1010 Wireless Repeating Function Select Advanced > Advanced Setup > Wireless Repeating to view or change wireless repeater settings for the router. You can configure the following wireless repeater settings: • Enable Wireless Repeating Function. Select the check box for the 2.4 GHz or 5 GHz network to use the wireless repeating function. • Wireless MAC of this router. This field displays the MAC address for your router for your reference.
N150 4-Port Wireless Router JNR1010 • Disable Wireless Client Association. If your router is the base station, selecting this check box means that wireless clients cannot associate with it. Only LAN client associations are allowed. • Repeater MAC Address (1 through 4). If your router is the base station, it can act as the “parent” of up to 4 other access points. Enter the MAC addresses of the other access points in these fields.
N150 4-Port Wireless Router JNR1010 Set Up a Repeater Unit Use a wired Ethernet connection to set up the repeater unit to avoid conflicts with the wireless connection to the base station. Note: If you are using the JNR1010 base station with a non- router as the repeater, you might need to change additional configuration settings. In particular, you should disable the DHCP server function on the wireless repeater AP. To configure the router as a repeater unit: 1.
N150 4-Port Wireless Router JNR1010 Remote Computer Access Basics When a computer on your network needs to access a computer on the Internet, your computer sends your router a message containing the source and destination address and process information. Before forwarding your message to the remote computer, your router must modify the source information and create and track the communication session so that replies can be routed back to your computer.
N150 4-Port Wireless Router JNR1010 router then modifies the message to restore the original address information replaced by NAT. Your router sends this reply message to your computer, which displays the web page from www.example.com. The message now contains the following address and port information: • Source address. The IP address of www.example.com. • Source port number. 80, which is the standard port number for a web server process. • Destination address. Your computer’s IP address.
N150 4-Port Wireless Router JNR1010 6. Upon receiving the incoming message to destination port 33333, your router checks its session table to determine whether there is an active session for port number 33333. Finding an active session, the router restores the original address information replaced by NAT and sends this reply message to your computer. 7.
N150 4-Port Wireless Router JNR1010 2. Your router receives the request message and looks in its rules table for any rules covering the disposition of incoming port 80 traffic. Your port forwarding rule specifies that incoming port 80 traffic should be forwarded to local IP address 192.168.1.123. Therefore, your router modifies the destination information in the request message. The destination address is replaced with 192.168.1.123. Your router then sends this request message to your local network. 3.
N150 4-Port Wireless Router JNR1010 Set Up Port Forwarding to Local Servers Using the port forwarding feature, you can allow certain types of incoming traffic to reach servers on your local network. For example, you might want to make a local web server, FTP server, or game server visible and available to the Internet. Use the Port Forwarding screen to configure the router to forward specific incoming protocols to computers on your local network.
N150 4-Port Wireless Router JNR1010 Add a Custom Service To define a service, game, or application that does not appear in the Service Name list, first determine which port number or range of numbers the application uses. You can usually get this information by contacting the publisher of the application or user groups or newsgroups. To add a custom service: 1. Select Advanced > Advanced Setup > Port Forwarding/Port Triggering. 2. Select Port Forwarding as the service type. 3.
N150 4-Port Wireless Router JNR1010 Edit or Delete a Port Forwarding Entry To edit or delete a port forwarding entry: 1. In the table, select the radio button next to the service name. 2. Click Edit Service or Delete Service. Application Example: Making a Local Web Server Public If you host a web server on your local network, you can use port forwarding to allow web requests from anyone on the Internet to reach your web server. To make a local web server public: 1.
N150 4-Port Wireless Router JNR1010 Port forwarding creates a static mapping of a port number or range to a single local computer. Port triggering can dynamically open ports to any computer that needs them and can close the ports when they are no longer needed.
N150 4-Port Wireless Router JNR1010 5. Click Add Service to display the following screen: 6. In the Service Name field, type a descriptive service name. 7. In the Service User list, select Any (the default) to allow this service to be used by any computer on the Internet. Otherwise, select Single address and enter the IP address of one computer to restrict the service to a particular computer. 8. Select the service type, either TCP or UDP or both (TCP/UDP). If you are not sure, select TCP/UDP. 9.
N150 4-Port Wireless Router JNR1010 registers your new IP address. If your host name is hostname, for example, you can reach your router at http://hostname.dyndns.org. On the Advanced tab, select Advanced Setup > Dynamic DNS to display the following screen: To set up Dynamic DNS: 1. Register for an account with one of the Dynamic DNS service providers whose names appear in the Service Provider list. For example, for DynDNS.org, select www.dyndns.org. 2. Select the Use a Dynamic DNS Service check box.
N150 4-Port Wireless Router JNR1010 Static Routes Static routes provide additional routing information to your router. Typically, you do not need to add static routes. You configure static routes only for unusual cases such as multiple routers or multiple IP subnets on your network. As an example of when a static route is needed, consider the following case: • Your primary Internet access is through a cable modem to an ISP.
N150 4-Port Wireless Router JNR1010 If you select the Private check box, the static route is not reported in RIP. 4. Select the Active check box to make this route effective. 5. Type the destination IP address of the final destination. 6. Type the IP subnet mask for this destination. If the destination is a single host, type 255.255.255.255. 7. Type the gateway IP address. The gateway IP address must be a router on the same LAN segment as the N150 4-Port Wireless Router. 8.
N150 4-Port Wireless Router JNR1010 3. In the Allow Remote Access By section, specify the external IP addresses to be allowed to access the router’s remote management, as follows: • To allow access from a single IP address on the Internet, select Only This Computer. Enter the IP address that will be allowed access. • To allow access from a range of IP addresses on the Internet, select IP Address Range. Enter a beginning and ending IP address to define the allowed range.
N150 4-Port Wireless Router JNR1010 To enable Universal Plug and Play: 1. Select Advanced > Advanced Setup > UPnP. The UPnP screen displays. 2. Configure the UPnP settings, as follows: • Turn UPnP On. UPnP can be enabled or disabled for automatic device configuration. The default setting for UPnP is disabled. If this check box is not selected, the router does not allow any device to automatically control the resources, such as port forwarding (mapping) of the router. • Advertisement Period.
N150 4-Port Wireless Router JNR1010 Traffic Meter Traffic metering allows you to monitor the volume of Internet traffic passing through your router’s Internet port. With the Traffic Meter utility, you can set limits for traffic volume, set a monthly limit, and get a live update of traffic usage. To monitor Internet traffic: 1. Click Advanced > Advanced Setup > Traffic Meter to display the following screen: 2. To enable the Traffic Meter, select the Enable Traffic Meter check box. 3.
8. Troubleshooting 8 This chapter provides information to help you diagnose and solve problems you might have with your router. If you do not find the solution here, check the NETGEAR support site at http://support.netgear.com for product and contact information.
N150 4-Port Wireless Router JNR1010 Quick Tips This section describes tips for troubleshooting some common problems Sequence to Restart Your Network Be sure to restart your network in this sequence: 1. Turn off and unplug the modem. 2. Turn off the router and computers. 3. Plug in the modem and turn it on. Wait 2 minutes. 4. Turn on the router and wait 2 minutes. 5. Turn on the computers. Check Ethernet Cable Connections Make sure that the Ethernet cables are securely plugged in.
N150 4-Port Wireless Router JNR1010 Troubleshooting with the LEDs After you turn on power to the router, the following sequence of events should occur: 1. When power is first applied, verify that the Power LED is on. 2. After approximately 30 seconds, verify the following: • The Power LED is solid green. • The Internet LED is on. • A numbered Ethernet port LED is on for any local port that is connected to a computer.
N150 4-Port Wireless Router JNR1010 Wireless LED Is Off If the Wireless LEDs stay off, check to see if the Wireless On/Off button on the router has been pressed. This button turns the wireless radios in the router on and off. The Wireless LEDs are lit when the wireless radio is turned on.
N150 4-Port Wireless Router JNR1010 Cannot Access the Internet If you can access your router but not the Internet, check to see if the router can obtain an IP address from your Internet service provider (ISP). Unless your ISP provides a fixed IP address, your router requests an IP address from the ISP. You can determine whether the request was successful using the Router Status screen. To check the WAN IP address: 1. Start your browser, and select an external site such as www.netgear.com. 2.
N150 4-Port Wireless Router JNR1010 Your Router Can Obtain an IP Address from the ISP But Cannot Access the Internet If your router can obtain an IP address, but your computer is unable to load any web pages from the Internet, the problem might be one of the following: • Your computer might not recognize any DNS server addresses. A DNS server is a host on the Internet that translates Internet names (such as www addresses) to numeric IP addresses.
N150 4-Port Wireless Router JNR1010 Troubleshooting Internet Browsing If your router can obtain an IP address but your computer is unable to load any web pages from the Internet, check the following: • Your computer might not recognize any DNS server addresses. A DNS server is a host on the Internet that translates Internet names (such as www addresses) to numeric IP addresses. Typically, your ISP provides the addresses of one or two DNS servers for your use.
N150 4-Port Wireless Router JNR1010 Wireless Connectivity If you are having trouble connecting wirelessly to the router, try to isolate the problem, as follows: • Does the wireless device or computer that you are using find your wireless network? If not, check the WiFi LED on the front of the router. It should be lit. If it is not, you can press the WiFi On/Off button on the side of the router to turn the router’s wireless radio back on.
N150 4-Port Wireless Router JNR1010 Troubleshoot Your Network Using the Ping Utility Most network devices and routers contain a ping utility that sends an echo request packet to the designated device. The device then responds with an echo reply. Troubleshooting a network is made easy by using the ping utility in your computer or workstation. Test the LAN Path to Your Router You can ping the router from your computer to verify that the LAN path to your router is set up correctly.
N150 4-Port Wireless Router JNR1010 Test the Path from Your Computer to a Remote Device After verifying that the LAN path works correctly, test the path from your computer to a remote device. To test the path from a Windows computer: 1. From the Windows toolbar, click the Start button and select Run. 2. In the Windows Run window, type the following: ping -n 10 is the IP address of a remote device such as your ISP’s DNS server.
A. Supplemental Information A This appendix provides factory default settings and technical specifications for the N150 4-Port Wireless Router JNR1010. Factory Settings You can return the router to its factory settings. Insert the end of a paper clip or a similar object to press and hold the Reset button on the back of the router for at least 7 seconds. The router resets, and returns to the factory configuration settings shown in the following table. Table 3.
N150 4-Port Wireless Router JNR1010 Table 3.
N150 4-Port Wireless Router JNR1010 Table 4. JNR1010 Router specifications (Continued) Feature Description Data encoding standards IEEE 802.11b/g/n 2.4GHz Maximum computers per wireless network Limited by the amount of wireless network traffic generated by each node (typically 50–70 nodes). Operating frequency range 802.11 security 2.412–2.462 GHz (US) 2.412–2.
B. Notification of Compliance NETGEAR Wireless Routers, G ateways, APs B Regulatory Compliance Information Note: This section includes user requirements for operating this product in accordance with National laws for usage of radio spectrum and operation of radio devices. Failure of the end-user to comply with the applicable requirements may result in unlawful operation and adverse action against the end-user by the applicable National regulatory authority.
N150 4-Port Wireless Router JNR1010 Español [Spanish] Por medio de la presente NETGEAR Inc. declara que el Radiolan cumple con los requisitos esenciales y cualesquiera otras disposiciones aplicables o exigibles de la Directiva 1999/5/CE. Ελληνική [Greek] ΜΕ ΤΗΝ ΠΑΡΟΥΣΑ NETGEAR Inc. ΔΗΛΩΝΕΙ ΟΤΙ Radiolan ΣΥΜΜΟΡΦΩΝΕΤΑΙ ΠΡΟΣ ΤΙΣ ΟΥΣΙΩΔΕΙΣ ΑΠΑΙΤΗΣΕΙΣ ΚΑΙ ΤΙΣ ΛΟΙΠΕΣ ΣΧΕΤΙΚΕΣ ΔΙΑΤΑΞΕΙΣ ΤΗΣ ΟΔΗΓΙΑΣ 1999/5/ΕΚ. Français [French] Par la présente NETGEAR Inc.
N150 4-Port Wireless Router JNR1010 Íslenska [Icelandic] Hér með lýsir NETGEAR Inc. yfir því að Radiolan er í samræmi við grunnkröfur og aðrar kröfur, sem gerðar eru í tilskipun 1999/5/EC. Norsk [Norwegian] NETGEAR Inc. erklærer herved at utstyret Radiolan er i samsvar med de grunnleggende krav og øvrige relevante krav i direktiv 1999/5/EF. This device is a 2.
Index repeater unit 68 user-defined services 48 connecting wirelessly 7 country setting 32 crossover cable 86 CTS/RTS Threshold 62 custom service (port forwarding) 74 A access remote 80 viewing logs 58 access points 64 accessing remote computer 69 adding custom service 74 priority rules 42 address reservation 40 advertisement period 82 alerts, emailing 51 applications, QoS for online gaming 42 attached devices 22 authentication, required by mail server 51 automatic firmware checking 53 automatic Internet c
N150 4-Port Wireless Router JNR1010 resetting 10 Fastlane 29 firmware version 54 firmware, upgrading 15, 53 fragmentation length 62 fragmented data packets 36 front panel 8 LAN port QoS for 43 LAN setup 37 language setting 32 lease, DHCP 56 LEDs described 9 troubleshooting and 86 local servers, port forwarding to 73 logging in 12, 14 logs emailing 51 viewing 58 G games, online, QoS for 42 gateway IP address 21 Genie, NETGEAR 13 guest networks 28 M H MAC addresses current 55 product label 10 QoS for 44
N150 4-Port Wireless Router JNR1010 port numbers 48 port status 55 port triggering 68, 70, 72, 75 ports,listed, back panel 10 positioning the router 7 Power LED, troubleshooting and 86 PPPoE (PPP over Ethernet) 88 Preamble mode 62 preset security about 25 passphrase 27 pre-shared key 29 primary DNS addresses 21 prioritizing traffic 41 specifications,technical 94 SSID, described 27 static routes 79 status, router, viewing 54 subnet mask 55 system up time 55 T technical specifications 94 technical support
N150 4-Port Wireless Router JNR1010 wireless network settings 27 wireless radio 62 wireless repeating 65, 66 base station 67 repeater unit 68 wireless security options 29 wireless settings 25 checking for correct 85 SSID broadcast 26 WMM (Wi-Fi Multimedia) 41 WPA encryption 29 WPA2 encryption 29 WPA2-PSK encryption 29 WPA-PSK/WPA2-PSK mixed mode 29 WPS button 16 WPS-PSK encryption 29 WPS-PSK+ WPA2-PSK encryption 29 103