
IP Camera and WiFi Automation White Paper

Page 5
White Paper
NETGEAR Auto-IP Surveillance Camera and
Auto-WiFi VLANs on NETGEAR Switches
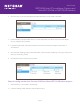
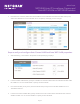
3. If the device is a Camera, select Auto-Camera Mode and click Enable. If the device is WiFi access point,
select Auto-WiFi Mode and click Enable. Once completed, click Apply to save changes.
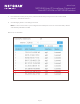
Steps to verify and congure Auto-Camera VLAN and Auto-WiFi VLAN properties:
1. Select Switching > Auto-VLAN > Properties. The Properties page displays.
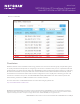
2. In the Auto-WiFi VLAN ID eld, specify the VLAN ID for the Auto-WiFi VLAN. The default Auto-WiFi VLAN
ID is 4086. You can use that VLAN ID or specify another VLAN ID.
3. From the Auto-WiFi priority menu, select the OUI-based priority for the Auto-WiFi VLAN from 0 to 7.
The default value is 7.
4. In the Auto-Camera VLAN ID eld, specify the ID for the Auto-Camera VLAN. The default Auto-Camera
VLAN ID is 4087. You can use that VLAN ID or specify another VLAN ID.