
User Manual


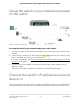

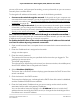
Table Of Contents
- Contents
- 1. Hardware
- 2. Install and Access the Switch in Your Network
- 3. Optimize the Switch Performance
- 4. Use VLANS for Traffic Segmentation
- 5. Manage the Switch in Your Network
- 6. Maintain and Monitor the Switch
- Update the firmware on the switch
- Manage the configuration file
- Return the switch to its factory default settings
- Control access to the device UI
- HTTP and HTTPS management access
- Change or lift access restrictions to the switch
- Manage the DoS prevention mode
- Manage the power saving mode
- Control the port LEDs
- Change the switch device name
- View system information
- Date and time settings
- View switch connections
- View the status of a port
- Power over Ethernet
- 7. Diagnostics and Troubleshooting
- 8. Factory Default Settings and Technical Specifications
- A. Additional Switch Discovery and Access Information

Set up the switch in your network and power
on the switch
Figure 1. Example connections
To set up the switch in your network and power on the switch:
1. Connect any port on the switch to a LAN port on a router that is connected to the
Internet.
2. On the switch, connect your PoE devices to the lowest number ports, starting with
port 1, and then connect any non-PoE devices.
For more information, see PoE considerations for switches that support PoE, PoE+
or PoE++ on page 92.
3. Connect the power adapter to the switch and plug the power adapter into an
electrical outlet.
The power LED lights, and the port LEDs for connected devices light.
Discover the switch's IP address to access its
device UI
Use a computer and a web browser to access the device UI so you can configure and
manage the switch. Choose one of the following methods to discover the switch's IP
User Manual15Install and Access the Switch in
Your Network
8-port Ultra60 PoE++ Multi-Gigabit (2.5G) Ethernet Plus Switch