
User Manual


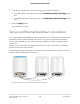
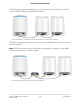
Table Of Contents
- Contents
- 1. Overview
- 2. Connect to Your Network and Access the Router
- 3. Manage the Mobile Broadband Connection
- Internet connection over mobile broadband
- Orbi features that do not apply to a mobile broadband connection
- Use the Setup Wizard to detect the mobile broadband Internet connection
- Set up automatic failover
- Change the Internet connection mode to wired Internet only or mobile broadband only
- Change the LTE provider’s access point name
- Change the mobile broadband network mode
- Configure the mobile broadband PDP, authentication method, and credentials
- Enter the PIN or PUK
- Change the roaming setting
- 4. Specify the Wired Internet Settings
- Use the Setup Wizard
- Manually set up the Internet connection
- Manage an IPv6 Internet connection
- Requirements for entering IPv6 addresses
- Specify IPv6 Internet connections
- Use auto detection for an IPv6 Internet connection
- Use auto configuration for an IPv6 Internet connection
- Set up an IPv6 6to4 tunnel Internet connection
- Set up an IPv6 6rd tunnel Internet connection
- Set up an IPv6 pass-through Internet connection
- Set up an IPv6 fixed Internet connection
- Set up an IPv6 DHCP Internet connection
- Set up an IPv6 PPPoE Internet connection
- Change the MTU size
- 5. Control Access to the Internet
- Enable Circle smart parental controls
- Activate and manage NETGEAR Armor using the Orbi app
- Allow or block access to your network
- Use keywords to block Internet sites
- Delete keywords that are used to block Internet sites
- Avoid blocking on a trusted computer
- Block services from the Internet
- Schedule when to block Internet sites and services
- Set up security event email notifications
- 6. Optimize Performance
- 7. Specify Network Settings
- Change the function of the WAN/LAN1 port
- View or change WAN settings
- Change the LAN TCP/IP settings
- Manage Dynamic DNS
- Set up a default DMZ server
- Change the router’s device name
- Use the router as a DHCP server
- Disable the DHCP server feature in the router
- Manage reserved LAN IP addresses
- Manage custom static routes
- Specify basic WiFi settings
- Change the WiFi password or security level
- Set up a guest WiFi network
- View or change advanced WiFi settings
- Use the router as a WiFi access point only
- Set up router mode
- Set up a bridge for a port group or VLAN tag group
- 8. Manage Your Network
- Update the firmware on the router
- Change the admin password
- Enable admin password reset
- Reset the admin password
- View router status and usage information
- Check the mobile broadband Internet connection status
- Check the wired Internet connection status
- Display Internet port statistics
- View and manage logs of router activity
- View devices connected to the network
- Edit device information on the Attached Devices page
- Monitor Internet traffic
- Set your time zone, adjust for daylight saving time, or change the NTP server
- Manage the router configuration file
- 9. Use VPN to Access Your Network
- 10. Customize Internet Traffic Rules for Ports
- 11. Set Up and Manage an Optional Orbi Satellite
- Orbi AC satellite LED behavior
- Place your satellite
- Sync an add-on satellite
- Log in to your router and add a satellite to your network
- Manually update satellite firmware
- Generate a new backhaul password
- View the satellite status
- View satellites connected to the network or edit satellite information
- Enable or disable daisy-chain topology
- Set up an Ethernet backhaul connection
- Manage the Orbi Outdoor Satellite LED lighting
- 12. Troubleshooting
- 13. Supplemental Information

Orbi AC satellite LED behavior
An Orbi AC satellite has a Power LED on the back and a Ring LED on the top.
The following table describes the LED behavior.
Note: The Orbi AC satellite model RBW30 does not include a Power LED.
Table 3. LED behavior for Orbi AC satellite
DescriptionLED color
Router is booting or Sync (WPS) button has been pushed.Pulsing white
Internet connection is established.Solid blue
Unable to connect to internet.Solid amber
The satellite’s firmware is corrupted.Pulsing red
88% to 99% of data is used.White and orange
pulse
100%+ of data is used.White and red pulse
Power is not suppliedOff
Place your satellite
Your satellite must be within range of your router’s WiFi signal in order for it to sync with
the router. Use the satellite’s ring LED to help you determine where to place your satellite.
Sync an add-on satellite
If you already set up the router and are adding an optional add-on satellite (sold
separately), follow these steps.
To sync your add-on satellite:
1. Place your satellite.
Make sure that your satellite is within range of your router’s WiFi signal.
2. Connect the satellite to a power source.
User Manual131Set Up and Manage an Optional
Orbi Satellite
Orbi LTE Router Model LBR20