
Owner's Manual


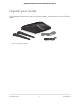
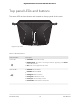
Table Of Contents
- User Manual
- Contents
- 1. Hardware Setup
- 2. Connect to the network and access the router
- 3. Specify Your Internet Settings
- Use the Internet Setup Wizard
- Manually set up the Internet connection
- Specify IPv6 Internet connections
- Requirements for entering IPv6 addresses
- Use auto detect for an IPv6 Internet connection
- Set up an IPv6 6to4 tunnel Internet connection
- Set up an IPv6 pass-through Internet connection
- Set up an IPv6 fixed Internet connection
- Set up an IPv6 DHCP Internet connection
- Set up an IPv6 PPPoE Internet connection
- Use auto config for an IPv6 Internet connection
- Set up an IPv6 6rd Internet connection
- Manage the MTU size
- 4. Control Access to the Internet
- 5. Manage Network Settings
- View or change the WAN settings
- Set up a default DMZ server
- Change the Router’s Device Name
- Change the LAN TCP/IP settings
- Specify the IP addresses that the router assigns
- Disable the DHCP server feature in the router
- Manage reserved LAN IP addresses
- Use the WPS Wizard for WiFi connections
- Specify basic WiFi settings
- Change the WiFi mode
- Change the Transmission Power Control
- Change the WiFi password or the WiFi security
- Set up a guest WiFi network
- Enable or disable the WiFi radios
- Set up a WiFi schedule
- Specify WPS settings
- Set up the router as a WiFi access point
- Set up a bridge for a port group or VLAN tag group
- Manage custom static routes
- Enable or disable implicit beamforming
- Enable or disable MU-MIMO
- Enable or disable AX WiFi
- Enable bridge mode
- 6. Optimize Performance
- 7. Manage Your Router
- Update the router firmware
- Change the admin password
- Enable admin password recovery
- Recover the admin password
- View information about the router and the Internet and WiFi settings
- Display the statistics of the Internet port
- Check the Internet connection status
- View and manage logs of router activity
- View devices currently on the network
- Monitor Internet traffic
- Manage the router configuration file
- Manage remote access
- Connect to your router with Anywhere Access
- Turn off the router LEDs
- Set your time zone
- Specify ReadyDLNA media server settings
- Return the router to its factory default settings
- 8. Share USB Storage Devices Attached to the Router
- USB device requirements
- Connect a USB storage device to the router
- Access a storage device connected to the router from a Windows-based computer
- Map a USB device to a Windows network drive
- Access a storage device that is connected to the router from a Mac
- Enable FTP access within your network
- View network folders on a storage device
- Add a network folder on a USB storage device
- Edit a network folder on a USB storage device
- Safely remove a USB storage device
- 9. Use Dynamic DNS to Access USB Storage Devices Through the Internet
- 10. Use VPN to Access Your Network
- 11. Manage port forwarding and port triggering
- 12. Troubleshooting
- 13. Supplemental Information
- Sim Card Kit

Contents
Chapter 1 Hardware Setup
Unpack your router...............................................................................9
Top panel LEDs and buttons.............................................................10
Rear panel............................................................................................12
Router label.........................................................................................13
Attach and position the antennas.....................................................13
Position your router............................................................................14
Wall-Mount Your Router....................................................................15
Cable your router and connect it to a modem...............................16
Set up the LAX20 using a SIM card..................................................16
Chapter 2 Connect to the network and access the router
Connect to the network.....................................................................19
Connect to the network using a wired connection....................19
Find and connect to the WiFi network........................................19
WiFi connection using WPS..........................................................19
Types of logins....................................................................................20
Use a web browser to access the router..........................................20
Automatic Internet Setup..............................................................20
Log in to the router........................................................................22
Install and manage your router with the Nighthawk app..............22
Change the language........................................................................23
Chapter 3 Specify Your Internet Settings
Use the Internet Setup Wizard..........................................................25
Manually set up the Internet connection.........................................25
Specify an Internet connection without a login..........................25
Specify an Internet connection that uses a login.......................27
Configure APN settings for 4G LTE.............................................28
Change the 4G LTE IP address range.........................................29
Enable the SIM PIN security feature on the 4G mobile router..29
Specify IPv6 Internet connections....................................................30
Requirements for entering IPv6 addresses.................................31
Use auto detect for an IPv6 Internet connection........................31
Set up an IPv6 6to4 tunnel Internet connection.........................33
Set up an IPv6 pass-through Internet connection......................34
3