
Owner's Manual


genie Advanced Home
48
N300 Wireless Router JWNR2000v3
• Subnet mask
• Gateway IP address (the router’s LAN IP address)
• Primary DNS server (if you entered a primary DNS address in the Basic Settings screen;
otherwise, the router’s LAN IP address)
• Secondary DNS server (if you entered a secondary DNS address in the Basic Settings
screen)
To specify the pool of IP addresses that the modem router assigns:
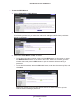
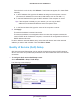
1. Select ADVANCED > Setup > LAN Setup.
2. Make sure that the Use Router as DHCP Server check box is selected.
3. Specify the range of IP addresses.
For example, using the default addressing scheme, define a range between 192.168.1.2
and 192.168.1.254, although you might want to save part of the range for devices with
fixed addresses.
• In the Starting IP Address field, specify the start of the range for the pool of IP address
in the same subnet as the modem router.
• In the Ending IP Address field, specify the end of the range for the pool of IP address
in the same subnet as the modem router.
4. Click Apply.
Your changes are saved.
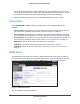
To disable the DHCP Server feature in the modem router:
1. Select ADVANCED > LAN Setup.
2. Clear the Use Router as DHCP Server check box.
3. Click Apply.
4. If no DHCP server is on your network, set your computers’ IP addresses manually so that
they can access the modem router.
Address Reservation
When you specify a reserved IP address for a computer on the LAN, that computer always
receives the same IP address each time it accesses the router’s DHCP server. Assign
reserved IP addresses to computers or servers that require permanent IP settings.
To reserve an IP address:
1. Select ADVANCED > Setup > LAN Setup.
2. In the Address Reservation section of the screen, click the Add button.
The Address Reservation screen displays.
3. If the device is in the Address Reservation Table, select its radio button.
The information from the Address Reservation Table populates the IP Address, MAC
Address, and Device Name fields.