N600 Wireless Dual Band Router JNDR3000 User Manual June 2013 202-11233-01 350 East Plumeria Drive San Jose, CA 95134 USA
N600 Wireless Dual Band Router JNDR3000 Support Thank you for selecting NETGEAR products. After installing your device, locate the serial number on the label of your product and use it to register your product at https://my.netgear.com. You must register your product before you can use NETGEAR telephone support. NETGEAR recommends registering your product through the NETGEAR website. For product updates and web support, visit http://support.netgear.com. Phone (US & Canada only): 1-888-NETGEAR.
Contents Chapter 1 Hardware Setup Unpack Your Router . . . . . . . . . . . . . . . . . . . . . . . . . . . . . . . . . . . . . . . . . . . 8 Prepare the Router . . . . . . . . . . . . . . . . . . . . . . . . . . . . . . . . . . . . . . . . . . 8 Hardware Features. . . . . . . . . . . . . . . . . . . . . . . . . . . . . . . . . . . . . . . . . . . 11 Front and Top Panel. . . . . . . . . . . . . . . . . . . . . . . . . . . . . . . . . . . . . . . . 11 Back Panel . . . . . . . . . . . . . . . . . . . . . . .
N600 Wireless Dual Band Router JNDR3000 Chapter 4 NETGEAR genie ADVANCED Home NETGEAR genie ADVANCED Home Screen . . . . . . . . . . . . . . . . . . . . . . 42 Internet Connection Setup Wizard . . . . . . . . . . . . . . . . . . . . . . . . . . . . . . . 42 WPS Wizard . . . . . . . . . . . . . . . . . . . . . . . . . . . . . . . . . . . . . . . . . . . . . . . . 43 WAN Setup. . . . . . . . . . . . . . . . . . . . . . . . . . . . . . . . . . . . . . . . . . . . . . . . . 44 Default DMZ Server . . . . . . .
N600 Wireless Dual Band Router JNDR3000 Change the Password . . . . . . . . . . . . . . . . . . . . . . . . . . . . . . . . . . . . . . . .85 Password Recovery . . . . . . . . . . . . . . . . . . . . . . . . . . . . . . . . . . . . . . . . . . 86 Chapter 8 Advanced Settings Advanced Wireless Settings. . . . . . . . . . . . . . . . . . . . . . . . . . . . . . . . . . . .88 Control the Wireless Radio . . . . . . . . . . . . . . . . . . . . . . . . . . . . . . . . . . .89 Set Up a Wireless Schedule . . . .
N600 Wireless Dual Band Router JNDR3000 Incorrect Date or Time . . . . . . . . . . . . . . . . . . . . . . . . . . . . . . . . . . . . . . . 124 Wireless Connectivity . . . . . . . . . . . . . . . . . . . . . . . . . . . . . . . . . . . . . . . . 124 Wireless Signal Strength . . . . . . . . . . . . . . . . . . . . . . . . . . . . . . . . . . . . . 124 Restore the Factory Settings and Password . . . . . . . . . . . . . . . . . . . . . . 125 Troubleshoot Your Network Using the Ping Utility . . . . . . . . .
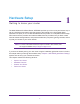
1. Hardware Setup Get t ing to kno w yo ur r out er 1 The N600 Wireless Dual Band Router JNDR3000 provides you with an easy and secure way to set up a wireless home network with fast access to the Internet over a high-speed digital subscriber line (DSL) or from a cable broadband service provider.
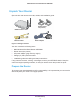
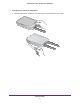
N600 Wireless Dual Band Router JNDR3000 Unpack Your Router Open the box and remove the router, cables, and installation guide. Router stand two pieces) N600 wireless router Ethernet cable Power adapter Figure 1.
N600 Wireless Dual Band Router JNDR3000 To prepare your router for installation: 1. Carefully peel off the protective film covering the top and sides of your router.
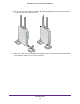
N600 Wireless Dual Band Router JNDR3000 2. Set up your router by inserting the tabs of the stand (supplied with your router) into the slots on the bottom of your router as shown. 3. Place your router in an area suitable for installation (near an AC power outlet and accessible to the Ethernet cables for your wired computers).
N600 Wireless Dual Band Router JNDR3000 Hardware Features Before you cable your router, take a moment to become familiar with the label and the front and back panels. Pay particular attention to the LEDs on the front panel. Front and Top Panel The router front panel has the status LEDs and the top panel has the buttons shown in the following figures. WPS button Wireless On/Off button WPS LED USB LED LAN Ports 1–4 LEDs Internet LED 5 GHz Wireless LED 2.4 GHz Wireless LED Power/Test LED Figure 2.
N600 Wireless Dual Band Router JNDR3000 Table 1. Front panel LED descriptions LED Description WPS • • • Solid green. Wireless security is enabled. Blinking green. The router is using WPS to add a wireless device to the network. Off. No WPS connection exists. • • Solid green. The USB drive is properly mounted. Off. No USB drive is detected. The USB drive is missing or not mounted correctly. • • • Solid green. The LAN port has detected a 1,000 Mbps link with an attached device. Solid amber.
N600 Wireless Dual Band Router JNDR3000 Back Panel The back panel has the button and port connections shown in the following figure. USB 2.0 port Restore Factory Settings button. Press and hold this button for about five seconds to reset the router to its factory default settings. Four local area networks (LAN) 10/100 Mbps Ethernet ports for connecting the router to your local computers. Internet/Wide Area Network (WAN) Ethernet port for connecting the router to a cable or DSL modem.
N600 Wireless Dual Band Router JNDR3000 Label The label on the router shows the WPS PIN, login information, MAC address, and serial number. Position Your Router The router lets you access your network from anywhere within the operating range of your wireless network. However, the operating distance or range of your wireless connection can vary significantly depending on the physical placement of your router.
N600 Wireless Dual Band Router JNDR3000 Cable Your Router Refer to the installation guide that came in the router box for cabling information.
2. Getting Started with NETGEAR genie 2 C onnec ting to th e ro ut er This chapter explains how to use NETGEAR genie to set up your router after you complete cabling as described in the installation guide and in the previous chapter in this book.
N600 Wireless Dual Band Router JNDR3000 Router Setup Preparation You can set up your router with the NETGEAR genie automatically, or you can use the Genie menus and screens to set up your router manually. However, before you start the setup process, you need to have your ISP information on hand and make sure the laptops, PCs, and other devices in the network have the settings described here.
N600 Wireless Dual Band Router JNDR3000 • Wireless network key or password. Your router is preset with a unique wireless network name (SSID) and password for wireless access. This information is on the label at the bottom of your router. NETGEAR genie Setup NETGEAR genie runs on any device with a web browser. It is the easiest way to set up the router because it automates many of the steps and verifies that those steps have been successfully completed. It takes about 15 minutes to complete.
N600 Wireless Dual Band Router JNDR3000 • Close and reopen the browser to make sure that the browser does not cache the previous page. • Browse to http://www.routerlogin.net. • If the computer is set to a static or fixed IP address (this is uncommon), change it to obtain an IP address automatically from the router. If the router does not connect to the Internet: 1. Review your settings to be sure that you have selected the correct options and typed everything correctly. 2.
N600 Wireless Dual Band Router JNDR3000 Upgrade Router Firmware When you set up your router and are connected to the Internet, the router automatically checks for you to see if newer firmware is available. If it is, a message is displayed on the top of the screen. For more information about upgrading firmware, see Upgrade the Router Firmware on page 77. To upgrade the firmware: 1. Click the message that tells you new firmware is available. During the firmware upgrade, you cannot access the Internet. 2.
N600 Wireless Dual Band Router JNDR3000 • Home. This dashboard screen displays when you log in to the router. • Internet. Set, update, and check the ISP settings of your router. • Wireless. View or change the wireless settings for your router. • Attached Devices. View the devices connected to your network. • Parental Controls. Download and set up parental controls to prevent objectionable content from reaching your computers. • ReadySHARE.
N600 Wireless Dual Band Router JNDR3000 To use WPS to join the wireless network: 1. Press the WPS button on the router until the LED status changes . 2. Within two minutes, press the WPS button on your wireless device, or follow the WPS instructions that came with the device. The device is now connected to your router. NETGEAR genie App and Mobile genie App The genie app is the easy dashboard for managing, monitoring, and repairing your home network.
N600 Wireless Dual Band Router JNDR3000 The genie mobile app works on your iPhone, iPad, or Android phone: Phone status Information about genie mobile app and the connected router Log in to the router Search NETGEAR support Figure 6.
3. NETGEAR genie Basic Settings Your I ntern et con ne ction and net wor k 3 This chapter contains the following sections: • Internet Setup • Basic Wireless Setup • View Attached Devices • Parental Controls • ReadySHARE USB Storage • Set Up a Guest Network For more information about the ReadySHARE feature on the BASIC Home tab, see Chapter 5, USB Storage.
N600 Wireless Dual Band Router JNDR3000 Internet Setup The Internet Setup screen is where you view or change ISP information. Note: You can use the Setup Wizard to detect the Internet connection and automatically set up the modem router. For more information, see WAN Setup on page 44. To view or change the basic Internet setup: 1. From the BASIC Home screen, select Internet.
N600 Wireless Dual Band Router JNDR3000 For information about the fields that appear on the screen, see Internet Setup If Your ISP Does Not Require a Login on page 28. 3. Enter the settings for the IP address and DNS server. The default settings usually work fine. If you have problems with your connection, check the ISP settings. 4. Click the Apply button to save your settings. 5. Click the Test button to test your Internet connection.
N600 Wireless Dual Band Router JNDR3000 • Internet Service Provider. ISP types. The choices are PPPoE, PPTP, and L2TP. • Login. The login name provided by your ISP. The login name is usually an email address. • Password. The password that you use to log in to your ISP. • Service Name (If Required). If your ISP provided a service name, enter it here. Otherwise, you can leave this field blank. • Connection Mode. The choices are Always On, Dial on Demand, or Manually Connect.
N600 Wireless Dual Band Router JNDR3000 Internet Setup If Your ISP Does Not Require a Login If your ISP does not require a login and you selected No, the following screen displays: Figure 8. ISP does not require a login screen These fields display when no login is required: • Account Name (If required). Enter the account name provided by your ISP. This might also be called the host name. • Domain Name (If required). Enter the domain name provided by your ISP. Internet IP Address.
N600 Wireless Dual Band Router JNDR3000 Router MAC Address. The Ethernet MAC address used by the router on the Internet port. Some ISPs register the MAC address of the network interface card in your computer when your account is first opened. They accept traffic only from the MAC address of that computer. This feature allows your router to use your computer’s MAC address (this is also called cloning). • Use Default Address. Use the default MAC address. • Use Computer MAC Address.
N600 Wireless Dual Band Router JNDR3000 The Wireless Setup screen displays: The screen sections, settings, and procedures are explained in the following sections. 2. Make any changes that are needed. 3. Click the Apply button. Your settings are saved. 4. Set up and test your wireless devices and computers to make sure that they can connect wirelessly.
N600 Wireless Dual Band Router JNDR3000 Region The region is the location where the router is used. Select from the countries in the list. In the United States, the region is fixed to United States and is not changeable. Wireless Network (2.4GHz g/g/n) Note: These settings apply separately to the 2.4 GHz b/g/n and 5 GHz a/n bands. • Enable Wireless Isolation.
N600 Wireless Dual Band Router JNDR3000 A security option is the type of security protocol applied to your wireless network. The security protocol in force encrypts data transmissions and ensures that only trusted devices receive authorization to connect to your network. This section presents an overview of the security options and provides guidance on when to use which option. Although it is possible to set up a guest network without wireless security, NETGEAR does not recommend it.
N600 Wireless Dual Band Router JNDR3000 2. In the Security Options section, select WEP: 3. Select the authentication type. The default is Automatic. Other choices are Open System (any client can authenticate itself to the network) and Shared Key (a passphrase and a four-way challenge is needed for authentication). 4. Select the encryption strength setting, either 64 bit or 128 bit. 5. Enter the four data encryption keys either manually or automatically.
N600 Wireless Dual Band Router JNDR3000 You can change the security settings for your modem router. If you do so, then write down the new settings and store them in a secure place for future reference. To change the WPA settings: 1. Select BASIC > Wireless settings: 1. Under Security Options, select the WPA option you want. 2. In the password field that displays when you select a WPA security option, enter the network key (password) that you want to use. It is a text string from 8 to 63 characters. 3.
N600 Wireless Dual Band Router JNDR3000 The following screen displays: Wired devices are connected to the router with Ethernet cables. Wireless devices have joined the wireless network. The following information is displayed: • # (number). The order in which the device joined the network. • IP Address. The IP address that the router assigned to this device when it joined the network. This number can change if a device is disconnected and rejoins the network. • MAC Address.
N600 Wireless Dual Band Router JNDR3000 The Live Parental Controls screen displays: 2. Click either the Windows Users or Mac Users button. 3. Follow the onscreen instructions to download and install the NETGEAR Live Parental Controls Management utility. After installation, Live Parental Controls automatically starts. 4. Click the Next button, read the note, and click the Next button again to proceed. You are prompted to log in or create a free account.
N600 Wireless Dual Band Router JNDR3000 5. Select the radio button that applies to you and click the Next button. • If you already have an OpenDNS account, leave the Yes radio button selected. • If you do not have an OpenDNS account, select the No radio button. After you log on or create your account, the filtering level screen displays: 6. Select the radio button for the filtering level that you want and click the Next button. 7. Click the Take me to the status screen button.
N600 Wireless Dual Band Router JNDR3000 ReadySHARE USB Storage You can view information about a USB storage device that is connected to the router’s USB port here. From the BASIC Home screen, select ReadySHARE to display the USB Storage (Basic Settings) screen: This screen displays the following: • Network/Device Name. The name used to access the USB device connected to the router. The default is \\readyshare. • Available Network Folders. The folders on the USB device. - Share Name.
N600 Wireless Dual Band Router JNDR3000 You can click the Refresh button to update this screen. For more information about USB storage, see Chapter 5, USB Storage. Set Up a Guest Network Adding a guest network allows visitors at your home to use the Internet without using your wireless security key. You can add a guest network to each wireless network: 2.4 GHz b/g/n and 5.0 GHz a/n. To set up a guest network: 1.
N600 Wireless Dual Band Router JNDR3000 • Allow guest to access My Local Network. If this check box is selected, any user who connects to this SSID has access to your local network, not just Internet access. 3. Give the guest network a name. The guest network name is case-sensitive and can be up to 32 characters. You then manually configure the wireless devices in your network to use the guest network name in addition to the main nonguest SSID. 4. Select a security option from the list.
4. NETGEAR genie ADVANCED Home S pecifying cu sto m se t t ings This chapter contains the following sections: • NETGEAR genie ADVANCED Home Screen • Internet Connection Setup Wizard • WPS Wizard • WAN Setup • LAN Setup • Quality of Service (QoS) Setup Some selections on the ADVANCED Home screen are described in separate chapters: • Guest Network. See Chapter 3, NETGEAR genie Basic Settings. • USB Storage. See Chapter 5, USB Storage. • Security. See Chapter 6, Security. • Administration.
N600 Wireless Dual Band Router JNDR3000 NETGEAR genie ADVANCED Home Screen The genie ADVANCED Home dashboard presents status information. The content is the same as what is on the Router Status screen available from the Administration menu. For more information, see View Router Status on page 78. Figure 9. NETGEAR genie ADVANCED home screen Internet Connection Setup Wizard You can use the Setup Wizard to detect your Internet settings and automatically set up your router.
N600 Wireless Dual Band Router JNDR3000 If you select the No button, you are taken to the Internet Setup screen (see Internet Setup on page 25). 3. Select your location. 4. Click the Next button. The Setup Wizard searches your Internet connection for servers and protocols to determine your ISP configuration. WPS Wizard The WPS Wizard helps you add a WPS-capable client device (a wireless device or computer) to your network.
N600 Wireless Dual Band Router JNDR3000 The following screen lets you select the method for adding the WPS client (a wireless device or computer). 3. Select the radio button for the setup method that you want to use. • Push Button. To use the push button method, either click the WPS button on this screen, or press the WPS button on the side of the router until the LED status changes. Within two minutes, go to the wireless client and press its WPS button to join the network without entering a password.
N600 Wireless Dual Band Router JNDR3000 To view or change the WAN settings: 1. Select ADVNCED > Setup > WAN Setup to view the following screen. 2. Specify the following settings: • Disable Port Scan and DoS Protection. DoS protection protects your LAN against denial of service attacks such as Syn flood, Smurf Attack, Ping of Death, Teardrop Attack, UDP Flood, ARP Attack, Spoofing ICMP, Null Scan, and many others. This should be disabled only in special circumstances. • Default DMZ Server.
N600 Wireless Dual Band Router JNDR3000 games, point-to-point applications, or multimedia applications from functioning. Open NAT provides a much less secured firewall, but allows almost all Internet applications to function. 3. Click the Apply button. Your changes are saved. Default DMZ Server The default DMZ server feature is helpful when you are using some online games and videoconferencing applications that are incompatible with Network Address Translation (NAT).
N600 Wireless Dual Band Router JNDR3000 The best MTU setting for NETGEAR equipment is often just the default value, and changing the value might fix one problem but cause another. Leave the MTU unchanged unless one of these situations occurs: • You have problems connecting to your ISP or other Internet service, and the technical support of either the ISP or NETGEAR recommends changing the MTU setting.
N600 Wireless Dual Band Router JNDR3000 2. In the MTU Size field, enter a new size between 64 and 1500. 3. Click the Apply button. Your changes are saved. LAN Setup The LAN Setup screen allows configuration of LAN IP services such as Dynamic Host Configuration Protocol (DHCP) and Routing Information Protocol (RIP). The router is shipped preconfigured to use private IP addresses on the LAN side and to act as a DHCP server. The router’s default LAN IP configuration is: • LAN IP address. 192.168.1.
N600 Wireless Dual Band Router JNDR3000 The following screen displays: 2. Enter the settings that you want to customize. These settings are described in the following section, LAN Setup Screen Settings. 3. Click the Apply button. Your changes are saved. LAN Setup Screen Settings The following settings are available on the LAN Setup screen. LAN TCP/IP Setup • IP Address. The LAN IP address of the router. • IP Subnet Mask. The LAN subnet mask of the router.
N600 Wireless Dual Band Router JNDR3000 - RIP-1 is universally supported. It is adequate for most networks, unless you have an unusual network setup. - RIP-2 carries more information. Both RIP-2B and RIP-2M send the routing data in RIP-2 format. RIP-2B uses subnet broadcasting. RIP-2M uses multicasting. Use Router as DHCP Server This check box is selected so that the router functions as a Dynamic Host Configuration Protocol (DHCP) server. • Starting IP Address.
N600 Wireless Dual Band Router JNDR3000 To disable the DHCP server feature in the router: 1. Select ADVANCED > Setup > LAN Setup. 2. Clear the Use Router as DHCP Server check box. 3. Click the Apply button. 4. (Optional) If this service is disabled and no other DHCP server is available on your network, set your computers’ IP addresses manually so they can access the router.
N600 Wireless Dual Band Router JNDR3000 Quality of Service (QoS) Setup QoS is an advanced feature that can be used to prioritize some types of traffic ahead of others. The router can provide QoS prioritization over the wireless link and on the Internet connection. WMM QoS for Wireless Multimedia Applications The router supports Wi-Fi Multimedia Quality of Service (WMM QoS) to prioritize wireless voice and video traffic over the wireless link.
N600 Wireless Dual Band Router JNDR3000 3. Click the Apply button. Set Up QoS for Internet Access You can give prioritized Internet access to the following types of traffic: • Specific applications • A specific device connected to the router • A specific device by MAC address To specify prioritization of traffic, you have to create a policy for the type of traffic and add the policy to the QoS Policy table in the QoS Setup screen.
N600 Wireless Dual Band Router JNDR3000 • Automatically check Internet Uplink bandwidth. If you do not know the Internet uplink bandwidth, select this radio button and click the Check button. 4. Select the QoS Rules radio button. 5. Select the QoS by Service radio button. 6. Select an application from the Applications drop-down menu. 7. Select the Priority from the Priority drop-down menu.
N600 Wireless Dual Band Router JNDR3000 4. Select the Fast Track radio button. 5. Select the Turn on Fast Track check box. 6. If the device appears in the MAC Device List, select its radio button. 7. Select how much of your total bandwidth you want your router to reserve for your device from the Trusted Device: bandwidth reserved drop-down menu. 8. Click the Apply button. By default, the WPS button on your router enables you to connect WPS-capable client devices to your network.
N600 Wireless Dual Band Router JNDR3000 2. Select the Enable Internet QoS check box. 3. Select one of the following radio buttons: • Uplink bandwidth Maximum. If you know the maximum uplink bandwidth, select this radio button and fill in the Uplink bandwidth Maximum field. • Automatically check Internet Uplink bandwidth. If you do not know the Internet uplink bandwidth, select this radio button and click the Check button. 4. Select the QoS Rules radio button. 5. Select the QoS by Device radio button. 6.
N600 Wireless Dual Band Router JNDR3000 Your changes are saved. Change the Priority of an Existing QoS Policy To edit a QoS policy: 1. Select ADVANCED > Setup > QoS Setup. 2. Select the QoS policy you want to edit from the QoS Rules list. 3. Click the Edit button. The QoS - Priority Rules screen displays: 4. Select the priority from the Priority drop-down menu. 5. Click the Apply button. Your changes are saved. Delete an Existing QoS Policy To delete a QoS policy: 1.
5. USB Storage A ccessin g a nd co nfig ur ing a USB s t or age drive 5 This chapter describes how to access and configure a USB storage drive attached to your router. Note that the USB port on the router can be used to connect only USB storage devices like flash drives or hard drives. Do not connect computers, USB modems, printers, CD drives, or DVD drives to the router USB port.
N600 Wireless Dual Band Router JNDR3000 USB Drive Requirements The router works with 1.0 and 1.1 (USB Full Speed) and 2.0 (USB High Speed) standards. The approximate USB bus speeds are shown in the following table. Actual bus speeds can vary, depending on the CPU speed, memory, speed of the network, and other variables. Table 3. USB drive speeds Bus Speed per Second USB 1.1 12 Mbits USB 2.0 480 Mbits The router should work with most USB-compliant external flash and hard drives.
N600 Wireless Dual Band Router JNDR3000 File-Sharing Scenarios You can share files on the USB drive for a wide variety of business and recreational purposes. The files can be any Windows, Mac, or Linux file type including text, Word, PowerPoint, Excel, and MP3 files, pictures, and multimedia. USB drive applications include: • Sharing multimedia, such as MP3 files, pictures, and so on, with friends and family who are local or remote. • Sharing resources on your network.
N600 Wireless Dual Band Router JNDR3000 3. Print the files. Share Large Files over the Internet Sending files that are larger than 5 MB can pose a problem for many email systems. The router allows you to share large files such as PowerPoint presentations or .zip files over the Internet. FTP can be used to easily download shared files from the router. Sharing files with a remote colleague involves the following considerations: • There are two user accounts: admin and guest.
N600 Wireless Dual Band Router JNDR3000 The USB Storage (Basic Settings) screen displays: 2. Click the network device name or the share name in your computer’s network folders list. 3. For SMB://readyshare, click the Connect button. Note: If you log in to the router before you connected your USB device, you might not see your USB device in the router screens until you log out and then log back in again.
N600 Wireless Dual Band Router JNDR3000 The following screen displays: 2. Specify access to the USB storage device. • Network/Device Name. The default is readyshare. This is the name used to access the USB device connected to the router. • Workgroup. If you are using a Windows workgroup rather than a domain, the workgroup name is displayed here. The name works only in an operating system that supports NetBIOS, such as Microsoft Windows. • Access Method. The access methods are described here.
N600 Wireless Dual Band Router JNDR3000 Your changes are saved. Available Network Folders You can view the share name, the permissions and access controls on the network folder, the folder name, volume name, total space and free space on your USB drive. To view network folder: 1. Select ADVACNED > USB Storage > Advanced Settings. 2. Scroll down to the Available Network Folder section of the screen. • Share Name. If only one device is connected, the default share name is USB_Storage.
N600 Wireless Dual Band Router JNDR3000 To add a network folder 1. Select ADVANCED> USB Storage > Advanced Settings. 2. Click the Create Network Folder button. If the Add a Network Folder screen does not display, your web browser might be blocking pop-ups. If it is, change the browser settings to allow pop-ups. 3. In the Folder field, browse and select the folder. 4. Fill in the Share Name field. 5. In the Read Access list and the Write Access list, select the settings that you want.
N600 Wireless Dual Band Router JNDR3000 The user name (account name) for All – no password is guest. The password for admin is the same one that is used to log in to the router. By default, it is password. 6. Click the Apply button. The folder is added on the USB device. To edit a network folder: 1. Select ADVANCED> USB Storage > Advanced Settings. 2. Click the Edit button. The Edit Network Folder screen displays the same settings shown in the Add a Network Folder screen. 3.
N600 Wireless Dual Band Router JNDR3000 The USB Drive Approved Devices screen displays: This screen shows the approved USB devices and the available USB devices. You can remove or add approved USB devices. 3. To add an approved USB device, select it from the Available USB Devices list. 4. Click the Add button. 5. Select the Allow only approved devices check box. 6. Click the Apply button. Your changes are saved.
N600 Wireless Dual Band Router JNDR3000 2. Type the account name and password that has access rights to the USB drive. The user name (account name) for All – no password is guest. 3. The directories of the USB drive that your account accesses are displayed, for example, share/partition1/directory1. You can now read and copy files from the USB directory.
6. Security K eeping un wan ted co nt ent out of y our net wor k 6 This chapter explains how to use the basic firewall features of the router to prevent objectionable content from reaching the computers and other devices connected to your network.
N600 Wireless Dual Band Router JNDR3000 Keyword Blocking of HTTP Traffic Use keyword blocking to prevent certain types of HTTP traffic from accessing your network. The blocking can be always or according to a schedule. 1. Select ADVANCED > Security > Block Sites. The following screen displays: 2. Select one of the keyword blocking options: • Per Schedule. Turn on keyword blocking according to the Schedule screen settings. • Always.
N600 Wireless Dual Band Router JNDR3000 3. Click the Delete Keyword button. 4. Click the Apply button. Your changes are saved. You can exempt one trusted computer from blocking and logging. The computer you exempt must have a fixed IP address. To specify a trusted computer: 1. Select ADVANCED > Security > Block Sites. 2. In the Trusted IP Address field, enter the IP address. 3. Click the Apply button. Your changes are saved.
N600 Wireless Dual Band Router JNDR3000 The following screen displays: 2. Select either the Per Schedule or the Always radio button to enable service blocking. If you select Per Schedule, specify a time period in the Schedule screen. For more information, seeSchedule Blocking on page 73. 3. Click the Add button. The Block Services Setup screen displays: 4. From the Service Type list, select the application or service to allow or block.
N600 Wireless Dual Band Router JNDR3000 The list already displays several common services, but you are not limited to these choices. To add any services or applications that do not already appear, select User Defined. 5. If you know that the application uses either TCP or UDP, select the appropriate protocol. If you are not sure, select TCP/UDP (both). 6. Enter the starting and ending port numbers. If the application uses a single port number, enter that number in both fields. 7.
N600 Wireless Dual Band Router JNDR3000 2. Set up the schedule for blocking keywords and services. • Days to Block. Select days on which you want to apply blocking by selecting the appropriate check boxes, or select Every Day to select the check boxes for all days. • Time of Day to Block. Select a start and end time in 24-hour format, or select All Day for 24-hour blocking. 3. Select your time zone from the list.
N600 Wireless Dual Band Router JNDR3000 4. Enter the email address to which logs and alerts are sent in the Send to This E-mail Address field. This email address is also used for the From address. If you leave this field blank, log and alert messages are not sent by email. 5. If your outgoing email server requires authentication, select the My Mail Server requires authentication check box. Fill in the User Name and Password fields for the outgoing email server. 6.
7. 7 Administration Managing yo ur n etwo r k This chapter describes the router settings for administering and maintaining your router and home network.
N600 Wireless Dual Band Router JNDR3000 Upgrade the Router Firmware The router firmware (routing software) is stored in flash memory. You can update the firmware from the Administration menu on the ADVANCED tab. You might see a message at the top of the genie screens when new firmware is available for your product. You can use the Check button on the Router Update screen to check and update to the latest firmware for your product if new firmware is available.
N600 Wireless Dual Band Router JNDR3000 When the upload is complete, your router restarts. The upgrade process typically takes about one minute. Read the new firmware release notes to determine whether you need to reconfigure the router after upgrading. View Router Status To view router status and usage information: Select ADVANCED Home, or select ADVANCED > Administration > Router Status. The following screen displays: Router Information • Hardware Version. The router model. • Firmware Version.
N600 Wireless Dual Band Router JNDR3000 - IP Address. The IP address used by the Ethernet (LAN) port of the router. The default is 192.168.1.1. - DHCP. Identifies whether the router’s built-in DHCP server is active for the LAN-attached devices. Internet Port • MAC Address. The Media Access Control address is the unique physical address used by the Internet (WAN) port of the router. • IP Address. The IP address used by the Internet (WAN) port of the router. If no address is shown or the address is 0.
N600 Wireless Dual Band Router JNDR3000 - Status. The link status of the port. - TxPkts. The number of packets transmitted on this port since reset or manual clear. - RxPkts. The number of packets received on this port since reset or manual clear. - Collisions. The number of collisions on this port since reset or manual clear. - Tx B/s. The current transmission (outbound) bandwidth used on the WAN and LAN ports. - Rx B/s. The current reception (inbound) bandwidth used on the WAN and LAN ports.
N600 Wireless Dual Band Router JNDR3000 • Default Gateway. The IP address for the default gateway that the router communicates with. • DHCP Server. The IP address for the Dynamic Host Configuration Protocol server that provides the TCP/IP configuration for all the computers that are connected to the router. • DNS Server. The IP address of the Domain Name Service server that provides translation of network names to IP addresses. • Lease Obtained. The date and time when the lease was obtained.
N600 Wireless Dual Band Router JNDR3000 • Wireless Isolation. Select this check box only if you want to prevent wireless connections to the router. • Wi-Fi Protected Setup. Indicates whether Wi-Fi Protected Setup is configured for this network. Guest Network (2.4 GHz and 5 GHz) Figure 11. Guest Network (2.4 GHz and 5 GHz) The following settings are displayed: • Name (SSID). The 11N wireless network name (SSID) used by the router. The default names are NETGEAR-Guest and NETGEAR-5G-Guest.
N600 Wireless Dual Band Router JNDR3000 The Logs screen displays. The log screen shows the following information: • Date and time. The date and time the log entry was recorded. • Source IP address. The IP address of the initiating device for this log entry. • Target address. The name or IP address of the website or news group visited or to which access was attempted. • Action. Whether the access was blocked or allowed. To refresh the log screen, click the Refresh button.
N600 Wireless Dual Band Router JNDR3000 Back Up Settings To back up the router’s configuration settings: 1. Select ADVANCED > Administration > Backup Settings. The following screen displays: 2. Click the Back Up button. 3. Choose a location to store the .cfg file that is on a computer on your network. A copy of the current settings is saved. Restore Configuration Settings To restore configuration settings that you backed up: 1. Select ADVANCED > Administration > Backup Settings. 2.
N600 Wireless Dual Band Router JNDR3000 Erase the Current Configuration Settings Under some circumstances (for example, if you move the router to a different network or if you have forgotten the password), you might want to erase the configuration and restore the factory default settings. You can either use the Restore Factory Settings button on the back of the router (see Factory Settings on page 128), or you can click the Erase button in this screen. To erase the configuration settings: 1.
N600 Wireless Dual Band Router JNDR3000 Your changes are saved. Password Recovery NETGEAR recommends that you enable password recovery if you change the password for the router’s user name of admin. You then have an easy way to recover the password if it is forgotten. This recovery process is supported in Internet Explorer, Firefox, and Chrome browsers, but not in the Safari browser. To set up password recovery: 1. Select ADVANCED > Administration > Set Password. 2.
8. 8 Advanced Settings F ine-t un ing yo ur n etw or k This chapter describes the advanced features of your router. This information is for users with a solid understanding of networking concepts who want to set up the router for unique situations such as remote access from the Internet by IP or domain name.
N600 Wireless Dual Band Router JNDR3000 Advanced Wireless Settings You can use this screen to turn the wireless radio on and off, to specify WPS settings, to use AP mode, and to set up a wireless access list. The Fragmentation Length, CTS/RTS Threshold, and Preamble Mode options in this screen are reserved for wireless testing and advanced configuration only. Do not change these settings unless you have a specific reason to do so. To view the Wireless Settings screen: 1.
N600 Wireless Dual Band Router JNDR3000 Enable 20/40 MHz Coexistence. This applies only to the 2.4 GHz band. The 20/40 MHz coexistence function is enabled by default when the wireless mode is set to Up to 300 mbps (40 MHZ), which is required for Wi-Fi certification. This check box is grayed out if the wireless mode is set to Up to 130 Mbps. The router can run in either 40 MHz mode or 20 MHz mode when the wireless mode is set to Up to 300 Mbps.
N600 Wireless Dual Band Router JNDR3000 To turn the wireless radio on or off: 1. Select ADVANCED > Advanced Setup > Wireless Settings. By default, the Enable Wireless Router Radio check box is selected. 2. Select or clear the Enable Wireless Router Radio check box. Clearing this check box turns off the WiFi feature of the wireless router. 3. (Optional) Select the Turn off wireless signal by schedule check box and fill in the fields to specify the times when you do not need a wireless connection.
N600 Wireless Dual Band Router JNDR3000 To configure and enable the wireless schedule: 1. Select ADVANCED > Advanced Setup > Wireless Settings. The Advanced Wireless Settings screen displays. 2. Click the Add a new period button. 3. Use the drop-down lists, radio buttons, and check boxes to set up a period during which you want to turn off the wireless signal. 4. Click the Apply button. The Advanced Wireless Settings screen displays. 5.
N600 Wireless Dual Band Router JNDR3000 By default, the Keep Existing Wireless Settings check box is selected. NETGEAR recommends that you leave this check box selected. If you clear this check box, the next time a new wireless client uses WPS to connect to the router, the router wireless settings change to an automatically generated random SSID and security key. 4. Click the Apply button. Your changes are saved.
N600 Wireless Dual Band Router JNDR3000 You can usually find the MAC address on the label of the wireless device. Tip: You can copy and paste the MAC addresses from the Attached Devices screen into the MAC Address field of this screen. Use each wireless computer or device to join the wireless network. Then each is listed in the Attached Devices screen. 5. Click the Add button. The screen changes back to the list screen. 6. Add each computer or device you want to allow to connect wirelessly. 7.
N600 Wireless Dual Band Router JNDR3000 Wireless repeating is a type of wireless distribution system (WDS). A WDS allows a wireless network to be expanded through multiple access points instead of using a wired backbone to link them. The following figure shows a wireless repeating scenario. Repeater access point Base station access point Figure 12.
N600 Wireless Dual Band Router JNDR3000 To set up a wireless network with WDS, the following conditions have to be met for both access points: • Both access points have to use the same SSID, wireless channel, and encryption mode. • Both access points have to be on the same LAN IP subnet. That is, all the access point LAN IP addresses are in the same network. • All LAN devices (wired and wireless computers) have to be configured to operate in the same LAN network address range as the access points.
N600 Wireless Dual Band Router JNDR3000 • Wireless MAC of this router. This field displays the MAC address for your router for your reference. Enter this MAC address in the corresponding Wireless Repeating Function screen of the other access point you are using. • Wireless Repeater. If your router is the repeater, select this check box. • Disable Wireless Client Association. If your router is the repeater, selecting this check box means that wireless clients cannot associate with it.
N600 Wireless Dual Band Router JNDR3000 The Wireless Repeating Function screen displays. 3. For the frequency you want to use (2.4 GHz or 5 GHz), select the Enable Wireless Repeating Function check box. 4. Select the Wireless Base Station radio button. 5. (Optional) Select the Disable Wireless Client Association check box to prevent wireless clients from associating with the base station and allow LAN client associations only.
N600 Wireless Dual Band Router JNDR3000 Note: If you are using the JNDR3000 base station with a non-NETGEAR router as the repeater, you might need to change more configuration settings. In particular, you should disable the DHCP server function on the wireless repeater AP. To configure the router as a repeater unit: 1. Log in to the router that will be the repeater. 2. Select BASIC > Wireless Settings and verify that the wireless settings match the base unit exactly.
N600 Wireless Dual Band Router JNDR3000 Leave the check box cleared if you prefer wireless clients to be able to associate with the repeater. In the Base Station MAC Address field, enter the MAC addresses for the access point that should function as the base station. 8. Click the Apply button. Your changes are saved. 9. Verify connectivity across the LANs.
N600 Wireless Dual Band Router JNDR3000 • Destination port number. 80, which is the standard port number for a web server process. 3. Your router creates an entry in its internal session table describing this communication session between your computer and the web server at www.example.com. Before sending the web page request message to www.example.
N600 Wireless Dual Band Router JNDR3000 Port Triggering to Open Incoming Ports In the preceding example, requests are sent to a remote computer by your router from a particular service port number, and replies from the remote computer to your router are directed to that port number. If the remote server sends a reply to a different port number, your router does not recognize it and discards it. However, some application servers (such as FTP and IRC servers) send replies to multiple port numbers.
N600 Wireless Dual Band Router JNDR3000 Note: Only one computer at a time can use the triggered application. Port Forwarding to Permit External Host Communications In both of the preceding examples, your computer initiates an application session with a server computer on the Internet. However, you might need to allow a client computer on the Internet to initiate a connection to a server computer on your network.
N600 Wireless Dual Band Router JNDR3000 How Port Forwarding Differs from Port Triggering The following points summarize the differences between port forwarding and port triggering: • Port triggering is used by any computer on your network, although only one computer can use it at a time. • Port forwarding is configured for a single computer on your network. • Port triggering does not require that you know the computer’s IP address in advance. The IP address is captured automatically.
N600 Wireless Dual Band Router JNDR3000 The following screen displays: 2. Leave the Port Forwarding radio button selected as the service type. 3. From the Service Name list, select the service or game that you host on your network. If the service does not appear in the list, see Add a Custom Service on page 104. 4. In the corresponding Server IP Address field, enter the last digit of the IP address of your local computer that provides this service. 5. Click the Add button.
N600 Wireless Dual Band Router JNDR3000 The following screen displays: 4. In the Service Name field, enter a descriptive name. 5. In the Protocol list, select the protocol. If you are unsure, select TCP/UDP. 6. Specify the port settings: • External Port Range. These are the starting number and ending number for the public ports at the Internet interface. For single port forwarding, the number in the External Starting Port and External Ending Port fields can be the same.
N600 Wireless Dual Band Router JNDR3000 Application Example: Making a Local Web Server Public If you host a web server on your local network, you can use port forwarding to allow web requests from anyone on the Internet to reach your web server. To make a local web server public: 1. Assign your web server either a fixed IP address or a dynamic IP address using DHCP address reservation. In this example, your router always gives your web server an IP address of 192.168.1.33. 2.
N600 Wireless Dual Band Router JNDR3000 To set up port triggering, you need to know which inbound ports the application needs. Also, you need to know the number of the outbound port that triggers the opening of the inbound ports. You can usually determine this information by contacting the publisher of the application or user groups or newsgroups. To enable port triggering: 1. Select ADVANCED > Advanced Setup > Port Forwarding/Port Triggering. 2. Select the Port Triggering radio button.
N600 Wireless Dual Band Router JNDR3000 The following screen displays: 3. In the Service Name field, type a descriptive service name. 4. In the Service User list, select Any (the default) to allow this service to be used by any computer on the Internet. Otherwise, select Single address, and enter the IP address of one computer to restrict the service to that particular computer. 5. Select the service type, either TCP or UDP or TCP/UDP (both). If you are not sure, select TCP/UDP. 6.
N600 Wireless Dual Band Router JNDR3000 Your router contains a client that can connect to the Dynamic DNS service provided by DynDNS.org. First visit their website at http://www.dyndns.org and obtain an account and host name that you configure in the router. Then, whenever your ISP-assigned IP address changes, your router automatically contacts the Dynamic DNS service provider, logs in to your account, and registers your new IP address.
N600 Wireless Dual Band Router JNDR3000 As an example of when a static route is needed, consider the following case: • Your primary Internet access is through a cable modem to an ISP. • You have an ISDN router on your home network for connecting to the company where you are employed. This router’s address on your LAN is 192.168.1.100. • Your company’s network address is 134.177.0.0. When you first configured your router, two implicit static routes were created.
N600 Wireless Dual Band Router JNDR3000 If Private is selected, the static route is not reported in RIP. 5. Select the Active check box to make this route effective. 6. Type the IP address of the final destination. 7. Type the IP subnet mask for this destination. If the destination is a single host, type 255.255.255.255. 8. Type the gateway IP address, which has to be a router on the same LAN segment as the router. 9. Type a number between 1 and 15 as the metric value.
N600 Wireless Dual Band Router JNDR3000 The following screen displays: 2. Select the Turn Remote Management On check box. 3. Under Allow Remote Access By, specify the external IP addresses allowed to access the router’s remote management. Note: For enhanced security, restrict access to as few external IP addresses as practical. • To allow access from a single IP address on the Internet, select Only This Computer. Enter the IP address that allows access.
N600 Wireless Dual Band Router JNDR3000 Universal Plug and Play Universal Plug and Play (UPnP) helps devices, such as Internet appliances and computers, to access the network and connect to other devices as needed. UPnP devices can automatically discover the services from other registered UPnP devices on the network.
N600 Wireless Dual Band Router JNDR3000 4. Type the advertisement time to live in hops. The time to live for the advertisement is measured in hops (steps) for each UPnP packet sent. Hops are the steps a packet takes between routes. The number of hops can range from 1 to 255. The default value for the advertisement time to live is 4 hops, which should be fine for most home networks. If you notice that some devices are not being updated or reached correctly, it might be necessary to increase this value. 5.
N600 Wireless Dual Band Router JNDR3000 The following screen displays: 2. Select the Enable Traffic Meter check box. 3. (Optional) Control the volume of Internet traffic. 4. You can use either the traffic volume control feature or the connection time control feature. • Select the Traffic volume control by radio button and then select one of the following options: • - No Limit. No restriction is applied when the traffic limit is reached. - Download only.
N600 Wireless Dual Band Router JNDR3000 • The Internet LED blinks green or amber. • The Internet connection is disconnected and disabled. 8. Click the Apply button. The Internet Traffic Statistics section helps you to monitor the data traffic. Click the Refresh button to update the Traffic Statistics section. Click the Traffic Status button to display more information about the data traffic on your router and to change the poll interval.
9. 9 Troubleshooting This chapter provides information to help you diagnose and solve problems you might have with your router. If you do not find the solution here, visit the NETGEAR support site at http://support.netgear.com for product and contact information.
N600 Wireless Dual Band Router JNDR3000 Quick Tips This section describes tips for troubleshooting some common problems. Sequence to Restart Your Network Be sure to restart your network in this sequence: 1. Turn off and unplug the modem. 2. Turn off the router and computers. 3. Plug in the modem and turn it on. Wait two minutes. 4. Turn on the router and wait two minutes. 5. Turn on the computers. Check Ethernet Cable Connections Make sure that the Ethernet cables are securely plugged in.
N600 Wireless Dual Band Router JNDR3000 Troubleshoot with the LEDs After you turn on power to the router, the following sequence of events should occur: 1. When power is first applied, verify that the Power LED is lit. 2. Verify that the Power/Test LED turns amber within a few seconds, indicating that the self-test is running. 3. After approximately 30 seconds, verify: • The Power/Test LED is solid green. • The Internet LED is lit.
N600 Wireless Dual Band Router JNDR3000 If all LEDs are still lit one minute after power-up: • Cycle the power to see if the router recovers. • Press and hold the Restore Factory Settings button to return the router to its factory settings. See Factory Settings on page 128. If the error persists, you might have a hardware problem and should contact technical support at www.netgear.com/support.
N600 Wireless Dual Band Router JNDR3000 • If you are using an Ethernet-connected computer, check the Ethernet connection between the computer and the router as described in the previous section. • Make sure that your computer’s IP address is on the same subnet as the router. If you are using the recommended addressing scheme, your computer’s address should be in the range of 192.168.1.2 to 192.168.1.254. • If your computer’s IP address is shown as 169.254.x.
N600 Wireless Dual Band Router JNDR3000 If your router is still unable to obtain an IP address from the ISP, the problem might be one of the following: • Your Internet service provider (ISP) might require a login program. Ask your ISP whether they require PPP over Ethernet (PPPoE) or some other type of login. • If your ISP requires a login, the login name and password might be set incorrectly. • Your ISP might check for your computer’s host name.
N600 Wireless Dual Band Router JNDR3000 If all of the steps indicate OK, your PPPoE connection is up and working. If any of the steps indicate Failed, you can attempt to reconnect by clicking the Connect button. The router continues to attempt to connect indefinitely. If you cannot connect after several minutes, you might be using an incorrect service name, user name, or password. There might also be a provisioning problem with your ISP.
N600 Wireless Dual Band Router JNDR3000 • When entering configuration settings, always click the Apply button before moving to another screen or tab, or your changes are lost. • Click the Refresh or Reload button in the web browser. The changes might have occurred, but the old settings might be in the web browser’s cache. Incorrect Date or Time Select Advanced > Security > Schedule to display the current date and time.
N600 Wireless Dual Band Router JNDR3000 • Is your router too far from your computer, or too close? Place your computer near the router, but at least 6 feet away, and see whether the signal strength improves.
N600 Wireless Dual Band Router JNDR3000 • Wrong physical connections For a wired connection, make sure that the numbered LAN port LED is on for the port to which you are connected. Check that the appropriate LEDs are on for your network devices. If your router and computer are connected to a separate Ethernet switch, make sure that the link LEDs are on for the switch ports that are connected to your computer and router.
A.
N600 Wireless Dual Band Router JNDR3000 Factory Settings You can return the router to its factory settings. Use the end of a paper clip or a similar object to press and hold the Restore Factory Settings button on the back of the router for at least five seconds. The router resets and returns to the factory settings. Your device returns to the factory configuration settings shown in the following table. Table 4.
N600 Wireless Dual Band Router JNDR3000 Table 4. Factory default settings (continued) Feature Wireless Default behavior Wireless communication Enabled SSID name See router label Security Enabled Broadcast SSID Enabled Transmission speed Auto* Country/region United States in the US; otherwise varies by region RF channel 2.4 GHz: Auto, 5 GHz: 153(P)+149(S) until region selected Operating mode 2.4 GHz b/g/n: Up to 145 Mbps 5.0 GHz a/n: Up to 300 Mbps Data rate Best Output power Full *.
N600 Wireless Dual Band Router JNDR3000 Technical Specifications Table 5. JNDR3000 Router specifications Feature Description Data and routing protocols TCP/IP, RIP-1, RIP-2, DHCP, PPPoE, PPTP, Bigpond, Dynamic DNS, UPnP, and SMB Power adapter China: Input 180V ~ 240V, 60Hz. Output 12V, 1.5A Dimensions 7.18 in. x 4.58in. x 1.18in (182.4 x 116.4 x 30 mm) Weight 0.61 lbs (0.
B. Notification of Compliance N E T GEAR Dua l Ban d - W ir eles s B Regulatory Compliance Information This section includes user requirements for operating this product in accordance with National laws for usage of radio spectrum and operation of radio devices. Failure of the end-user to comply with the applicable requirements may result in unlawful operation and adverse action against the end-user by the applicable National regulatory authority.
N600 Wireless Dual Band Router JNDR3000 FCC Radio Frequency Interference Warnings & Instructions This equipment has been tested and found to comply with the limits for a Class B digital device, pursuant to Part 15 of the FCC Rules. These limits are designed to provide reasonable protection against harmful interference in a residential installation.
N600 Wireless Dual Band Router JNDR3000 Avertissement: Le dispositif fonctionnant dans la bande 5150-5250 MHz est réservé uniquement pour une utili-sation à l'intérieur afin de réduire les risques de brouillage préjudiciable aux systèmes de satellites mobiles utilisant les mêmes canaux. Les utilisateurs de radars de haute puissance sont désignés utilisateurs principaux (c.-à-d.