
User's Manual


9
2 Install the Wireless PCI adapter
After unpacking the box and determining all the configuration information, you’re ready to install
the wireless PCI adapter.
Install the Wireless PCI adapter
The HA311 Wireless PCI adapter requires a PCI slot in your computer. You must turn off your
computer and open the computer before installing the HA311 Wireless PCI Adapter. You must
install the HA311 Wireless PCI adapter before installing the network driver.
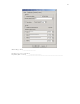
Before you proceed with the installation steps, decide on a name for your network and for each PC
(this information is different from the wireless parameters previously mentioned. Each network
much has the same workgroup name and each PC must have a unique computer name for
Microsoft networking to work properly.)
Install the Adapter Driver (First Time Installation)
Note: If you are reinstalling or upgrading the driver, you may need to contact NETGEAR Technical
Support for advice. You will find contact information in the Support information card that came
with your adapter.
This section explains the installation of the Windows 2000 adapter driver. Other versions of
Microsoft Windows may respond with different dialog boxes, or the dialog boxes may open in a
different sequence than those shown in this guide, but should prompt you for the same
information.
Note: You may need the Windows 2000 CD-ROM and the HA311 Resource CD-ROM ready to use
in the installation.
Note: If the “insert disk” dialog box opens and the ”Please insert the disk labeled Windows 2000…”
message appears at any time during the installation process, insert the Windows 2000 CD-ROM
and click “OK.” Then follow the next step in the instructions.
Note: To install the driver on Windows XP, 200, or NT 4.0, you must log in with Administrator
privilege.
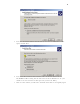
1. If you have chosen to install the card with the PC turned off, turn the power on now. The
new hardware is found. Click “Next”.
2. Insert the HA311 Resource CD-ROM into your CD-ROM drive.
3. In the next window, select “Search for a suitable driver for my device (recommended),”
and then click “Next.”