
System information


84 | Chapter 3: Configuring Stacking Switches
GS752TXS Smart Switch Software Administration Manual
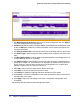
1. Use Management Unit Selected to select the unit to be managed unit and click Apply to
move the management to the selected unit.
2. Unit ID displays the list of units of the stack. Details of the selected unit are displayed. There
is also an ADD option visible only to Admin users which can be used to preconfigure new
members of the stack.
3. Use Change to Switch ID to renumber the switch ID of the selected switch by admin users.
4. Use Switch Type to specify the type of switch hardware when creating a new switch in the
stack.
5. Use Management Status to indicate whether the selected switch is the management unit or
a normal stacking member or on standby.
6. Use Switch Priority to select whether you want this unit to become a management unit in
preference to another unit. The default value for this setting is undefined. If the preference
level is set to zero, then the device cannot become a management unit. A higher value
indicates a higher priority, the maximum value is 15.
7. Click Add to add a unit to the stack with the specific switch type.
8. Click Delete to remove the selected unit from the stack.
9. Click Refresh to update the page with the latest information from the switch.
10. Click Cancel to cancel the configuration on the screen and reset the data on the screen to
the latest value of the switch.
11. Click Apply to apply the new settings to the switch. Configuration changes take effect
immediately.
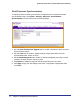
The following table describes the Stack Configuration fields.