
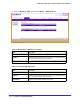
System information


168 | Chapter 5: Configuring Routing
GS752TXS Smart Switch Software Administration Manual
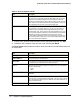
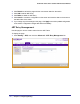
2. Click Refresh to refresh the page with the most current data from the switch.
3. Click Add to add an ARP Entry.
4. Click Delete to delete an ARP Entry.
5. Click Cancel to cancel the configuration on the screen and reset the data on the screen to
the latest value of the switch.
6. If you change any of the settings on the page, click Apply to send the updated configuration
to the switch. Configuration changes take effect immediately.
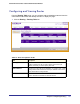
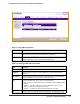
ARP Entry Management
Use this page to remove certain entries from the ARP Table.
To display the page:
1. Click Routing ARP, then click the Advanced ARP Entry Management link.