
User Manual
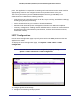
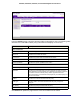
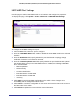


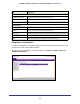
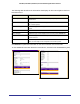
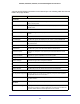
Table Of Contents
- GS728TS, GS728TPS, GS752TS, and GS752TPS Gigabit Smart Switches
- Contents
- 1. Getting Started
- Getting Started with the Smart Switches
- Switch Management Interface
- Connecting the Switch to the Network
- Switch Discovery in a Network with a DHCP Server
- Switch Discovery in a Network without a DHCP Server
- Configuring the Network Settings on the Administrative System
- Web Access
- Smart Control Center Utilities
- Understanding the User Interfaces
- Interface Naming Convention
- 2. Configuring System Information
- 3. Configuring Switching Information
- 4. Configuring Routing
- 5. Configuring Quality of Service
- 6. Managing Device Security
- 7. Monitoring the System
- 8. Maintaining the System
- 9. Accessing Help
- A. Hardware Specifications and Default Values
- B. Configuration Examples
- C. Notification of Compliance
- Index

85
GS728TS, GS728TPS, GS752TS, and GS752TPS Gigabit Smart Switches
LLDP-MED Port Settings
Use this page to enable LLDP-MED mode on an interface and configure its properties.
To display this page, click System > LLDP > Advanced > LLDP-MED Port Settings.
To configure LLDP-MED settings for a port:
1. From the Port field, select the port to configure.
2. From the LLDP-MED Status field, enable or disable the LLDP-MED mode for the selected
interface.
3. From the Notification field, specify whether the port should send a topology change
notification if a device is connected or removed.
4. From the Transmit Optional TLVs field, specify whether the port should transmit optional
type length values (TLVs) in the LLDP PDU frames. If enabled, the following LLDP-MED
TLVs are transmitted:
• MED Capabilities
• Network Policy
• Location Identification
• Extended Power via MDI: PSE
• Extended Power via MDI: PD
• Inventory
5. Click Apply to send the updated configuration to the switch. These changes occur
immediately and the configuration will be saved.
6. Click Cancel to cancel the configuration on the screen and reset the data on the screen to
the latest value of the switch.
7. Click Refresh to update the screen with the current information.