
User Manual
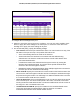


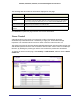
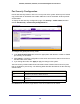
Table Of Contents
- GS728TS, GS728TPS, GS752TS, and GS752TPS Gigabit Smart Switches
- Contents
- 1. Getting Started
- Getting Started with the Smart Switches
- Switch Management Interface
- Connecting the Switch to the Network
- Switch Discovery in a Network with a DHCP Server
- Switch Discovery in a Network without a DHCP Server
- Configuring the Network Settings on the Administrative System
- Web Access
- Smart Control Center Utilities
- Understanding the User Interfaces
- Interface Naming Convention
- 2. Configuring System Information
- 3. Configuring Switching Information
- 4. Configuring Routing
- 5. Configuring Quality of Service
- 6. Managing Device Security
- 7. Monitoring the System
- 8. Maintaining the System
- 9. Accessing Help
- A. Hardware Specifications and Default Values
- B. Configuration Examples
- C. Notification of Compliance
- Index

223
GS728TS, GS728TPS, GS752TS, and GS752TPS Gigabit Smart Switches
• Authenticator PAE State. This field displays the current state of the authenticator
PAE state machine. Possible values are as follows:
• Initialize
• Disconnected
• Connecting
• Authenticating
• Authenticated
• Aborting
• Held
• ForceAuthorized
• ForceUnauthorized
• Backend State. This field displays the current state of the backend authentication
state machine. Possible values are as follows:
• Request
• Response
• Success
• Fail
• Timeout
• Initialize
• Idle
• EAPOL Flood Mode. This field is used to enable or disable the EAPOL Flood mode
per Interface.The default value is Disable.
3. Click Apply to send the updated screen to the switch and cause the changes to occur on
the switch and the changes will be saved.
4. Click Initialize to begin the initialization sequence on the selected port(s). This button is only
selectable if the control mode is auto. If the button is not selectable, it will be grayed out.
When this button is clicked, the action is immediate. It is not required to click Apply for the
action to occur.
5. Click Reauthenticate to begin the reauthentication sequence on the selected port. This
button is only selectable if the control mode is auto. If the button is not selectable, it will be
grayed out. When this button is pressed, the action is immediate. It is not required to click
Apply for the action to occur.
6. Click Cancel to cancel the configuration on the screen and reset the data on the screen to
the latest value of the switch.