
User Manual
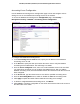
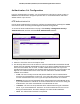

Table Of Contents
- GS728TS, GS728TPS, GS752TS, and GS752TPS Gigabit Smart Switches
- Contents
- 1. Getting Started
- Getting Started with the Smart Switches
- Switch Management Interface
- Connecting the Switch to the Network
- Switch Discovery in a Network with a DHCP Server
- Switch Discovery in a Network without a DHCP Server
- Configuring the Network Settings on the Administrative System
- Web Access
- Smart Control Center Utilities
- Understanding the User Interfaces
- Interface Naming Convention
- 2. Configuring System Information
- 3. Configuring Switching Information
- 4. Configuring Routing
- 5. Configuring Quality of Service
- 6. Managing Device Security
- 7. Monitoring the System
- 8. Maintaining the System
- 9. Accessing Help
- A. Hardware Specifications and Default Values
- B. Configuration Examples
- C. Notification of Compliance
- Index

206
GS728TS, GS728TPS, GS752TS, and GS752TPS Gigabit Smart Switches
TACACS+ Server Configuration
Use the TACACS+ Server Configuration page to configure up to five TACACS+ servers with
which the switch can communicate.
To display the TACACS+ Server Configuration page, click Security > Management Security,
and then click the TACACS+ > Server Configuration link.
To configure TACACS+ server settings:
1. To add a new TACACS+ server, enter its IP address or hostname in the TACACS+
Server field.
2. In the Priority field, specify the order in which the TACACS+ servers are used. A value of 0
is the highest priority.
3. In the Port field, specify the authentication port number through which the TACACS+
session occurs. The default is port 49, and the range is 0–65535.
4. In the Key String field, specify the authentication and encryption key for TACACS+
communications between the switch and the TACACS+ server. This key must match the
encryption used on the TACACS+ server. The valid range is 0–128 characters.
5. In the Connection Timeout field, specify the amount of time that passes before the
connection between the device and the TACACS+ server times out. The field range is from
1 to 30 seconds.
6. If you make changes to the page, or add a new entry, click Apply to apply the changes to
the system.
7. To delete a configured TACACS+ server, select the check box associated with the server
you want to remove, and then click Delete.
8. Click Cancel to abandon the changes.