
User Manual
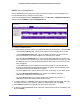
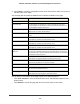
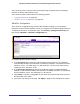

Table Of Contents
- GS728TS, GS728TPS, GS752TS, and GS752TPS Gigabit Smart Switches
- Contents
- 1. Getting Started
- Getting Started with the Smart Switches
- Switch Management Interface
- Connecting the Switch to the Network
- Switch Discovery in a Network with a DHCP Server
- Switch Discovery in a Network without a DHCP Server
- Configuring the Network Settings on the Administrative System
- Web Access
- Smart Control Center Utilities
- Understanding the User Interfaces
- Interface Naming Convention
- 2. Configuring System Information
- 3. Configuring Switching Information
- 4. Configuring Routing
- 5. Configuring Quality of Service
- 6. Managing Device Security
- 7. Monitoring the System
- 8. Maintaining the System
- 9. Accessing Help
- A. Hardware Specifications and Default Values
- B. Configuration Examples
- C. Notification of Compliance
- Index

205
GS728TS, GS728TPS, GS752TS, and GS752TPS Gigabit Smart Switches
The TACACS+ protocol ensures network security through encrypted protocol exchanges
between the device and TACACS+ server.
The TACACS+ folder contains links to the following features:
• Configuring TACACS+ on page 204
• TACACS+ Server Configuration on page 206
TACACS+ Configuration
The TACACS+ Configuration page contains the TACACS+ settings for communication
between the switch and the TACACS+ server you configure via the inband management port.
To display the TACACS+ Configuration page, click Security > Management Security, and
then click the TACACS+ > TACACS+ Configuration link.
To configure global TACACS+ settings:
1. In the Key String field, specify the authentication and encryption key for TACACS+
communications between the GS728TS, GS728TPS, GS752TS, or GS752TPS and the
TACACS+ server. The valid range is 0–128 characters. The key must match the key
configured on the TACACS+ server.
2. In the Connection Timeout field, specify the maximum number of seconds allowed to
establish a TCP connection between the GS728TS, GS728TPS, GS752TS, or GS752TPS
and the TACACS+ server. The valid range is 1–30 seconds.
3. Click Cancel to cancel the configuration on the screen and reset the data on the screen to
the latest value of the switch.
4. If you make any changes to the page, click Apply to apply the new settings to the system.