
User Manual
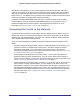
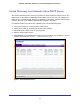
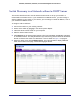
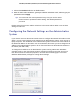
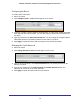
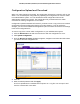
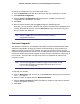
Table Of Contents
- GS728TS, GS728TPS, GS752TS, and GS752TPS Gigabit Smart Switches
- Contents
- 1. Getting Started
- Getting Started with the Smart Switches
- Switch Management Interface
- Connecting the Switch to the Network
- Switch Discovery in a Network with a DHCP Server
- Switch Discovery in a Network without a DHCP Server
- Configuring the Network Settings on the Administrative System
- Web Access
- Smart Control Center Utilities
- Understanding the User Interfaces
- Interface Naming Convention
- 2. Configuring System Information
- 3. Configuring Switching Information
- 4. Configuring Routing
- 5. Configuring Quality of Service
- 6. Managing Device Security
- 7. Monitoring the System
- 8. Maintaining the System
- 9. Accessing Help
- A. Hardware Specifications and Default Values
- B. Configuration Examples
- C. Notification of Compliance
- Index

15
GS728TS, GS728TPS, GS752TS, and GS752TPS Gigabit Smart Switches
7. Choose the Disabled radio box to disable DHCP.
8. Enter the static switch IP address, gateway IP address and subnet mask, and then type your
password and click Apply.
Tip: You must enter the current password every time you use the Smart
Control Center to update the switch setting. The default password is
password.
Please ensure that your PC and the switch are in the same subnet. Make a note of these
settings for later use.
Configuring the Network Settings on the Administrative
System
If you choose not to use the Smart Control Center to configure the network information on the
switch, you can connect directly to the switch from an administrative system, such as a PC or
laptop computer. The IP address of the administrative system must be in the same subnet as
the default IP address on the switch. For most networks, this means you must change the IP
address of the administrative system to be on the same subnet as the default IP address of
the switch (192.168.0.239).
To change the IP address on an administrative system running a Microsoft
®
Windows
®
operating system, open the Internet Protocol (TCP/IP) properties screen that you access
from the Local Area Connection properties, as shown in the following figure. You need
Windows Administrator privileges to change these settings.