
User Manual

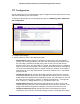
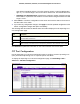
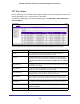
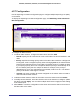
Table Of Contents
- GS728TS, GS728TPS, GS752TS, and GS752TPS Gigabit Smart Switches
- Contents
- 1. Getting Started
- Getting Started with the Smart Switches
- Switch Management Interface
- Connecting the Switch to the Network
- Switch Discovery in a Network with a DHCP Server
- Switch Discovery in a Network without a DHCP Server
- Configuring the Network Settings on the Administrative System
- Web Access
- Smart Control Center Utilities
- Understanding the User Interfaces
- Interface Naming Convention
- 2. Configuring System Information
- 3. Configuring Switching Information
- 4. Configuring Routing
- 5. Configuring Quality of Service
- 6. Managing Device Security
- 7. Monitoring the System
- 8. Maintaining the System
- 9. Accessing Help
- A. Hardware Specifications and Default Values
- B. Configuration Examples
- C. Notification of Compliance
- Index

121
GS728TS, GS728TPS, GS752TS, and GS752TPS Gigabit Smart Switches
3. To modify information for an entry in the OUI list, select the check box next to the OUI prefix,
update the OUI prefix or description, and then click Apply.
4. Click Cancel to cancel the configuration on the screen and reset the data on the screen to
the latest value of the switch.
5. Click Restore Defaults to restore the list to the preconfigured OUIs.
Auto-VoIP
The Auto-VoIP automatically makes sure that time-sensitive voice traffic is given priority over
data traffic on ports that have this feature enabled. Auto-VoIP checks for packets carrying the
following VoIP protocols:
• Session Initiation Protocol (SIP)
• H.323
• Skinny Client Control Protocol (SCCP)
• Media Gateway Control Protocol (MGCP)
VoIP frames that are received on ports that have the Auto-VoIP feature enabled are marked
with CoS traffic class 6.
To display the Auto-VoIP page, click Switching> Auto-VoIP.
To configure Auto-VoIP settings:
1. To configure Auto-VoIP settings for a physical port, click the unit ID of the stack member
with the ports to configure.
2. To configure Auto-VoIP settings for a Link Aggregation Group (LAG), click LAGS.
3. To configure Auto-VoIP settings for both physical ports and LAGs, click ALL.