
User Manual
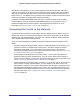
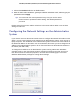
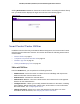
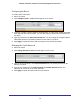
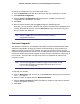
Table Of Contents
- GS728TS, GS728TPS, GS752TS, and GS752TPS Gigabit Smart Switches
- Contents
- 1. Getting Started
- Getting Started with the Smart Switches
- Switch Management Interface
- Connecting the Switch to the Network
- Switch Discovery in a Network with a DHCP Server
- Switch Discovery in a Network without a DHCP Server
- Configuring the Network Settings on the Administrative System
- Web Access
- Smart Control Center Utilities
- Understanding the User Interfaces
- Interface Naming Convention
- 2. Configuring System Information
- 3. Configuring Switching Information
- 4. Configuring Routing
- 5. Configuring Quality of Service
- 6. Managing Device Security
- 7. Monitoring the System
- 8. Maintaining the System
- 9. Accessing Help
- A. Hardware Specifications and Default Values
- B. Configuration Examples
- C. Notification of Compliance
- Index

12
GS728TS, GS728TPS, GS752TS, and GS752TPS Gigabit Smart Switches
Switch Discovery in a Network with a DHCP Server
This section describes how to set up your switch in a network that has a DHCP server. The
DHCP client on the switch is enabled by default. When you connect it to your network, the
DHCP server will automatically assign an IP address to your switch. Use the Smart Control
Center to discover the IP address automatically assigned to the switch.
To install the switch in a network with a DHCP server, use the following steps:
1. Connect the switch to a network with a DHCP server.
2. Power on the switch by connecting its AC-DC power adapter.
3. Install the Smart Control Center on your computer.
4. Start the Smart Control Center.
5. Click Discover for the Smart Control Center to find your switch. You should see a screen
similar to the one shown in Figure 1, Smart Switch Discovery.
Figure 1. Smart Switch Discovery