
User Manual
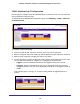
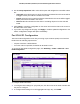

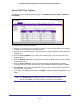
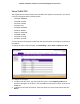
Table Of Contents
- GS728TS, GS728TPS, GS752TS, and GS752TPS Gigabit Smart Switches
- Contents
- 1. Getting Started
- Getting Started with the Smart Switches
- Switch Management Interface
- Connecting the Switch to the Network
- Switch Discovery in a Network with a DHCP Server
- Switch Discovery in a Network without a DHCP Server
- Configuring the Network Settings on the Administrative System
- Web Access
- Smart Control Center Utilities
- Understanding the User Interfaces
- Interface Naming Convention
- 2. Configuring System Information
- 3. Configuring Switching Information
- 4. Configuring Routing
- 5. Configuring Quality of Service
- 6. Managing Device Security
- 7. Monitoring the System
- 8. Maintaining the System
- 9. Accessing Help
- A. Hardware Specifications and Default Values
- B. Configuration Examples
- C. Notification of Compliance
- Index

117
GS728TS, GS728TPS, GS752TS, and GS752TPS Gigabit Smart Switches
To set up Protocol Based VLAN Group Membership:
1. Select the protocol-based VLAN Group ID for which you want to display or configure
data in the Group ID drop-down menu.
The Group Name field identifies the name for the protocol-based VLAN you selected.
2. Click the orange bar to display the ports for a specific switch unit and click the box below a
port number to add it to the protocol-based VLAN group.
Note that each interface can belong to only one group for a given protocol. For example,
if you have already added a port to a group for IP, you cannot add it to another group that
also includes IP, although you could add it to a new group for IPX.
3. Click the Current Members button view the current numbers in the selected protocol based
VLAN Group.
4. Click Cancel to cancel the configuration on the screen and reset the data on the screen to
the latest value of the switch.
If you make any changes to this page, click Apply to send the updated configuration to the
switch. Configuration changes take place immediately.