
Owner's Manual


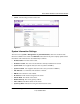


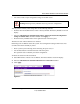

Table Of Contents
- Smart Switch Software User Manual GS748T
- Contents
- About This Manual
- Chapter 1 Switch Management Overview
- Chapter 2 Using the Smartwizard Discovery Utility
- Chapter 3 Basic Web Management
- Chapter 4 Configuring the Switch
- Configuring Ports
- Configuring the Link Aggregation Group (LAG)
- Setting Up SNMP
- Configuring and Creating VLANs
- Enabling Spanning Tree Protocol
- Establishing Multicast Groups
- Enabling Jumbo Frames
- Setting Rate Limits
- Setting QoS Global Configuration
- Enabling Storm Control
- Configuring the IP Access List
- Controlling Switch Access by MAC Address and VLAN ID
- Setting up Mirroring or “Sniffer Ports”
- Viewing Packet Statistics
- Appendix A Specifications and Default Values
- Appendix B Virtual Local Area Networks (VLANs)
- Appendix C Network Cabling

Smart Switch Software User Manual GS748T
3-2 Basic Web Management
v1.0, October 2007
Accessing the Switch Management Home Screen
You can access the home screen for the GS748T Smart Switch from any PC with a web browser.
To start the application:
1. Open a web browser.
2. Enter the device IP address in the address bar.
3. Press Enter. The Login page appears as shown below.
4. Enter the password (the factory default is password) and click Login. The GS748T switch
System > Management home page is displayed as shown below.
The home page shows the navigation tabs across the top which provide a menu for access to the
various configuration functions of the switch. Under the navigation tab headings are the secondary
tabs which allow you to view/change all the components under a specific feature. There are
secondary functions available under the subtabs on the left navigation pane.
The main navigation tabs remain displayed as each successive screen is accessed. From the main
screen, click Help to access customer support.
Within the various browser interface screens, there are several buttons that you can use. Their
names and functions are listed below:
• Refresh. Refreshes the system data to current values on the system.
• Apply. Submits change request to system and refreshes screen data.
• Add. Adds new entries to table information and refreshes screen data.
• Delete. Deletes selected entries from table and refreshes screen data.
Figure 3-1