Application Guide
Manuals
Brands
NETGEAR Manuals
Computers & Accessories
NETGEAR GS748T-500NAS 48-Port Gigabit Ethernet Smart Managed Pro Switch, 4 SFP, ProSAFE Lifetime Protection (GS748T)
11
12
13
14
15
16
17
18
19
20
Page 13 of 20
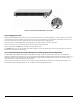
Figure 3-2. Example of Backbone S
witching
1
...
...
11
12
13
14
15
...
...
20