
User Manual


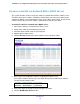
Table Of Contents
- 24-Port Gigabit Smart Managed Pro Switch with PoE+ and 2 SFP Ports Model GS724TPv2
- Contents
- 1. Get Started
- Switch Management Interface Overview
- Change the Default IP Address of the Switch
- Discover a Switch in a Network With a DHCP Server
- Discover a Switch in a Network Without a DHCP Server
- Configure the Network Settings on Your Computer
- Access the Web Browser–Based Management Interface
- About the User Interfaces
- Use a Web Browser to Access the Switch and Log In
- Web Browser–Based Management Interface Device View
- Interface Naming Conventions
- Configure Interface Settings
- Context-Sensitive Help and Access to the Support WebSite
- Register Your Product
- 2. Configure System Information
- 3. Configure Switching
- Configure Port Settings
- Configure Link Aggregation Groups
- Configure VLANs
- Configure a Voice VLAN
- Configure Auto-VoIP
- Configure Spanning Tree Protocol
- Configure Multicast
- View the MFDB Table
- View the MFDB Statistics
- IGMP Snooping Overview
- Configure IGMP Snooping
- Configure IGMP Snooping for Interfaces
- View the IGMP Snooping Table
- Configure IGMP Snooping for VLANs
- Modify IGMP Snooping Settings for a VLAN
- IGMP Snooping Querier Overview
- Configure IGMP Snooping Querier
- Configure IGMP Snooping Querier for VLANs
- Display IGMP Snooping Querier for VLAN Status
- Configure a Static Multicast Group
- Remove a Static Multicast Group
- Configure Multicast Group Membership
- Configure the Multicast Forward All Option
- View and Configure the MAC Address Table
- 4. Configure Quality of Service
- 5. Manage Device Security
- Configure the Management Security Settings
- Configure Management Access
- Configure Port Authentication
- Configure Traffic Control
- Configure Access Control Lists
- Use the ACL Wizard to Create a Simple ACL
- Configure a MAC ACL
- Configure MAC ACL Rules
- Configure MAC Bindings
- View or Delete MAC ACL Bindings in the MAC Binding Table
- Configure an IP ACL
- Configure Rules for a Basic IP ACL
- Configure Rules for an Extended IP ACL
- Configure IP ACL Interface Bindings
- View or Delete IP ACL Bindings in the IP ACL Binding Table
- 6. Monitor the System
- 7. Maintenance
- A. Configuration Examples
- B. Specifications and Default Settings

Get Started
9
NETGEAR 24-Port Gigabit Smart Managed Pro Switch with PoE+ and 2 SFP Ports Model GS724TPv2
Switch Management Interface Overview
The switch provides administrative management options that let you configure, monitor, and
control the network. Using the web browser–based management interface, you can configure
the switch and the network, including the ports, the management VLAN, VLANs for traffic
control, link aggregation for increased bandwidth, quality of service (QoS) for prioritizing
traffic, and network security.
Initial discovery of the switch on the network requires the Smart Control Center (SCC)
program, which runs on a Windows-based computer and is included on the resource CD. You
can also download the SCC program from downloadcenter.netgear.com. If you do not use a
Windows-based computer, get the IP address of the switch from the DHCP server in the
network or use an IP scanner utility.
After discovery, you can configure the switch using the web browser–based management
interface for advanced setup and configuration of features, or the SCC program for very
basic setup. For more information, see the SCC user manual, which you can download from
downloadcenter.netgear.com.
Change the Default IP Address of the Switch
To enable remote management of the switch through a web browser or SNMP, connect the
switch to the network and specify an IP address, subnet mask, and default gateway. The
switch default IP address is 192.168.0.239 and the default subnet mask is 255.255.255.0.
To change the default IP address of the switch, use one of the following methods:
• Dynamic assignment through DHCP. DHCP is enabled on the switch by default. If you
connect the switch to a network with a DHCP server, the switch obtains its network
information automatically. You can use the Smart Control Center to discover the
automatically assigned network information. For more information, see Discover a Switch
in a Network With a DHCP Server on page 10.
• Static assignment through the Smart Control Center. If you connect the switch to a
network that does not include a DHCP server, you can use the Smart Control Center to
assign a static IP address, subnet mask, and default gateway. For more information, see
Discover a Switch in a Network Without a DHCP Server on page 11.
• Static assignment by connecting from a local host. If you do not want to use the
Smart Control Center to assign a static address, you can connect to the switch from a
host (administrative system) in the 192.168.0.0/24 network and change the settings by
using the web browser–based management interface on the switch. For information
about how to set the IP address on the administrative system so that it is in the same
subnet as the default IP address of the switch, see Configure the Network Settings on
Your Computer on page 12.