
User Manual


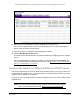
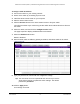


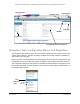
Table Of Contents
- S350 Series 24-Port (PoE+) and 48-Port Gigabit Ethernet Smart Managed Pro Switches with 2 or 4 SFP Ports
- Contents
- 1 Get Started
- Available Publications
- Switch Management and Discovery Overview
- Options to Change the Default IP Address of the Switch
- Discover or Change the Switch IP Address
- About the User Interfaces
- Access the Local Browser Interface
- Change the Language of the Local Browser Interface
- Use the Device View of the Local Browser Interface
- Interface Naming Conventions
- Configure Interface Settings
- Context-Sensitive Help and Access to the Support WebSite
- Access the User Guide Online
- Register Your Product
- 2 Configure System Information
- 3 Configure Switching
- Configure the Port Settings and Maximum Frame Size
- Configure Link Aggregation Groups
- Configure LAG Settings
- Configure LAG Membership
- Set the LACP System Priority
- Set the LACP Port Priority Settings
- Configure VLANs
- Configure VLAN Settings
- Configure VLAN Membership
- View the VLAN Status
- Configure Port PVID Settings
- Configure a MAC-Based VLAN
- Configure Protocol-Based VLAN Groups
- Configure Protocol-Based VLAN Group Membership
- Configure a Voice VLAN
- Configure Auto-VoIP
- Configure Spanning Tree Protocol
- Configure Multicast
- View, Search, or Clear the MFDB Table
- View the MFDB Statistics
- Configure the Auto-Video Multicast Settings
- About IGMP Snooping
- Configure IGMP Snooping
- Configure IGMP Snooping for Interfaces
- View, Search, or Clear the IGMP Snooping Table
- Configure IGMP Snooping for VLANs
- Modify IGMP Snooping Settings for a VLAN
- Disable IGMP Snooping on a VLAN
- Configure a Multicast Router Interface
- Configure a Multicast Router VLAN
- IGMP Snooping Querier Overview
- Configure an IGMP Snooping Querier
- Configure an IGMP Snooping Querier for VLANs
- Display IGMP Snooping Querier for VLAN Status
- View, Search, and Manage the MAC Address Table
- Configure Layer 2 Loop Protection
- 4 Configure Quality of Service
- 5 Manage Device Security
- Configure the Management Security Settings
- Configure Management Access
- Configure Port Authentication
- Set Up Traffic Control
- Configure Access Control Lists
- Use the ACL Wizard to Create a Simple ACL
- Configure a Basic MAC ACL
- Configure MAC ACL Rules
- Configure MAC Bindings
- View or Delete MAC ACL Bindings in the MAC Binding Table
- Configure a Basic or Extended IP ACL
- Configure Rules for a Basic IP ACL
- Configure Rules for an Extended IP ACL
- Configure IP ACL Interface Bindings
- View or Delete IP ACL Bindings in the IP ACL Binding Table
- 6 Monitor the System
- 7 Maintenance
- A Configuration Examples
- B Specifications and Default Settings

S350 Series 24-Port (PoE+) and 48-Port Gigabit Ethernet Smart Managed Pro Switches
Get Started User Manual13
6. Make a note of the displayed IP address assigned by the DHCP server.
You can use IP address later to access the switch directly from a web browser (that is,
without using the Smart Control Center).
7. Select your switch by clicking the line that displays the switch.
8. Click the We
b Browser Access button.
The Smart Control Center launches a browser that displays the login page of the selected
device.
Use your web browser to manage your switch. The default password is password
. For
more information about the page layout and options, see
Navigation Tabs, Configuration
Menus, and Page Menu on page 20.
Discover the Switch in a Network Without a DHCP Server
This section describes how to use the Smart Control Center (SCC) to set up your switch in a
network without a DHCP server. If your network does not include a DHCP service, you must
assign a static IP address to your switch.
If you prefer, you can assign the switch a static IP address even if your network does include
a DHCP server.
Note: For more information about the SCC program, see the SCC user manual,
which you can download by visiting netgear.com/support/download/.