
User Manual
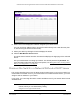
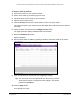


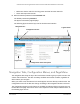
Table Of Contents
- S350 Series 8-Port Gigabit Ethernet Smart Switch
- Contents
- 1 Get Started
- Available Publications
- Switch Management and Discovery Overview
- Options to Change the Default IP Address of the Switch
- Discover or Change the Switch IP Address
- About the User Interfaces
- Access the Local Browser Interface
- Change the Language of the Local Browser Interface
- Use the Device View of the Local Browser Interface
- Interface Naming Conventions
- Configure Interface Settings
- Context-Sensitive Help and Access to the Support WebSite
- Access the User Guide Online
- Register Your Product
- 2 Configure System Information
- 3 Configure Switching
- Configure the Port Settings and Maximum Frame Size
- Configure Link Aggregation Groups
- Configure VLANs
- Configure a Voice VLAN
- Configure Auto-VoIP
- Configure Spanning Tree Protocol
- Configure Multicast
- View and Search the MFDB Table
- View the MFDB Statistics
- Configure the Auto-Video Multicast Settings
- About IGMP Snooping
- Configure IGMP Snooping
- Configure IGMP Snooping for Interfaces
- View, Search, or Clear the IGMP Snooping Table
- Configure IGMP Snooping for VLANs
- Modify IGMP Snooping Settings for a VLAN
- Disable IGMP Snooping on a VLAN
- Configure a Multicast Router Interface
- Configure a Multicast Router VLAN
- IGMP Snooping Querier Overview
- Configure an IGMP Snooping Querier
- Configure an IGMP Snooping Querier for VLANs
- Display IGMP Snooping Querier for VLAN Status
- View, Search, and Manage the MAC Address Table
- Configure Layer 2 Loop Protection
- 4 Configure Quality of Service
- 5 Manage Device Security
- Configure the Management Security Settings
- Configure Management Access
- Configure Port Authentication
- Set Up Traffic Control
- Configure Access Control Lists
- Use the ACL Wizard to Create a Simple ACL
- Configure a Basic MAC ACL
- Configure MAC ACL Rules
- Configure MAC Bindings
- View or Delete MAC ACL Bindings in the MAC Binding Table
- Configure a Basic or Extended IP ACL
- Configure Rules for a Basic IP ACL
- Configure Rules for an Extended IP ACL
- Configure IP ACL Interface Bindings
- View or Delete IP ACL Bindings in the IP ACL Binding Table
- Configure VLAN ACL Bindings
- 6 Monitor the System
- 7 Maintenance
- A Configuration Examples
- B Specifications and Default Settings

S350 Series 8-Port Gigabit Ethernet Smart Switch Models GS308T and GS310TP
Get Started User Manual17
If you did not disable the DHCP client and assigned a static IP address to the switch,
enter 192.168.0.239.
The login window opens.
6. If the browser does not display the login window
, do the following:
• Y
our browser might display a security message and might not let you proceed.
Consider the following examples:
- Google Chrome. If Google Chrome displays a Y
our connection is not private
message, click the ADVANCED link. Then, click the Proceed to x.x.x.x (unsafe)
link, in which x.x.x.x represents the IP address of the switch.
- Mozilla Firefox. If Mozilla Firefox displays a Y
our connection is not secure
message, click the ADVANCED button. Then, click the Add Exception button. In
the pop-up window that opens, click the Confirm Security Exception button.
- Microsoft Internet Explorer. If Microsoft Internet Explorer displays a There is a
problem with this website’
s security certificate message, click the Continue to
this website (not recommended) link.
- Apple Safari. If
Apple Safari displays a This connection is not private message,
click the Show Details button. Then, click the visit this website link. If a warning
pop-up window opens, click the Visit Website button. If another pop-up window
opens to let you confirm changes to your certificate trust settings, enter your Mac
password and click the Update Setting button.
• Make sure that the switch is receiving power and that its Power LED is lit.
• Close and reopen the browser
.
7. Enter the switch’
s password in the Password field.
The default password is password.
The System Information page displays.
8. Select System > Management > IP Configuration.
The IP Configuration page displays.
9. Select the Static IP
Address radio button.
10. Configure the IP address, subnet mask, and default gateway to be assigned to the switch.
11. Click the Apply button.
Your settings are saved.
Disconnect the Ethernet cable and return the network configuration on your computer to the
original settings.