
User Manual
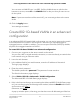
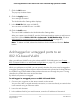
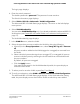
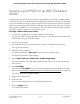
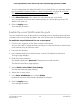
Table Of Contents
- Contents
- 1. Hardware Overview of the Switch
- 2. Install and Access the Switch in Your Network
- 3. Use VLANS for Traffic Segmentation
- VLAN overview
- Create basic port-based VLANs
- Assign ports to multiple port-based VLANs
- Create 802.1Q-based VLANs in a basic configuration
- Create 802.1Q-based VLANs in an advanced configuration
- Add tagged or untagged ports to an 802.1Q-based VLAN
- Specify a port PVID for an 802.1Q-based VLAN
- Manage the voice VLAN
- 4. Optimize Performance With Quality of Service
- 5. Manage Network Settings
- 6. Manage and Monitor the Switch
- Manage flow control
- Manage the port speed and the port status
- Enable loop prevention
- Manage the power saving mode
- Manually download and upgrade the firmware
- Reboot the switch
- Save the switch configuration
- Restore a saved switch configuration
- Return the switch to its factory default settings
- Enable port mirroring
- View switch information or change the switch device name
- View or clear the port statistics
- 7. Diagnostics and Troubleshooting
- A. Factory Default Settings and Technical Specifications
- B. Mount the Switch

Enable 802.1p/DSCP-based quality of service
802.1p/DSCP-based priority uses a field in the data packet header that identifies the
class of data in the packet (for example, voice or video). When 802.1p/DSCP-based
priority is used, the switch reads information in the packet header to determine the
priority to assign to the packet. The switch reads both 802.1p tag information and
DSCP/ToS tag information. If an ingress packet contains both an 802.1p tag and a
DSCP/ToS tag, the switch gives precedence to the 802.1p tag.
All ports on the switch check the packet header and transmit the packet with a priority
determined by the packet content.
To enable 802.1p/DSCP-based QoS:
1. Connect your computer to the same network as the switch.
You can use a WiFi or wired network connection, or connect directly to a switch that
is off-network using an Ethernet cable.
2. Launch a web browser.
3.
In the address field of your web browser, enter the IP address of the switch.
The login page displays.
4. Enter the switch password.
The default password is password. The password is case-sensitive.
The Switch Information page displays.
5. Select QoS.
The Quality of Service page displays.
6.
Select the 802.1p/DSCP-based radio button.
A pop-up window opens, informing you that the current QoS settings will be lost.
7. Click the OK button.
The pop-up window closes.
8. Click the Apply button.
Your settings are saved.
Configure port-based quality of service
You can assign a priority to all data passing through a particular port. Data with a higher
priority is transmitted faster. If packets arrive at several ports at the same time, the ports
User Manual40Optimize Performance With
Quality of Service
8-Port Gigabit Ethernet Plus Switch with 2-Port 10G/Multi-Gig Uplinks GS110EMX