
User Manual
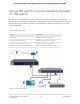


Table Of Contents
- Contents
- 1. Hardware Overview of the Switch
- 2. Install and Access the Switch in Your Network
- 3. Use VLANS for Traffic Segmentation
- VLAN overview
- Create basic port-based VLANs
- Assign ports to multiple port-based VLANs
- Create 802.1Q-based VLANs in a basic configuration
- Create 802.1Q-based VLANs in an advanced configuration
- Add tagged or untagged ports to an 802.1Q-based VLAN
- Specify a port PVID for an 802.1Q-based VLAN
- Manage the voice VLAN
- 4. Optimize Performance With Quality of Service
- 5. Manage Network Settings
- 6. Manage and Monitor the Switch
- Manage flow control
- Manage the port speed and the port status
- Enable loop prevention
- Manage the power saving mode
- Manually download and upgrade the firmware
- Reboot the switch
- Save the switch configuration
- Restore a saved switch configuration
- Return the switch to its factory default settings
- Enable port mirroring
- View switch information or change the switch device name
- View or clear the port statistics
- 7. Diagnostics and Troubleshooting
- A. Factory Default Settings and Technical Specifications
- B. Mount the Switch

Set up the switch in your network and power
on the switch
Before you set up the switch in your network, we recommend that you review the
information in the following table, which describes the network cables that you can use
for the switch connections and the speeds that these cables can support, up to 100
meters (328 feet).
Table 3. Cables and speeds
Cable TypeSpeed
Category 5 (Cat 5) or higher rated100 Mbps
Category 5e (Cat 5e) or higher rated1 Gbps, 2.5 Gbps, or 5 Gbps
Category 6 (Cat 6) or higher rated10 Gbps, up to 55 meters (180 feet)
Category 6A (Cat 6A) or higher rated10 Gbps, more than 55 meters (180 feet)
Figure 5. Sample connections
User Manual16Install and Access the Switch in
Your Network
8-Port Gigabit Ethernet Plus Switch with 2-Port 10G/Multi-Gig Uplinks GS110EMX