
GC728X-GC728XP-GC752X-GC752XP Hardware Installation Guide
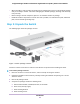
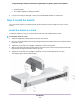
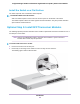
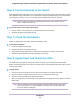

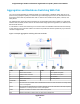
Table Of Contents
- Contents
- 1. Introduction
- 2. Hardware Overview
- 3. Installation
- Step 1: Prepare the Site
- Step 2: Protect Against Electrostatic Discharge
- Step 3: Unpack the Switch
- Step 4: Install the Switch
- Optional Step 5: Install SFP Transceiver Modules
- Step 6: Connect Devices to the Switch
- Step 7: Check the Installation
- Step 8: Apply Power and Check the LEDs
- Step 9: Manage the Switch
- 4. Applications
- 5. Troubleshooting

Install the Switch on a Flat Surface
The switch ships with four self-adhesive rubber footpads.
To install the switch on a flat surface:
Stick one rubber footpad on each of the four concave spaces on the bottom of the switch.
The rubber footpads cushion the switch against shock and vibrations.They also provide ventilation
space between stacked switches.
Optional Step 5: Install SFP Transceiver Modules
The following optional procedure describes how to install an optional SFP transceiver module into one of
the SFP ports of the switch.
Contact your NETGEAR reseller to purchase these modules. If you do not want to
install an SFP module, skip this procedure.
Note
To install an SFP transceiver module:
1. Insert the transceiver into the SFP port.
2. Press firmly on the flange of the module to seat it securely into the connector.
The following figure shows model GC728X.
Installation
23
Insight Managed 28-Port and 52-Port Gigabit Ethernet (PoE+) Smart Cloud Switch