
GC110-GC110P Hardware Installation Guide
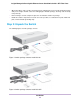

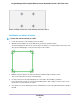
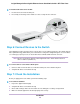
Table Of Contents
- Contents
- 1. Introduction
- 2. Hardware Overview
- 3. Applications
- 4. Installation
- Step 1: Prepare the Site
- Step 2: Protect Against Electrostatic Discharge
- Step 3: Unpack the Switch
- Step 4: Install the Switch
- Optional Step 5: Install SFP Transceiver Modules
- Step 6: Connect Devices to the Switch
- Step 7: Check the Installation
- Step 8: Apply Power and Check the LEDs
- Step 9: Manage the Switch
- 5. Troubleshooting

Step 8: Apply Power and Check the LEDs
The switch does not provide an on/off power switch.The DC power adapter connection controls the power.
Before connecting the DC power adapter to the DC connector on the switch, select an AC outlet for the DC
power adapter. Make sure that the AC outlet is not controlled by a wall switch, which can turn off power to
the switch.
To apply power:
1. Connect the plug of the DC power adapter to the DC power receptacle on the back of the switch.
2. Plug the DC power adapter into a power source such as a wall socket or power strip.
3. Check to see that the LEDs on the switch light correctly.
When you apply power, the Power LED on the switch front panel lights and the port LEDs for attached
devices light.
After you apply power, the Power LED lights solid amber while the switch starts. After
two or three minutes, the switch completes its startup process and the Power LED
turns from amber to solid green.
Note
If the Power LED does not light, check to see that the DC power adapter is plugged in correctly and that
the power source is good.
Step 9: Manage the Switch
Using the NETGEAR Insight app, you can discover the switch on the network and add the switch to the
NETGEAR Insight app so that you can perform basic management and monitoring tasks from your
smartphone. The switch also contains built-in web browser–accessible software for viewing, changing, and
monitoring the way it functions.
The NETGEAR Insight app and management software are not required for the switch to work.You can use
the ports without using NETGEAR Insight app or the management software. However, the management
software enables the setup of VLAN and trunking features and also improves the efficiency of the switch,
which results in the improvement of its overall performance as well as the performance of the network.
After you power on the switch for the first time, you can configure the switch using the NETGEAR Insight
app. For very advanced configurations, you can use the local browser interface.
For more information about managing the switch, see the installation guide that came with the switch, the
NETGEAR knowledge base articles at support.netgear.com, and the user manual, which you can download
from downloadcenter.netgear.com.
The switch’s default IP address is 192.168.0.239 and its default subnet mask is
255.255.255.0.
Note
Installation
29
Insight Managed 8-Port Gigabit Ethernet Smart Cloud Switch with 2 SFP Fiber Ports