
GC110-GC110P Hardware Installation Guide
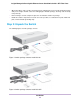

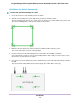
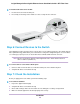
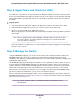
Table Of Contents
- Contents
- 1. Introduction
- 2. Hardware Overview
- 3. Applications
- 4. Installation
- Step 1: Prepare the Site
- Step 2: Protect Against Electrostatic Discharge
- Step 3: Unpack the Switch
- Step 4: Install the Switch
- Optional Step 5: Install SFP Transceiver Modules
- Step 6: Connect Devices to the Switch
- Step 7: Check the Installation
- Step 8: Apply Power and Check the LEDs
- Step 9: Manage the Switch
- 5. Troubleshooting

Check the contents of the boxes to make sure that all items are present before installing the switch.
To check the package contents:
1. Place the container on a clean flat surface, and cut all straps securing the container.
2. Unpack the hardware from the boxes by carefully removing the hardware and placing it on a secure
and clean surface.
3. Remove all packing material.
4. Verify that the package contains the following items:
• Switch of the correct model
• For model GC110, a DC power adapter localized to the country of sale. For model GC110P, a DC
power adapter with a removable power cord localized to country of sale
• Wall-mounting screws
• Installation guide
• Rubber footpads for tabletop installation
5. If any item is missing or damaged, contact your local NETGEAR reseller for replacement
Step 4: Install the Switch
You can install the switch on a flat surface or attach it to a wall.
You can also use any off-the-shelf 75 mm VESA standard mount to secure the switch to a wall, a pole, or
another surface.
Install the Switch on a Flat Surface
The switch ships with four self-adhesive rubber footpads.
To install the switch on a flat surface:
Stick one rubber footpad on each of the four concave spaces on the bottom of the switch.
The rubber footpads cushion the switch against shock and vibrations. They also provide ventilation
space between stacked switches.
Wall-Mount the Switch
The bottom panel of the switch provides four VESA mount holes that allow you to mount the switch to a
wall.The switch ships with wall-mount screws and anchors that you can secure to a wall and attach the
switch to. Although you could use only two screws, we recommend that you use four screws for greater
stability.
Installation
23
Insight Managed 8-Port Gigabit Ethernet Smart Cloud Switch with 2 SFP Fiber Ports