
User's Manual


Reference Manual for the ProSafe Wireless 802.11g Firewall/Print Server Model FWG114P
Print Server 6-7
M-10177-01
3.
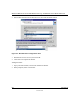
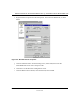
In the Select the Printer Port screen, select LPR Port, as shown below. Click Next to continue.
Figure 6-4: Windows Add Printer Wizard
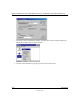
4.
In the Dialog requesting “Name or Address of server providing lpd”, enter the IP address of
the FWG114P Wireless Firewall/Print Server.
5. For Name of printer or print queue on that server, enter L1.
6. Click OK, then Next, and continue the Wizard.
7. At the Select Sharing screen, select the button for Share As, and enter the shared printer name.
The shared name is how other users will see this printer. You should advise client PCs of the
Server name and this printer name.
8. Complete the Add Printer wizard.
Client PC Setup for LPD/LPR Printing
After configuring the Windows Server, client PCs on the LAN can install the new printer.
The following procedure is for Windows 95/98/ME, Windows NT4.0, and Windows 2000
workstation.
1. From Start -> Settings, open the Printers folder, and start the Add Printer Wizard.
2. When prompted, select Network Printer.