
Quick Reference Guide


ProSafe Dual WAN Gigabit Firewall with SSL & IPsec VPN FVS336G Reference Manual
6-12 Virtual Private Networking Using SSL
v1.0, January 2010
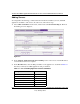
Adding Routes for VPN Tunnel Clients
The VPN Tunnel Clients assume that the following networks are located across the VPN over SSL
tunnel:
• The subnet containing the client IP address (PPP interface), as determined by the class of the
address (Class A, B, or C).
• Subnets specified in the Configured Client Routes table.
If the assigned client IP address range is in a different subnet than the corporate network or if the
corporate network has multiple subnets, you must define Client Routes.
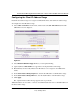
To add an SSL VPN Tunnel client route, follow these steps:
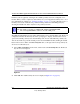
1. Access the SSL VPN Client screen shown in Figure 6-5 on page 6-11.
2. In the Add Routes for VPN Tunnel Clients section, enter the destination network IP address
of a local area network or subnet. For example, enter 192.168.0.0.
3. Enter the appropriate Subnet Mask.
4. Click Add.
The “Operation Successful” message appears at the top of the tab and the new client route is
listed in the Configured Client Routes table.
Restart the VPN firewall if VPN tunnel clients are currently connected. Restarting forces clients to
reconnect and receive new addresses and routes.
Replacing and Deleting Client Routes
If an existing route is no longer needed, or if the specifications of an existing route need to be
changed, follow these steps:
1. Make a new entry with the correct specifications. (This step is not applicable if you only want
to delete the route.)
2. In the Configured Client Routes table, click the Delete button adjacent to the out-of-date
route entry.
Note: You must also add a static route on your corporate firewall that directs local traffic
destined for the VPN tunnel client address range to the VPN firewall.