ProSafe 802.11g Wireless VPN Firewall FVG318 Reference Manual NETGEAR, Inc.
© 2007 by NETGEAR, Inc. All rights reserved. Trademarks NETGEAR and the NETGEAR logo are registered trademarks and ProSafe is a trademark of NETGEAR, Inc. Microsoft, Windows, and Windows NT are registered trademarks of Microsoft Corporation. Other brand and product names are registered trademarks or trademarks of their respective holders.
Europe – Declaration of Conformity in Languages of the European Community Cesky [Czech] NETGEAR Inc. tímto prohlašuje, že tento Radiolan je ve shode se základními požadavky a dalšími príslušnými ustanoveními smernice 1999/5/ES.. Dansk [Danish] Undertegnede NETGEAR Inc. erklærer herved, at følgende udstyr Radiolan overholder de væsentlige krav og øvrige relevante krav i direktiv 1999/5/EF. Deutsch [German] Hiermit erklärt NETGEAR Inc.
Português [Portuguese] NETGEAR Inc. declara que este Radiolan está conforme com os requisitos essenciais e outras disposições da Directiva 1999/5/CE. Slovensko [Slovenian] NETGEAR Inc. izjavlja, da je ta Radiolan v skladu z bistvenimi zahtevami in ostalimi relevantnimi določili direktive 1999/5/ES. Slovensky [Slovak] NETGEAR Inc. týmto vyhlasuje, _e Radiolan spĺňa základné po_iadavky a všetky príslušné ustanovenia Smernice 1999/5/ES. Suomi [Finnish] NETGEAR Inc.
interference will not occur in a particular installation.
Product and Publication Details Model Number: FVG318 Publication Date: September 2007 Product Family: Wireless Router Product Name: ProSafe 802.11g Wireless VPN Firewall Home or Business Product: Business Language: English Publication Part Number: 202-10318-01 Publication Version Number: 1.0 vi v1.
Contents About This Manual Conventions, Formats, and Scope ..................................................................................xiii How to Use This Manual .................................................................................................xiv How to Print this Manual ..................................................................................................xiv Revision History .................................................................................................
ProSafe 802.11g Wireless VPN Firewall FVG318 Reference Manual Chapter 3 Configuring Wireless Connectivity Observing Performance, Placement, and Range Guidelines .........................................3-1 Implementing Appropriate Wireless Security ..................................................................3-2 Understanding Wireless Settings ...................................................................................3-3 Security Check List for SSID and WEP Settings ............................
ProSafe 802.11g Wireless VPN Firewall FVG318 Reference Manual Setting Up a Client-to-Gateway VPN Configuration .......................................................5-5 Step 1: Configuring the Client-to-Gateway VPN Tunnel on the FVG318 .................5-5 Step 2: Configuring the NETGEAR ProSafe VPN Client on the Remote PC ...........5-7 Monitoring the Progress and Status of the VPN Client Connection .......................5-15 Transferring a Security Policy to Another Client ..............................
ProSafe 802.11g Wireless VPN Firewall FVG318 Reference Manual Configuring Static Routes ...............................................................................................8-5 Configuring RIP ........................................................................................................8-6 Static Route Example ...............................................................................................8-7 Enabling Remote Management Access ...............................................
ProSafe 802.11g Wireless VPN Firewall FVG318 Reference Manual The FVG318-to-FVS318v2 Case .................................................................................. C-7 Configuring the VPN Tunnel ................................................................................... C-7 Viewing and Editing the VPN Parameters ............................................................... C-8 Initiating and Checking the VPN Connections ........................................................
ProSafe 802.11g Wireless VPN Firewall FVG318 Reference Manual xii Contents v1.
About This Manual The NETGEAR® ProSafe™ 802.11g Wireless VPN Firewall FVG318 Reference Manual describes how to install, configure and troubleshoot the ProSafe 802.11g Wireless VPN Firewall. The information in this manual is intended for readers with intermediate computer and Internet skills. Conventions, Formats, and Scope The conventions, formats, and scope of this manual are described in the following paragraphs: • • Typographical Conventions.
ProSafe 802.11g Wireless VPN Firewall FVG318 Reference Manual Danger: This is a safety warning. Failure to take heed of this notice may result in personal injury or death. • Scope. This manual is written for the VPN firewall according to these specifications: Product Version ProSafe 802.11g Wireless VPN Firewall Manual Publication Date September 2007 For more information about network, Internet, firewall, and VPN technologies, see the links to the NETGEAR website in Appendix B, “Related Documents.
ProSafe 802.11g Wireless VPN Firewall FVG318 Reference Manual • Printing from PDF. Your computer must have the free Adobe Acrobat reader installed in order to view and print PDF files. The Acrobat reader is available on the Adobe Web site at http://www.adobe.com. – Printing a PDF Chapter. Use the PDF of This Chapter link at the top left of any page. – • Click the PDF of This Chapter link at the top left of any page in the chapter you want to print.
ProSafe 802.11g Wireless VPN Firewall FVG318 Reference Manual xvi About This Manual v1.
Chapter 1 Introduction This chapter describes the features of the NETGEAR® ProSafe 802.11g Wireless VPN Firewall, Model FVG318. Key Features of the VPN Firewall Router The ProSafe 802.11g Wireless VPN Firewall with eight-port switch connects your local area network (LAN) to the Internet through an external access device such as a cable modem or DSL modem and provides 802.11b/g wireless LAN connectivity. The FVG318 is a complete security solution that protects your network from attacks and intrusions.
ProSafe 802.11g Wireless VPN Firewall FVG318 Reference Manual 802.11g and 802.11b Wireless Networking The VPN firewall includes an 802.11g-compliant wireless access point. The access point provides: • 802.11b standards-based wireless networking at up to 11 Mbps. • 802.11g wireless networking at up to 54 Mbps, which conforms to the 802.11g standard. • WPA and WPA2 enterprise class strong security with RADIUS and certificate authentication as well as dynamic encryption key generation.
ProSafe 802.11g Wireless VPN Firewall FVG318 Reference Manual The FVG318 logs security events such as blocked incoming traffic, port scans, attacks, and administrator logins. You can configure the firewall to email the log to you at specified intervals. You can also configure the firewall to send immediate alert messages to your e-mail address or email pager whenever a significant event occurs. • With its content filtering feature, the FVG318 prevents objectionable content from reaching your PCs.
ProSafe 802.11g Wireless VPN Firewall FVG318 Reference Manual • IP Address Sharing by NAT. The VPN firewall allows several networked PCs to share an Internet account using only a single IP address, which may be statically or dynamically assigned by your Internet service provider (ISP). This technique, known as NAT, allows the use of an inexpensive single-user ISP account. • Automatic Configuration of Attached PCs by DHCP.
ProSafe 802.11g Wireless VPN Firewall FVG318 Reference Manual Maintenance and Support NETGEAR offers the following features to help you maximize your use of the VPN firewall: • Flash memory for firmware upgrade. • Free technical support seven days a week, 24 hours a day. Note: The FVS318v3 firmware is not backward compatible with earlier versions of the FVS318 firewall. Package Contents The product package should contain the following items: • ProSafe 802.11g Wireless VPN Firewall. • AC power adapter.
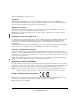
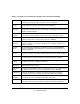
ProSafe 802.11g Wireless VPN Firewall FVG318 Reference Manual You can use some of the LEDs to verify connections. Viewed from left to right, Table 1-1 describes the LEDs on the front panel of the firewall. These LEDs are green when lit. Table 1-1. LED Descriptions LED Label Activity Description PWR On Power is supplied to the firewall. TEST On Off The system is initializing. The system is ready and running. 100 (100 Mbps) On Off The Internet (WAN) port is operating at 100 Mbps.
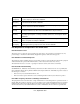
ProSafe 802.11g Wireless VPN Firewall FVG318 Reference Manual Viewed from left to right, the rear panel contains the following features: • Detachable wireless antenna • Factory default reset push button • Eight Ethernet LAN ports • Internet Ethernet WAN port for connecting the firewall to a cable or DSL modem • DC power input Introduction 1-7 v1.
ProSafe 802.11g Wireless VPN Firewall FVG318 Reference Manual 1-8 Introduction v1.
Chapter 2 Connecting the Firewall to the Internet This chapter describes how to set up the firewall on your LAN, connect to the Internet, perform basic configuration of your ProSafe 802.11g Wireless VPN Firewall using the Setup Wizard, or how to manually configure your Internet connection. Follow these instructions to set up your firewall.
ProSafe 802.11g Wireless VPN Firewall FVG318 Reference Manual A Figure 2-1 d. Securely insert the Ethernet cable from your modem into the FVG318 Internet port (point B in the illustration). B Figure 2-2 e. Securely insert one end of the NETGEAR cable that came with your FVG318 into a Local port on the router such as port 4 (point C in the illustration), and the other end into the Ethernet port of your computer (point D in the illustration). 2-2 Connecting the Firewall to the Internet v1.
ProSafe 802.11g Wireless VPN Firewall FVG318 Reference Manual D C Figure 2-3 2. Restart your network in the correct sequence Warning: Failure to restart your network in the correct sequence could prevent you from connecting to the Internet. a. First, plug in and turn on the cable or DSL modem.Wait about 2 minutes. b. Now, plug in the power cord to your FVG318 and wait about 30 seconds. c. Last, turn on your computer.
ProSafe 802.11g Wireless VPN Firewall FVG318 Reference Manual • Power: The power light should be lit. If after 2 minutes the power light turns solid amber, see the Troubleshooting Tips in this guide. • Test: The test light blinks when the FVG318 is first turned on. If after 2 minutes it is still on, see the Troubleshooting Tips in this guide. • Internet: The Internet light on the FVG318 should be lit.
ProSafe 802.11g Wireless VPN Firewall FVG318 Reference Manual 2. When prompted, enter admin for the firewall User Name and password for the firewall Password. Both fields are case-sensitive. (For security reasons, the firewall has its own User Name and Password.) Figure 2-6 3. Click Login. You will be connected to the firewall Router Status screen which will give you status of your router configuration and current firmware version. Figure 2-7 Connecting the Firewall to the Internet v1.
ProSafe 802.11g Wireless VPN Firewall FVG318 Reference Manual 4. Select Network Configuration. The WAN ISP Settings screen will display. Click Auto Detect at the bottom of the WAN ISP Settings screen. The router will automatically attempt to detect your connection type. A message will display indicating if the service connection was detected. Figure 2-8 If you know your ISP connection type or if want to bypass the auto configuration, you can manually configure the router settings on the WAN ISP screen.
ProSafe 802.11g Wireless VPN Firewall FVG318 Reference Manual Note: When you enable remote management, we strongly advise that you change your password. See “Changing the Administrator Password” on page 7-6 for the procedure on how to do this. Manually Configuring your Internet Connection Unless your ISP assigns your configuration automatically via DHCP, you will need the configuration parameters from your ISP.
ProSafe 802.11g Wireless VPN Firewall FVG318 Reference Manual – • Password. Enter the password you use to log in to your ISP. Enter your ISP Type information: – – Austria (PPTP): If your ISP is Austria Telecom or any other ISP that uses PPTP to log in, fill in the following fields: • Account Name (also known as Host Name or System Name): Valid account name for the PPTP connection. This is usually your email “ID” assigned by your ISP, the name before the “@” symbol in your email address.
ProSafe 802.11g Wireless VPN Firewall FVG318 Reference Manual • IP Subnet Mask: This is usually provided by the ISP or your network administrator. • Gateway IP Address: IP address of your ISP’s gateway. This is usually provided by the ISP or your network administrator. 3. Select your Domain Name Servers (DNS). Domain name servers (DNS) convert Internet names such as www.google.com, www.netgear.com, etc. to Internet addresses called IP addresses.
ProSafe 802.11g Wireless VPN Firewall FVG318 Reference Manual The gateway contains a client that can connect to a dynamic DNS service provider. To use this feature, you must select a service provider and obtain an account with them. After you have configured your account information in the gateway, whenever your ISP-assigned IP address changes, your gateway will automatically contact your dynamic DNS service provider, log in to your account, and register your new IP address. To configure Dynamic DNS: 1.
ProSafe 802.11g Wireless VPN Firewall FVG318 Reference Manual 5. Click Apply to save your configuration. Configuring Your Time Zone The VPN firewall uses the Network Time Protocol (NTP) to obtain the current time and date from one of several Network Time Servers on the Internet. In order to localize the time for your log entries, you must specify your Time Zone. Figure 2-10 To specify your time zone: 1. Select Administration > Time Zone from the menu. The Time Zone screen will display. 2.
ProSafe 802.11g Wireless VPN Firewall FVG318 Reference Manual • Select the Use Custom NTP Servers if you prefer to use a particular NTP server. – Enter the name or IP address of an NTP Server in the Server 1 Name/IP Address field. – If required, you can also enter the address of another NTP server in the Server 2 Name/IP Address field. If you select this option and leave either the Server 1 or Server 2 fields empty, then they will be set to the default NETGEAR NTP servers (time-a.netgear.com, timeb.
ProSafe 802.11g Wireless VPN Firewall FVG318 Reference Manual • Some cable modem ISPs require you to use the MAC address of the computer registered on the account. If so, in the Router MAC Address section of the Basic Settings menu, select, “Use this Computer’s MAC Address.” The router will then capture and use the MAC address of the computer that you are now using. You must be using the computer that is registered with the ISP. Click Apply to save your settings.
ProSafe 802.11g Wireless VPN Firewall FVG318 Reference Manual Table 2-2. Accessing the firewall router (continued) Firewall State Access Options Description Configuration Settings Have Been Applied Enter the standard URL to access the VPN firewall router Connect to the VPN firewall router by typing the default router IP address in the address field of your browser, then press Enter: http://192.168.0.1 The VPN firewall router will prompt you to enter the user name of admin and the password.
Chapter 3 Configuring Wireless Connectivity This chapter describes how to configure the wireless features of your FVG318 VPN firewall. Observing Performance, Placement, and Range Guidelines In planning your wireless network, you should consider the level of security required. You should also select the physical placement of your FVG318 in order to maximize the network speed. For further information on wireless networking, refer to in “Wireless Communications” in Appendix B.
ProSafe 802.11g Wireless VPN Firewall FVG318 Reference Manual Implementing Appropriate Wireless Security Unlike wired network data, your wireless data transmissions can extend beyond your walls and can be received by anyone with a compatible adapter. For this reason, use the security features of your wireless equipment. The VPN firewall provides highly effective security features which are covered in detail in this chapter.
ProSafe 802.11g Wireless VPN Firewall FVG318 Reference Manual • Wi-Fi Protected Access (WPA and WPA2). The very strong authentication along with dynamic per frame rekeying of WPA and WPA2 make it virtually impossible to compromise. Because this is a new standard, wireless device driver and software availability may be limited. – WPA with PSK (Wi-Fi Protected Access Pre-Shared Key). WPA-PSK uses TKIP standard encryption. – WPA2 with PSK. WPA2 is a later version of WPA.
ProSafe 802.11g Wireless VPN Firewall FVG318 Reference Manual Figure 3-2 Note: The 802.11b and 802.11g wireless networking protocols are configured in exactly the same fashion. The FVG318 will automatically adjust to the 802.11g or 802.11b protocol as the device requires without compromising the speed of the other devices. • Wireless Network. The station name of the FVG318. – Wireless Network Name (SSID). The SSID is also known as the wireless network name.
ProSafe 802.11g Wireless VPN Firewall FVG318 Reference Manual – Region. This field identifies the region where the FVG318 can be used. It may not be legal to operate the wireless features of the VPN firewall router in a region other than one of those identified in this field. Unless you select a region, you will only be able to use Channel 11. – Channel. This field determines which operating frequency will be used.
ProSafe 802.11g Wireless VPN Firewall FVG318 Reference Manual – WPA2-PSK: WPA2 is a later version of WPA. Only select this if all clients support WPA2. If selected, you must use AES encryption – WPA-PSK and WPA2-PSK: This selection allows clients to use either WPA (with TKIP encryption) or WPA2 (with AES encryption). If selected, encryption must be TKIP + AES. – WPA with Radius: This version of WPA requires the use of a Radius server for authentication.
ProSafe 802.11g Wireless VPN Firewall FVG318 Reference Manual Security Check List for SSID and WEP Settings For a new wireless network, print or copy this form and fill in the configuration parameters. For an existing wireless network, the person who set up or is responsible for the network will be able to provide this information. Be sure to set the Regulatory Domain correctly as the first step. • SSID: The Service Set Identification (SSID) identifies the wireless local area network.
ProSafe 802.11g Wireless VPN Firewall FVG318 Reference Manual Setting Up and Testing Basic Wireless Connectivity Follow the instructions below to set up and test basic wireless connectivity. Once you have established basic wireless connectivity, you can enable security settings appropriate to your needs. 1. Log in using the default LAN address of http://192.168.0.1 with the default user name of admin and default password of password, or using whatever LAN address and password you have set up. 2.
ProSafe 802.11g Wireless VPN Firewall FVG318 Reference Manual 7. For initial configuration and test, leave the Wireless Card Access List set to “All Wireless Stations” and the Encryption Strength set to “Disable.” 8. Click Apply to save your changes. Note: If you are configuring the FVG318 from a wireless computer and you change the VPN firewall router’s SSID, channel, or security settings, you will lose your wireless connection when you click on Apply.
ProSafe 802.11g Wireless VPN Firewall FVG318 Reference Manual 3. Check the Yes radio box to enable MAC filtering and turn on the Access Control List. Then click Apply. An “Operation Succeed” message will display. Only Trusted Wireless Stations will be able to connect to the VPN firewall router. 4. You can add trusted devices by selecting a device from the list of available wireless cards the FVG318 has discovered in your area, or you can manually enter the MAC address.
ProSafe 802.11g Wireless VPN Firewall FVG318 Reference Manual Figure 3-5 3. In the Wireless Security Type section, select the WEP radio box. The WEP fields section will be highlighted. 4. Choose the Authentication Type (Automatic, Open System or Shared Key) and Encryption Strength options. You can manually or automatically program the four data encryption keys. These values must be identical on all PCs and Access Points in your network.
ProSafe 802.11g Wireless VPN Firewall FVG318 Reference Manual • Manual Entry Mode: Enter ten hexadecimal digits (any combination of 0-9, a-f, or A-F). These hex values are not case sensitive. Select which of the four keys will be used and enter the matching WEP key information for your network in the selected key box. – For 64 bit WEP: Enter ten hexadecimal digits (any combination of 0-9, A-F). – For 128 bit WEP: Enter twenty-six hexadecimal digits (any combination of 0-9, AF).
ProSafe 802.11g Wireless VPN Firewall FVG318 Reference Manual Figure 3-6 3. Select the WPA radio box and then select RADIUS from the WPA with: pull-down menu in the Wireless Security Type section. The RADIUS settings fields in the Radius Server Settings section will be highlighted. Note: The Encryption choice will be TKIP by default. For WPA with RADIUS, TKIP is used. 4. Enter the Radius Server Settings. • Primary Server Name/IP Address: This field is required.
ProSafe 802.11g Wireless VPN Firewall FVG318 Reference Manual Configuring WPA2 with RADIUS Note: Not all wireless adapters support WPA2. Furthermore, client software is required on the client. Windows XP and Windows 2000 with Service Pack 3 do include the client software that supports WPA2. Nevertheless, the wireless adapter hardware and driver must also support WPA2. Consult the product document for your wireless adapter and WPA2 client software for instructions on configuring WPA2 settings.
ProSafe 802.11g Wireless VPN Firewall FVG318 Reference Manual Note: The Encryption choice will be AES by default. For WPA2 with RADIUS, AES is used. 4. Enter the Radius Server Settings. • Primary Server Name/IP Address: This field is required. Enter the name or IP address of the primary Radius Server on your LAN. • Radius Port: Enter the port number used for connecting to the Radius Server. • Shared Key: Enter the desired value for the Shared Key. This must match the value used on the Radius server. 5.
ProSafe 802.11g Wireless VPN Firewall FVG318 Reference Manual Figure 3-8 3. Select the WPA and WPA2 radio box and then select RADIUS from the WPA with: pulldown menu in the Wireless Security Type section. The RADIUS settings fields in the Radius Server Settings section will be highlighted. Note: The Encryption choice will be TKIP+AES by default. For WPA/WPA2 with RADIUS, TKIP+AES is used. 4. Enter the Radius Server Settings. • Primary Server Name/IP Address: This field is required.
ProSafe 802.11g Wireless VPN Firewall FVG318 Reference Manual Configuring WPA-PSK Note: Not all wireless adapters support WPA. Furthermore, client software is required on the client. Windows XP and Windows 2000 with Service Pack 3 do include the client software that supports WPA. Nevertheless, the wireless adapter hardware and driver must also support WPA. Consult the product document for your wireless adapter and WPA client software for instructions on configuring WPA settings. To configure WPA-PSK: 1.
ProSafe 802.11g Wireless VPN Firewall FVG318 Reference Manual Note: The Encryption choice will be TKIP by default. For WPA+PSK, TKIP is used. 4. In the PSK Settings section: • Enter the pre-shared key in the Passphrase field. Enter a word or group of printable characters in the Passphrase box. The Passphrase must be 8 to 63 characters in length. The 256 Bit key used for encryption is generated from this passphrase. • Enter a value in the Key Lifetime field.
ProSafe 802.11g Wireless VPN Firewall FVG318 Reference Manual Figure 3-10 3. Select the WPA2 radio box and then select PSK from the WPA with: pull-down menu in the Wireless Security Type section. The PSK settings fields in the PSK Settings section will be highlighted. Note: The Encryption choice will be AES by default. For WPA2+PSK, AES is used. 4. In the PSK Settings section: • Enter the pre-shared key in the Passphrase field. Enter a word or group of printable characters in the Passphrase box.
ProSafe 802.11g Wireless VPN Firewall FVG318 Reference Manual Configuring WPA-PSK and WPA2-PSK Note: Not all wireless adapters support WPA and WPA2. Furthermore, client software is required on the client. Windows XP and Windows 2000 with Service Pack 3 do include the client software that supports WPA and WPA2. Nevertheless, the wireless adapter hardware and driver must also support WPA and WPA2.
ProSafe 802.11g Wireless VPN Firewall FVG318 Reference Manual Note: The Encryption choice will be TKIP+AES by default. For WPA and WPA2+PSK, TKIP+AES is used. 4. In the PSK Settings section: • Enter the pre-shared key in the Passphrase field. Enter a word or group of printable characters in the Passphrase box. The Passphrase must be 8 to 63 characters in length. The 256 Bit key used for encryption is generated from this passphrase. • Enter a value in the Key Lifetime field.
ProSafe 802.11g Wireless VPN Firewall FVG318 Reference Manual 3-22 Configuring Wireless Connectivity v1.
Chapter 4 Firewall Protection and Content Filtering This chapter describes how to use the content filtering features of the ProSafe 802.11g Wireless VPN Firewall to protect your network. These features can be found by clicking on the Security heading in the main menu of the browser interface. Firewall Protection and Content Filtering Overview The ProSafe 802.11g Wireless VPN Firewall FVG318 provides you with Web content filtering options, plus browsing activity reporting and instant alerts via e-mail.
ProSafe 802.11g Wireless VPN Firewall FVG318 Reference Manual Certain commonly used web components can also be blocked for increased security. Some of these components can be used by malicious websites to infect computers that access them. For example: • Proxy. A proxy server allows computers to route connections to other computers through the proxy, thus circumventing certain firewall rules.
ProSafe 802.11g Wireless VPN Firewall FVG318 Reference Manual 2. Check the Yes radio box in the Content Filtering section and click Apply. This will enable content filtering and allow you to specify Web Components to be blocked. 3. Check the radio box for each Web Component you want to enable; then click Apply. The selected Web Component options will be blocked. Once Content Filtering has been enabled you can add Trusted IP Addresses, Blocked Keywords and Trusted Domains.
ProSafe 802.11g Wireless VPN Firewall FVG318 Reference Manual 1. In the appropriate field add the IP Address or Domain Name. 2. Click Add. The IP Address or Domain Name will appear in the appropriate table. 3. Click Edit adjacent to the entry to modify or change the selected IP Address or Domain Name. An Edit screen will display. When you have completed your changes, click Apply. The change will appear in the appropriate table.
ProSafe 802.11g Wireless VPN Firewall FVG318 Reference Manual A firewall has two default rules, one for inbound traffic and one for outbound. The default rules of the FVG318 are: • Inbound: Block all access from outside except responses to requests from the LAN side. • Outbound: Allow all access from the LAN side to the outside. These default rules are shown in the Rules table of the Rules menu in Figure 4-3: Figure 4-3 You may define additional rules that specify exceptions to the default rules.
ProSafe 802.11g Wireless VPN Firewall FVG318 Reference Manual An example of the menu for defining or editing a rule is shown in Figure 4-3. The parameters are: • Service. From this list, select the application or service to be allowed or blocked. The list already displays many common services, but you are not limited to these choices. Use the Services menu to add any additional services or applications that do not already appear. • Action. Choose how you would like this type of traffic to be handled.
ProSafe 802.11g Wireless VPN Firewall FVG318 Reference Manual Inbound Rule Example: A Local Public Web Server If you host a public Web server on your local network, you can define a rule to allow inbound Web (HTTP) requests from any outside IP address to the IP address of your Web server at any time of day.
ProSafe 802.11g Wireless VPN Firewall FVG318 Reference Manual Considerations for Inbound Rules • If your external IP address is assigned dynamically by your ISP, the IP address may change periodically as the DHCP lease expires. Consider using the Dynamic DNS feature in the Advanced menus so that external users can always find your network. • If the IP address of the local server PC is assigned by DHCP, it may change when the PC is rebooted.
ProSafe 802.11g Wireless VPN Firewall FVG318 Reference Manual . Figure 4-6 Order of Precedence for Rules As you define new rules, they are added to the tables in the Rules table, as shown below: Figure 4-7 For any traffic attempting to pass through the firewall, the packet information is subjected to the rules in the order shown in the Rules table, beginning at the top and proceeding to the default rules at the bottom.
ProSafe 802.11g Wireless VPN Firewall FVG318 Reference Manual Default DMZ Server Incoming traffic from the Internet is normally discarded by the firewall unless the traffic is a response to one of your local computers or a service for which you have configured an inbound rule. Instead of discarding this traffic, you can have it forwarded to one computer on your network. This computer is called the Default DMZ Server.
ProSafe 802.11g Wireless VPN Firewall FVG318 Reference Manual . Note: For security, NETGEAR strongly recommends that you avoid using the Default DMZ Server feature. When a computer is designated as the Default DMZ Server, it loses much of the protection of the firewall, and is exposed to many exploits from the Internet. If compromised, the computer can be used to attack your network.
ProSafe 802.11g Wireless VPN Firewall FVG318 Reference Manual Attack Check Type Description VPN Pass through IPSec/PPTP/L2TPa Typically, the router is used as a VPN Client or Gateway that connects to other VPN Gateways. When the router is in NAT mode, all packets going to the Remote VPN Gateway are first filtered through NAT and then encrypted, per the VPN policy. a.
ProSafe 802.11g Wireless VPN Firewall FVG318 Reference Manual b. From the Type pull-down menu, select whether the service uses TCP, UDP or ICMP as its transport protocol. c. Enter the lowest port number used by the service in the Start Port field. a. Enter the highest port number used by the service in the Finish Port field. If the service only uses a single port number, enter the same number in both fields. Figure 4-8 3. Click Add.
ProSafe 802.11g Wireless VPN Firewall FVG318 Reference Manual . Figure 4-9 To block keywords or Internet domains based on a schedule: 1. Select Security > Schedule from the menu. The Schedule 1 screen will display. 2. In the Scheduled Days section, select the All Days or Specific Days radio box. If you want to limit access completely for the selected days, select All Day. Otherwise, select the specific days that you want to limit access. 3.
ProSafe 802.11g Wireless VPN Firewall FVG318 Reference Manual 2. Enter the Log Identifier in the Log Options sections. Every logged message will contain a prefix for easier identification of the source of the message. The Log Identifier will be prefixed to both e-mail and Syslog messages. 3. Select which Routing Log packets you want to log. • Accepted Packets. Logs packets that were successfully transferred through the segment. • Dropped Packets.
ProSafe 802.11g Wireless VPN Firewall FVG318 Reference Manual Figure 4-10 5. Enable E-Mail Logs. Check the Yes radio box if you wish to receive e-mail logs from the firewall. 6. Enter your E-Mail Address information. If you enabled e-mail notification, these boxes cannot be blank. • 4-16 Enter the E-Mail Server Address of your ISP’s outgoing (SMTP) mail server (such as mail.myISP.com). You may be able to find this information in the configuration menu of your e-mail program.
ProSafe 802.11g Wireless VPN Firewall FVG318 Reference Manual • Enter the Return E-Mail Address to which logs and alerts are sent. This e-mail address will also be used as the Send To E-mail address. If you leave this box blank, log and alert messages will not be sent via e-mail. 7. If the SMTP server requires authentication before accepting connections, select either Login Plain or CRAM-MD5 and enter the User Name and Password to be used for authentication.
ProSafe 802.11g Wireless VPN Firewall FVG318 Reference Manual Log entries are described in Table 4-1 Table 4-1. Log entry descriptions Field Description Date and Time The date and time the log entry was recorded. Description or Action The type of event and what action was taken if any. Source IP The IP address of the initiating device for this log entry. Source port and interface The service port number of the initiating device, and whether it originated from the LAN or WAN.
Chapter 5 Basic Virtual Private Networking This chapter describes how to use the virtual private networking (VPN) features of the VPN firewall. VPN communications paths are called tunnels. VPN tunnels provide secure, encrypted communications between your local network and a remote network or computer. The VPN information is organized as follows: • “Overview of VPN Configuration” on page 5-2 provides an overview of the two most common VPN configurations: client-to-gateway and gateway-to-gateway.
ProSafe 802.11g Wireless VPN Firewall FVG318 Reference Manual Overview of VPN Configuration Two common scenarios for configuring VPN tunnels are between a remote personal computer and a network gateway and between two or more network gateways. The FVG318 supports both of these types of VPN configurations. The VPN firewall supports up to eight concurrent tunnels.
ProSafe 802.11g Wireless VPN Firewall FVG318 Reference Manual A VPN between two or more NETGEAR VPN-enabled firewalls is a good way to connect branch or home offices and business partners over the Internet. VPN tunnels also enable access to network resources across the Internet. In this case, use FVG318s on each end of the tunnel to form the VPN tunnel end points. See “Setting Up a Gateway-to-Gateway VPN Configuration” on page 5-19 to set up this configuration.
ProSafe 802.11g Wireless VPN Firewall FVG318 Reference Manual Table 5-1. Parameters recommended by the VPNC and used in the VPN Wizard • • Parameter Factory Default Authentication Protocol SHA-1 Diffie-Hellman (DH) Group Group 2 (1024 bit) Key Life 8 hours IKE Life Time 24 hours NETBIOS Enabled What level of IPSec VPN encryption will you use? – DE – The Data Encryption Standard (DES) processes input data that is 64 bits wide, encrypting these values using a 56 bit key.
ProSafe 802.11g Wireless VPN Firewall FVG318 Reference Manual Setting Up a Client-to-Gateway VPN Configuration Setting up a VPN between a remote PC running the NETGEAR ProSafe VPN Client and a network gateway (see Figure 5-3) involves the following two steps: • “Step 1: Configuring the Client-to-Gateway VPN Tunnel on the FVG318” on page 5-5 uses the VPN Wizard to configure the VPN tunnel between the remote PC and network gateway.
ProSafe 802.11g Wireless VPN Firewall FVG318 Reference Manual 2. Select VPN > VPN Wizard from the menu. The WPN Wizard screen will display. Select the radio button: A remote VPN client (single PC) Enter the new Connection Name: (RoadWarrior in this example) Enter the pre-shared key: (12345678 in this example) Figure 5-4 3. Check the VPN Client radio button and enter the Connection Name and the pre-shared key.
ProSafe 802.11g Wireless VPN Firewall FVG318 Reference Manual 4. Click the VPN Wizard Default Values link on the VPN Wizard screen to display the VPN default values shown below. The Wizard sets most parameters to defaults as proposed by the VPN Consortium. Figure 5-5 5. Click Apply on the VPN Wizard screen to complete the configuration procedure. The VPN Policies screen will display showing that the new tunnel is enabled. Figure 5-6 To view or modify the tunnel settings, click Edit.
ProSafe 802.11g Wireless VPN Firewall FVG318 Reference Manual The PC must have the NETGEAR ProSafe VPN Client program installed that supports IPSec. Go to the NETGEAR Web site (http://www.netgear.com) and select VPN01L_VPN05L in the Product Quick Find drop-down menu for information on how to purchase the NETGEAR ProSafe VPN Client. Note: Before installing the NETGEAR ProSafe VPN Client software, be sure to turn off any virus protection or firewall software you may be running on your PC. 1.
ProSafe 802.11g Wireless VPN Firewall FVG318 Reference Manual Note: In this example, the Connection Name used on the client side of the VPN tunnel is NETGEAR_VPN_router and it does not have to match the RoadWarrior Connection Name used on the gateway side of the VPN tunnel (see Figure 5-8) because Connection Names are unrelated to how the VPN tunnel functions. Tip: Choose Connection Names that make sense to the people using and administrating the VPN. Figure 5-7 3.
ProSafe 802.11g Wireless VPN Firewall FVG318 Reference Manual f. Select Domain Name in the ID Type menu below the check box. g. Enter the public WAN IP Domain Name of the FVG318 in the field directly below the ID Type menu. In this example, fvg_local.com would be used. The resulting Connection Settings are shown in Figure 5-8. Figure 5-8 4. Configure the Security Policy in the NETGEAR ProSafe VPN Client software. a.
ProSafe 802.11g Wireless VPN Firewall FVG318 Reference Manual Figure 5-9 5. Configure the VPN Client Identity. Provide information about the remote VPN client PC. You will need to provide: – The Pre-Shared Key that you configured in the FVG318. – Either a fixed IP address or a “fixed virtual” IP address of the VPN client PC. a. In the Network Security Policy list on the left side of the Security Policy Editor window, click on My Identity. Figure 5-10 Basic Virtual Private Networking 5-11 v1.
ProSafe 802.11g Wireless VPN Firewall FVG318 Reference Manual b. Choose None in the Select Certificate box. c. Select IP Address in the ID Type box. If you are using a virtual fixed IP address, enter this address in the Internal Network IP Address box. Otherwise, leave this box empty. d. In the Internet Interface box, select the adapter you use to access the Internet. Select PPP Adapter in the Name menu if you have a dial-up Internet account.
ProSafe 802.11g Wireless VPN Firewall FVG318 Reference Manual Figure 5-12 c. In the Authentication Method menu, select Pre-Shared key. d. In the Encrypt Alg menu, select the type of encryption. In this example, use Triple DES. e. In the Hash Alg menu, select SHA-1. f. In the SA Life menu, select Unspecified. g. In the Key Group menu, select Diffie-Hellman Group 2. 7. Configure the VPN Client Key Exchange Proposal. Provide the type of encryption (DES or 3DES) to be used for this connection.
ProSafe 802.11g Wireless VPN Firewall FVG318 Reference Manual Figure 5-13 8. Save the VPN Client Settings. From the File menu at the top of the Security Policy Editor window, click Save. After you have configured and saved the VPN client information, your PC will automatically open the VPN connection when you attempt to access any IP addresses in the range of the remote VPN firewall’s LAN. To check the VPN connection.
ProSafe 802.11g Wireless VPN Firewall FVG318 Reference Manual Figure 5-14 This will cause a continuous ping to be sent to the first FVG318. After between several seconds and two minutes, the ping response should change from “timed out” to “reply”, as shown below. Figure 5-15 Once the connection is established, you can open the browser of the PC and enter the LAN IP address of the remote FVG318.
ProSafe 802.11g Wireless VPN Firewall FVG318 Reference Manual Figure 5-16 Note: Use the active VPN tunnel information and pings to determine whether a failed connection is due to the VPN tunnel or some reason outside the VPN tunnel. 2. The Connection Monitor screen for a similar connection is shown below: Figure 5-17 In this example you can see the following: • The FVG318 has a public IP WAN address of 22.23.24.25. • The FVG318 has a LAN IP address of 192.168.3.1.
ProSafe 802.11g Wireless VPN Firewall FVG318 Reference Manual Note: While your PC is connected to a remote LAN through a VPN, you might not have normal Internet access. If this is the case, you will need to close the VPN connection in order to have normal Internet access. Transferring a Security Policy to Another Client This section explains how to export and import a security policy as an .
ProSafe 802.11g Wireless VPN Firewall FVG318 Reference Manual To import an existing Security Policy: 1. Invoke the NETGEAR ProSafe VPN Client and select Import Security Policy from the File pull-down menu. Figure 5-20 2. Select the security policy to import. In this example, the security policy file is named FVS318v3_clientpolicy_direct.spd and located on the Desktop. Figure 5-21 The security policy is now imported.
ProSafe 802.11g Wireless VPN Firewall FVG318 Reference Manual Setting Up a Gateway-to-Gateway VPN Configuration Note: This section uses the VPN Wizard to set up the VPN tunnel using the VPNC default parameters listed in Table 5-1 on page 5-4. If you have special requirements not covered by these VPNC-recommended parameters, refer to Chapter 6, “Advanced Virtual Private Networking” to set up the VPN tunnel.
ProSafe 802.11g Wireless VPN Firewall FVG318 Reference Manual 5. In the End Point Information section, enter the Remote WANs IP Address or Internet Name and the Local WAN’s IP Address or Internet Name. Both local and remote ends must be defined as either IP addresses or Internet Names (FQDNs). Note: The Local IP Address field can be left as the default address unless you are using a different IP Address or FQDN.
ProSafe 802.11g Wireless VPN Firewall FVG318 Reference Manual Figure 5-24 7. Click Apply to complete the configuration procedure. The IKE Policies menu will display the local and remote WAN connection points as shown below. Figure 5-25 8. Click the VPN Policy to display the VPN Policies showing that the new tunnel is enabled. Figure 5-26 Basic Virtual Private Networking 5-21 v1.
ProSafe 802.11g Wireless VPN Firewall FVG318 Reference Manual To configure a gateway-to-gateway VPN tunnel using the VPN Wizard on LAN B:. 1. Log in to the FVG318 on LAN B at its default LAN address of http://192.168.0.1 with its default user name of admin and password of password. 2. Repeat the VPN Wizard process for the FVG318 on LAN B. Pay special attention and use the following network settings as appropriate. • WAN IP of the remote VPN gateway (for example, 14.15.16.
ProSafe 802.11g Wireless VPN Firewall FVG318 Reference Manual Figure 5-28 Activating a VPN Tunnel There are three ways to activate a VPN tunnel: • Start using the VPN tunnel. • Use the IPSec Connection Status screen. • Activate the VPN tunnel by pinging the remote endpoint. To use a VPN tunnel: 1. Open a Web browser. 2. Go to the URL whose IP address or IP address range is covered by the policy for that VPN tunnel. To use the IPSec Connection Status screen to activate a VPN tunnel: 1.
ProSafe 802.11g Wireless VPN Firewall FVG318 Reference Manual To activate the VPN tunnel by pinging the remote endpoint, select your configuration (either client-to-gateway or gateway-to-gateway): Note: This section uses 192.168.3.1 for an example remote endpoint LAN IP address. • Client-to-Gateway Configuration – to check the VPN Connection, you can initiate a request from the remote PC to the FVG318’s network by using the “Connect” option in the NETGEAR ProSafe menu bar.
ProSafe 802.11g Wireless VPN Firewall FVG318 Reference Manual Figure 5-30 Once the connection is established, you can open the browser of the PC and enter the LAN IP address of the remote FVG318. After a short wait, you should see the login screen of the VPN Firewall Router (unless another PC already has the FVG318 management interface open). • Gateway-to-Gateway Configuration. Test the VPN tunnel by pinging the remote network from a PC attached to the FVG318. a.
ProSafe 802.11g Wireless VPN Firewall FVG318 Reference Manual To Use the IPSec Connection Status screen to change the status of a VPN connection: 3. Click VPN > Connection Status (Figure 5-26) to get the IPSec Connection Status screen (Figure 5-27). This page lists the following data for each active VPN Tunnel. • SPI – each SA has a unique SPI (Security Parameter Index) for traffic in each direction. For Manual key exchange, the SPI is specified in the Policy definition.
ProSafe 802.11g Wireless VPN Firewall FVG318 Reference Manual 3. Select the checkbox adjacent to the policy you want to disable and click disable. The VPN Policy will be disabled. Figure 5-32 Using the VPN Status Page to Deactivate a VPN Tunnel To use the VPN Connection Status screen to deactivate a VPN tunnel: 1. Log in to the VPN Firewall Router. 2. Select the VPN > Connection Status screen. The IPSec Connection Status screen will display. 3.
ProSafe 802.11g Wireless VPN Firewall FVG318 Reference Manual 5-28 Basic Virtual Private Networking v1.
Chapter 6 Advanced Virtual Private Networking This chapter describes how to use the advanced virtual private networking (VPN) features of the VPN firewall. See Chapter 5, “Basic Virtual Private Networking” for a description on how to use the basic VPN features. The FVG318 uses state-of-the-art firewall and security technology to facilitate controlled and actively monitored VPN connectivity.
ProSafe 802.11g Wireless VPN Firewall FVG318 Reference Manual • VPN Policies. Apply the IKE policy to specific traffic that requires a VPN tunnel. Or, you can create a VPN policy that does not use an IKE policy but in which you manually enter all the authentication and key parameters. Since VPN policies use IKE policies, you define the IKE policy first. The FVG318 also allows you to manually input the authentication scheme and encryption key values.
ProSafe 802.11g Wireless VPN Firewall FVG318 Reference Manual The IKE Policy Configuration fields are defined in the following table. Click to create VPN policy. Figure 6-2 VPN Policy Configuration for Auto Key and Manual Negotiation Click the Add New VPN Policy link on the Add IKE Policy screen or select VPN > Policies and click the VPN Policies tab to navigate to the VPN Policies configuration screen. • An already defined IKE policy is required for VPN Auto Policy configuration.
ProSafe 802.11g Wireless VPN Firewall FVG318 Reference Manual Figure 6-3 The VPN Manual and Auto Policy fields are defined in the following table. Table 6-1. VPN Manual and Auto Policy Configuration Fields Field Description General These settings identify this policy and determine its major characteristics. 6-4 Advanced Virtual Private Networking v1.
ProSafe 802.11g Wireless VPN Firewall FVG318 Reference Manual Table 6-1. VPN Manual and Auto Policy Configuration Fields (continued) Field Description Policy Name The descriptive name of the VPN policy. Each policy should have a unique policy name. This name is not supplied to the remote VPN endpoint. It is only used to help you identify VPN policies.
ProSafe 802.11g Wireless VPN Firewall FVG318 Reference Manual Table 6-1. VPN Manual and Auto Policy Configuration Fields (continued) Field Description Manual Policy Parameters The Manual Policy creates an SA (Security Association) based on static inputs SPI-Incoming; SPI-Outgoing Takes a hexadecimal value between 3 and 8 characters; for example: 0x1234 Encryption Algorithm: The algorithm used to encrypt the data: • Encryption Key-In: Encryption key of the inbound policy.
ProSafe 802.11g Wireless VPN Firewall FVG318 Reference Manual Table 6-1. VPN Manual and Auto Policy Configuration Fields (continued) Field Description PFS Key Group Perfect Forward Secrecy (PFS) improves security. While this is slower, it will ensure that a Diffie-Hellman exchange is performed for every phase 2 negotiation. • DH Group 1 (768 bit) • DH Group 2 (1024 bit) • DH Group 5 (1536 bit) Select IKE Policy The existing IKE policies are presented a drop-down list.
ProSafe 802.11g Wireless VPN Firewall FVG318 Reference Manual Whenever an IKE policy receives the certificate from a peer, it checks for this certificate in the CRL on the FVG318 obtained from the corresponding CA. If the certificate is not present in the CRL it means that the certificate is not revoked. IKE can then use this certificate for authentication. If the certificate is present in the CRL it means that the certificate is revoked, and the IKE will not authenticate the client.
ProSafe 802.11g Wireless VPN Firewall FVG318 Reference Manual VPN Consortium Scenario 1: Gateway-to-Gateway with Preshared Secrets The following is a typical gateway-to-gateway VPN that uses a preshared secret for authentication. Figure 6-4 Gateway A connects the internal LAN 10.5.6.0/24 to the Internet. Gateway A’s LAN interface has the address 10.5.6.1, and its WAN (Internet) interface has the address 14.15.16.17. Gateway B connects the internal LAN 172.23.9.0/24 to the Internet.
ProSafe 802.11g Wireless VPN Firewall FVG318 Reference Manual FVG318 Gateway A to FVG318 Gateway B (IKE and VPN Policies) Note: This scenario assumes all ports are open on the FVG318. You can verify this by reviewing the security settings as seen in Figure 6-5 Note: FVG318 FVG318 Figure 6-5 Use this scenario illustration and configuration screens as a model to build your configuration. 1. Log in to the FVG318 labeled Gateway A as in the illustration. Log in at the default address of http://192.168.0.
ProSafe 802.11g Wireless VPN Firewall FVG318 Reference Manual WAN IP addresses ISP provides these addresses Figure 6-6 b. Configure the WAN Internet Address according to the settings above and click Apply to save your settings. For more information on configuring the WAN IP settings, please see “Manually Configuring your Internet Connection” on page 2-7. c. Select Network Configuration > LAN Setup. The LAN Setup screen will display. Figure 6-7 Advanced Virtual Private Networking 6-11 v1.
ProSafe 802.11g Wireless VPN Firewall FVG318 Reference Manual d. Configure the LAN IP address according to the settings above and click Apply to save your settings. For more information on LAN TCP/IP setup topics, please see “Configuring LAN TCP/IP Setup Parameters” on page 8-2. Note: After you click Apply to change the LAN IP address settings, your workstation will be disconnected from the FVG318. You will have to log on with http://10.5.6.
ProSafe 802.11g Wireless VPN Firewall FVG318 Reference Manual a. Select VPN > Policies and click the VPN Policies tab. The VPN Policies screen will display. Click Add to display the Add VPN Policy screen. Figure 6-9 b. Configure the VPN Policy according to the settings in the illustration above and click Apply to save your settings. For more information on VPN Policy topics, please see “VPN Policy Configuration for Auto Key and Manual Negotiation” on page 6-3. 5.
ProSafe 802.11g Wireless VPN Firewall FVG318 Reference Manual To test the Gateway A FVG318 LAN and the Gateway B LAN connection: 1. Using our example, from a PC attached to the FVG318 on LAN A, on a Windows PC click the Start button on the task bar and then click Run. 2. Type ping -t 172.23.9.1, and then click OK. 3. This will cause a continuous ping to be sent to the LAN interface of Gateway B. Within two minutes, the ping response should change from timed out to reply. 4.
ProSafe 802.11g Wireless VPN Firewall FVG318 Reference Manual VPN Consortium Scenario 2: FVG318 Gateway to Gateway with Digital Certificates The following is a typical gateway-to-gateway VPN that uses Public Key Infrastructure x.509 (PKIX) certificates for authentication. The network setup is identical to the WAN one given in IP Address Scenario 1.
ProSafe 802.11g Wireless VPN Firewall FVG318 Reference Manual f. • Hash Algorithm. Select the desired option: MD5 or SHA1. • Signature Algorithm. Select the desired option: DSS or RSA. • Signature Key Length. Select the desired option: 512, 1024, or 2048. Fill in any optional fields on the Add Self Certificate screen that may apply. • IP Address. If you use “IP type” in the IKE policy, you should input the IP Address here. Otherwise, you should leave this blank. • Domain Name.
ProSafe 802.11g Wireless VPN Firewall FVG318 Reference Manual g. Click Generate The FVG318 generates a pending Self Certificate Request as shown below. Click view to display the data. Highlight, copy, and paste this data into a text file. Figure 6-11 4. Transmit the Self Certificate Request data to the Trusted Root CA. a. Highlight the text in the Data to supply to CA area, copy it, and paste it into a text file. b. Give the certificate request data to the CA.
ProSafe 802.11g Wireless VPN Firewall FVG318 Reference Manual f. The “FVG318” certificate will display in the Active Self Certificates table and the pending “FVG318” Self Certificate Request will be deleted. 7. Associate the new certificate and the Trusted Root CA certificate on the FVG318. a. Create a new IKE policy called Scenario_2 with all the same properties of Scenario_1, except now select the RSA Signature radio box instead of the Pre-shared key. b.
Chapter 7 Maintenance This chapter describes how to use the maintenance features of your ProSafe 802.11g Wireless VPN Firewall. These features can be found by selecting Monitoring > Router Status from the main menu of the browser interface. Viewing VPN Firewall Router Status Information The Router Status menu provides status and usage information. From the main menu of the browser interface, click Monitoring > Router Status to view this screen. Figure 7-1 Maintenance 7-1 v1.
ProSafe 802.11g Wireless VPN Firewall FVG318 Reference Manual This screen shows the following parameters: Table 7-1. FVG318 Status fields Field Description System Name The System Name assigned to the firewall. Firmware Version The firewall firmware version. Wireless Configuration SSID: The wireless settings of the router The name of your wireless network. The default is NETGEAR. Mode Security Settings Shows what security has been associated with the wireless configuration.
ProSafe 802.11g Wireless VPN Firewall FVG318 Reference Manual Table 7-1. FVG318 Status fields Field Description IP Address The IP address used by the Local (LAN) port of the firewall. The default is 192.168.0.1 IP Subnet Mask The IP Subnet Mask used by the Local (LAN) port of the firewall. The default is 255.255.255.0 DHCP Identifies if the firewall’s built-in DHCP server is active for the LAN attached devices.
ProSafe 802.11g Wireless VPN Firewall FVG318 Reference Manual Upgrading the Firewall Software The routing software of the FVG318 VPN firewall is stored in FLASH memory, and can be upgraded as new software is released by NETGEAR. Upgrade files can be downloaded from NETGEAR's Web site. If the upgrade file is compressed (.zip file), you must first extract the binary (.bin) file before sending it to the firewall. The upgrade file can be sent to the firewall using your browser.
ProSafe 802.11g Wireless VPN Firewall FVG318 Reference Manual 3. Highlight the file and click Upload. Note: When uploading software to the VPN firewall, it is important not to interrupt the Web browser by closing the window, clicking a link, or loading a new page. If the browser is interrupted, it may corrupt the software. When the upload is complete, your firewall will automatically restart. The upgrade process will typically take about 1 minute.
ProSafe 802.11g Wireless VPN Firewall FVG318 Reference Manual Changing the Administrator Password The default password for the firewall’s Web Configuration Manager is password. NETGEAR recommends that you change this password to a more secure password. Select Administration > Set Password to display the Set Password screen.. Figure 7-4 You can change the password for both the Administrator and Guest settings. To change the password: 1.
Chapter 8 Advanced Configuration This chapter describes how to configure the advanced features of your ProSafe 802.11g Wireless VPN Firewall FVG318. Configuring Dynamic DNS If your network has a permanently assigned IP address, you can register a domain name and have that name linked with your IP address by public Domain Name Servers (DNS).
ProSafe 802.11g Wireless VPN Firewall FVG318 Reference Manual 8. If your dynamic DNS provider allows the use of wildcards in resolving your URL, you may select the Use wildcards check box to activate this feature. For example, the wildcard feature will cause *.yourhost.dyndns.org to be aliased to the same IP address as yourhost.dyndns.org 9. Click Apply to save your configuration. Note: If your ISP assigns a private WAN IP address such as 192.168.x.x or 10.x.x.
ProSafe 802.11g Wireless VPN Firewall FVG318 Reference Manual These addresses are part of the IETF-designated private address range for use in private networks, and should be suitable in most applications. If your network has a requirement to use a different IP addressing scheme, you can make those changes in this menu. The LAN IP parameters are: • IP Address. This is the LAN IP address of the firewall. • IP Subnet Mask. This is the LAN Subnet Mask of the firewall.
ProSafe 802.11g Wireless VPN Firewall FVG318 Reference Manual • Primary DNS server (if you entered a primary DNS address in the WAN Settings menu; otherwise, the firewall’s LAN IP address) • Secondary DNS server (if you entered a secondary DNS address in the WAN Settings menu Using Address Reservation When you specify a reserved IP address for a PC on the LAN, that PC will always receive the same IP address each time it accesses the firewall’s DHCP server.
ProSafe 802.11g Wireless VPN Firewall FVG318 Reference Manual Configuring Static Routes Static Routes provide additional routing information to your firewall. Under normal circumstances, the firewall has adequate routing information after it has been configured for Internet access, and you do not need to configure additional static routes. You must configure static routes only for unusual cases such as multiple firewalls or multiple IP subnets located on your network.
ProSafe 802.11g Wireless VPN Firewall FVG318 Reference Manual 5. Type the Destination IP Address of the final destination. 6. Type the IP Subnet Mask for this destination. If the destination is a single host, type 255.255.255.255. 7. Type the Gateway IP Address, which must be a firewall on the same LAN segment as the firewall. 8. Type a number between 1 and 15 as the Metric value. This represents the number of firewalls between your network and the destination.
ProSafe 802.11g Wireless VPN Firewall FVG318 Reference Manual – When set to Both or In Only, it incorporates the RIP information that it receives. – When set to None, it will not send any RIP packets and ignores any RIP packets received. 3. Enable the RIP Version. This controls the format and the broadcasting method of the RIP packets that the firewall sends. (It recognizes both formats when receiving.) – RIP-1 is universally supported.
ProSafe 802.11g Wireless VPN Firewall FVG318 Reference Manual • You have an ISDN firewall on your home network for connecting to the company where you are employed. This firewall’s address on your LAN is 192.168.0.100. • Your company’s network is 134.177.0.0. When you first configured your firewall, two implicit static routes were created. A default route was created with your ISP as the gateway, and a second static route was created to your local network for all 192.168.0.x addresses.
ProSafe 802.11g Wireless VPN Firewall FVG318 Reference Manual Figure 8-6 2. Select the Yes radio box for Allow Remote Management. • Specify what external addresses will be allowed to access the firewall’s remote management. Note: For enhanced security, restrict access to as few external IP addresses as practical. • To allow access from any IP address on the Internet, select Everyone. • To allow access from a range of IP addresses on the Internet, select IP address range.
ProSafe 802.11g Wireless VPN Firewall FVG318 Reference Manual Tip: If you are using a dynamic DNS service such as TZO, you can always identify the IP address of your FVG318 by running TRACERT from the Windows Start menu Run option. For example, type tracert yourFVG318.mynetgear.net and you will see the IP address your ISP assigned to the FVG318. SNMP Administration Simple Network Management Protocol (SNMP) lets you monitor and manage your router from an SNMP Manager.
ProSafe 802.11g Wireless VPN Firewall FVG318 Reference Manual To create a new SNMP configuration entry: 1. Enter the IP address of an SNMP trap agent. 2. Enter the Subnet Mask. The network mask used to determine the list of allowed SNMP managers. • To allow any IP on the network to manager the device, enter 255.255.255.0. • For a specific host, enter 255.255.255.255. • To allow global access, enter 0.0.0.0. 3. Enter the SNMP trap port to which the trap messages will be sent. 4.
ProSafe 802.11g Wireless VPN Firewall FVG318 Reference Manual Enabling Universal Plug and Play (UPnP) UPnP (Universal Plug and Play) allows for automatic discovery of devices that can communicate with this router. This feature should be used with caution as it breaches firewall security. Select Security > UPnP to display the UPnP screen. Figure 8-8 To enable UPnP: 1. Select the Yes radio box for Do you want to enable UPnP? to enable UPnP.
Chapter 9 Troubleshooting This chapter gives information about troubleshooting your ProSafe 802.11g Wireless VPN Firewall. After each problem description, instructions are provided to help you diagnose and solve the problem. Basic Functioning After you turn on power to the firewall, the following sequence of events should occur: 1. When power is first applied, verify that the PWR LED is on. 2. After approximately 30 seconds, verify that: a. The TEST LED is not lit. b.
ProSafe 802.11g Wireless VPN Firewall FVG318 Reference Manual LEDs Never Turn Off When the firewall is turned on, the LEDs turn on briefly and then turn off. If all the LEDs stay on, there is a fault within the firewall. If all LEDs are still on one minute after power up: • Cycle the power to see if the firewall recovers. • Clear the firewall’s configuration to factory defaults. This will set the firewall’s IP address to 192.168.0.1.
ProSafe 802.11g Wireless VPN Firewall FVG318 Reference Manual Note: If your PC’s IP address is shown as 169.254.x.x: Recent versions of Windows and MacOS will generate and assign an IP address if the computer cannot reach a DHCP server. These auto-generated addresses are in the range of 169.254.x.x. If your IP address is in this range, check the connection from the PC to the firewall and reboot your PC.
ProSafe 802.11g Wireless VPN Firewall FVG318 Reference Manual If your firewall is unable to obtain an IP address from the ISP, you may need to force your cable or DSL modem to recognize your new firewall by performing the following procedure: 1. Turn off power to the cable or DSL modem. 2. Turn off power to your firewall. 3. Wait five minutes and reapply power to the cable or DSL modem. 4. When the modem’s LEDs indicate that it has reacquired sync with the ISP, reapply power to your firewall.
ProSafe 802.11g Wireless VPN Firewall FVG318 Reference Manual Troubleshooting a TCP/IP Network Using a Ping Utility Most TCP/IP terminal devices and firewalls contain a ping utility that sends an echo request packet to the designated device. The device then responds with an echo reply. Troubleshooting a TCP/IP network is made very easy by using the ping utility in your PC or workstation.
ProSafe 802.11g Wireless VPN Firewall FVG318 Reference Manual – Verify that the IP address for your firewall and your workstation are correct and that the addresses are on the same subnet. Testing the Path from Your PC to a Remote Device After verifying that the LAN path works correctly, test the path from your PC to a remote device. From the Windows run menu, type: PING -n 10 where is the IP address of a remote device such as your ISP’s DNS server.
ProSafe 802.11g Wireless VPN Firewall FVG318 Reference Manual • Use the Reset button on the rear panel of the firewall. Use this method for cases when the administration password or IP address are not known. a. Press and hold the Reset button until the Test LED turns on and begins blinking (about 10 seconds). b. Release the Reset button and wait for the firewall to reboot. Problems with Date and Time The E-Mail menu in the Content Filtering section displays the current date and time of day.
ProSafe 802.11g Wireless VPN Firewall FVG318 Reference Manual 9-8 Troubleshooting v1.
Appendix A Default Settings and Technical Specifications Default Settings You can use the reset button located on the front of your device to reset all settings to their factory defaults. This is called a hard reset. • To perform a hard reset, push and hold the reset button for approximately 5 seconds (until the TEST LED blinks rapidly). Your device will return to the factory configuration settings shown in below.
ProSafe 802.11g Wireless VPN Firewall FVG318 Reference Manual Feature Default Behavior DHCP Starting IP Address 192.168.0.2 DHCP Ending IP Address 192.168.0.
ProSafe 802.11g Wireless VPN Firewall FVG318 Reference Manual Technical Specifications This appendix provides technical specifications for the ProSafe 802.11g Wireless VPN Firewall. Network Protocol and Standards Compatibility Data and Routing Protocols: TCP/IP, RIP-1, RIP-2, DHCP PPP over Ethernet (PPPoE) Power Adapter North America: 120V, 60 Hz, input United Kingdom, Australia: 240V, 50 Hz, input Europe: 230V, 50 Hz, input Japan: 100V, 50/60 Hz, input All regions (output): 12 V DC @ 1.
ProSafe 802.11g Wireless VPN Firewall FVG318 Reference Manual A-4 Default Settings and Technical Specifications v1.
Appendix B Related Documents This appendix provides links to reference documents you can use to gain a more complete understanding of the technologies used in your NETGEAR product. Document Link Windows XP and Vista Wireless Configuration Utilities http://documentation.netgear.com/reference/enu/winzerocfg/index.htm Internet Networking and TCP/IP Addressing http://documentation.netgear.com/reference/enu/tcpip/index.htm Wireless Communications http://documentation.netgear.
ProSafe 802.11g Wireless VPN Firewall FVG318 Reference Manual B-2 Related Documents v1.
Appendix C VPN Configuration of NETGEAR FVG318 This is a case study on how to configure a secure IPSec VPN tunnel on a NETGEAR FVS318v3. This case study follows the VPN Consortium interoperability profile guidelines (found at http://www.vpnc.org/InteropProfiles/Interop-01.html).
ProSafe 802.11g Wireless VPN Firewall FVG318 Reference Manual Figure C-1 Configuring the Gateways Configure each gateway: 1. Configure Gate A. a. Log in to the router at Gateway A. b. Use the VPN Wizard to configure this router. Enter the requested information as prompted by the VPN Wizard: • Connection Name and Pre-Shared Key • Remote WAN IP address • Remote LAN IP Subnet: IP Address and Subnet Mask: 2. Repeat the above steps for Gateway B. a. Log in to the router at Gateway B. b.
ProSafe 802.11g Wireless VPN Firewall FVG318 Reference Manual Note: The default log in address for the FVG318 router is http://192.168.0.1 with the default user name of admin and default password of password. The login address will change to the local LAN IP subnet address after you configure the router. The user name and password will also change to the ones you have chosen to use in your installation.
ProSafe 802.11g Wireless VPN Firewall FVG318 Reference Manual Table C-1. Policy Summary Security Scheme: IKE with Preshared Secret/Key IP Addressing: NETGEAR-Gateway A Static IP address NETGEAR-Gateway B Static IP address Configuring the VPN Tunnel This scenario assumes all ports are open on the FVG318. FVG318 FVG318 Figure C-3 Use this scenario illustration and configuration screens as a model to build your configuration. 1. Log in to the FVG318 labeled Gateway A.
ProSafe 802.11g Wireless VPN Firewall FVG318 Reference Manual – Subnet Mask: 255.255.255.0 (in this example) 3. Log in to the FVG318 labeled Gateway B. Log in at the default address of http://192.168.0.1 with the default user name of admin and default password of password (or using whatever password and LAN address you have chosen). Note: Based on the network addresses used in this example, you would log in to the LAN IP address of http://172.23.9.1 at Gateway B 4.
ProSafe 802.11g Wireless VPN Firewall FVG318 Reference Manual Initiating and Checking the VPN Connections You can test connectivity and view VPN status information on the FVG318 according to the testing flowchart shown in Figure C-2. To test the VPN tunnel from the Gateway A LAN, do the following: 1. Test 1: Ping Remote LAN IP Address: To establish the connection between the FVG318 Gateway A and Gateway B tunnel endpoints, perform these steps at Gateway A: a.
ProSafe 802.11g Wireless VPN Firewall FVG318 Reference Manual The FVG318-to-FVS318v2 Case Table C-2. Policy Summary VPN Consortium Scenario: Scenario 1 Type of VPN LAN-to-LAN or Gateway-to-Gateway Security Scheme: IKE with Preshared Secret/Key Date Tested: November 2004 IP Addressing: NETGEAR-Gateway A Static IP address NETGEAR-Gateway B Static IP address Configuring the VPN Tunnel This scenario assumes all ports are open on the FVG318 and FVS318v2.
ProSafe 802.11g Wireless VPN Firewall FVG318 Reference Manual • • • • Connection Name: Scenario_1 (in this example) Pre-Shared Key: 12345678 (in this example), must be the same at both VPN tunnel endpoints Remote WAN IP address: 22.23.24.25 (in this example), must be unique at each VPN tunnel endpoint Remote LAN IP Subnet – IP Address: 172.23.9.1 (in this example), must be unique at each VPN tunnel endpoint – Subnet Mask: 255.255.255.0 (in this example) 3. Log in to the FVS318v2 labeled Gateway B.
ProSafe 802.11g Wireless VPN Firewall FVG318 Reference Manual • The remote WAN and LAN IP addresses for one VPN tunnel endpoint will be the local WAN and LAN IP addresses for the other VPN tunnel endpoint. • The VPN Wizard ensures the other VPN parameters are the same at both VPN tunnel endpoints. Initiating and Checking the VPN Connections You can test connectivity and view VPN status information on the FVG318 according to the testing flowchart shown in Figure C-2.
ProSafe 802.11g Wireless VPN Firewall FVG318 Reference Manual The FVG318-to-FVL328 Case Table C-3. Policy Summary VPN Consortium Scenario: Scenario 1 Type of VPN LAN-to-LAN or Gateway-to-Gateway Security Scheme: IKE with Preshared Secret/Key IP Addressing: NETGEAR-Gateway A Static IP address NETGEAR-Gateway B Static IP address Configuring the VPN Tunnel This scenario assumes all ports are open on the FVG318 and FVL328.
ProSafe 802.11g Wireless VPN Firewall FVG318 Reference Manual • • • Pre-Shared Key: 12345678 (in this example), must be the same at both VPN tunnel endpoints Remote WAN IP address: 22.23.24.25 (in this example), must be unique at each VPN tunnel endpoint Remote LAN IP Subnet – IP Address: 172.23.9.1 (in this example), must be unique at each VPN tunnel endpoint – Subnet Mask: 255.255.255.0 (in this example) 3. Log in to the FVL328 labeled Gateway B. Log in at the default address of http://192.168.0.
ProSafe 802.11g Wireless VPN Firewall FVG318 Reference Manual • The remote WAN and LAN IP addresses for one VPN tunnel endpoint will be the local WAN and LAN IP addresses for the other VPN tunnel endpoint. • The VPN Wizard ensures the other VPN parameters are the same at both VPN tunnel endpoints. Initiating and Checking the VPN Connections You can test connectivity and view VPN status information on the FVG318 and FVL328 according to the testing flowchart shown in Figure C-2.
ProSafe 802.11g Wireless VPN Firewall FVG318 Reference Manual The FVG318-to-VPN Client Case Table C-4.
ProSafe 802.11g Wireless VPN Firewall FVG318 Reference Manual Configuring the VPN Tunnel This scenario assumes all ports are open on the FVG318. Figure C-6 Use this scenario illustration and configuration screens as a model to build your configuration. 1. Log in to the FVG318 labeled Gateway A Log in at the default address of http://192.168.0.1 with the default user name of admin and default password of password (or using whatever password and LAN address you have chosen).
ProSafe 802.11g Wireless VPN Firewall FVG318 Reference Manual b. Add a new connection using the Edit/Add/Connection menu and rename it Scenario_1. (Scenario_1 is used in this example to reflect the fact that the connection uses the PreShared Key security scheme and encryption parameters proposed by the VPN Consortium, but you may want to choose a name for your connection that is meaningful to your specific installation.
ProSafe 802.11g Wireless VPN Firewall FVG318 Reference Manual Figure C-8 d. Select Security Policy on the left hierarchy menu and then select Aggressive Mode under Select Phase 1 Negotiation Mode (see Figure C-9). (The Select Phase 1 Negotiation Mode choice must match the Exchange Mode setting for the General IKE Policy Configuration parameters shown in Figure C-9 for the gateway router.) Figure C-9 e.
ProSafe 802.11g Wireless VPN Firewall FVG318 Reference Manual • Under My Identity, select Domain Name for the ID Type and then enter fvs_remote. (Domain Name must match the Remote Identity Data parameter of the IKE Policy Configuration screen shown in Figure C-10 for the gateway router.) Preshared Key must be the same at both ends of the VPN tunnel Figure C-10 f.
ProSafe 802.11g Wireless VPN Firewall FVG318 Reference Manual You are new ready to activate the tunnel, but you must do it from the client endpoint (see “Initiating and Checking the VPN Connections” on page C-18). In the client-to-gateway scenario, the gateway router will not know the client’s IP address until the client initiates the traffic.
ProSafe 802.11g Wireless VPN Firewall FVG318 Reference Manual 2. Test 2: Ping Remote WAN IP Address (if Test 1 fails): To test connectivity between the Gateway A and Gateway B WAN ports, follow these steps: a. From a Windows Client PC, click the Start button on the task bar and then click Run. b. Type ping -t 14.151.6.17, and then click OK. c. This causes a ping to be sent to the WAN interface of Gateway A. Within two minutes, the ping response should change from timed out to reply.
ProSafe 802.11g Wireless VPN Firewall FVG318 Reference Manual C-20 VPN Configuration of NETGEAR FVG318 v1.